Replacing a Seacock or Through-Hull Fitting
When a seacock is frozen, corroded or really a gate valve, it has to be replaced with the boat out of the water. Learn what a proper seacock is, bronze vs Marelon, why the through-hull and backing block usually get replaced too, how the job is done, and when to hand it to a yard.
Time
6 h
Shop would charge
$400-1200
Applies to
All engines · Sailboat, Cabin cruiser, Yacht, Center console, Fishing boat, Bowrider / runabout
Safety first: This job is done only with the boat hauled out and properly blocked on stands. Never remove a seacock, through-hull or the hose on it while the boat is afloat. A badly installed seacock can fail without warning and sink the boat at the dock, so if you have any doubt about your work, have a yard or ABYC-certified technician do it or check it before launch. If a fitting leaks or breaks while you're afloat, close the seacock if you can, drive a wooden plug into the hole, run the pumps and call USCG on VHF 16 or 911 and your tow service.
Fuel smell, water coming in, CO alarm or smoke? Stop, get everyone in life jackets and call USCG on VHF 16 or 911. For a tow: Sea Tow or TowBoatUS.
Owners often ask
- My boat has old gate valves on the through-hulls. Can I just screw a ball valve on, or do I need a real seacock?
- Can I put a Marelon seacock on my existing bronze through-hull?
This guide walks you through it. Still stuck? Ask the AI Mechanic about your engine.
Tools
- Large pipe wrench and a through-hull installation tool or spanner made for the fitting
- Reciprocating saw or oscillating multitool (for cutting out old fittings)
- Drill, hole saw and bits sized to the new parts
- Heat gun, scrapers and a plastic putty knife
- Grinder or sanding tools, dust mask, eye protection and gloves
- Screwdrivers, socket set and nut drivers
- A helper (one person outside the hull, one inside)
Parts & supplies
- Matched seacock and through-hull of the same material, from a reputable marine maker
- Backing block (fiberglass, a marine-grade composite block, or as the seacock maker specifies)
- Bedding compound and thread sealant recommended by the seacock maker
- Through-bolts or screws specified by the seacock maker (if the flange is fastened through the hull)
- New marine hose rated for the job, and all-316 stainless hose clamps
- Epoxy for sealing a cored hull or bonding the backing block
Before you start
What you're replacing.
- Through-hull: the fitting that passes through the hull, with a flange outside and a threaded stem inside.
- Seacock: the valve that closes the through-hull. A proper seacock, per BoatUS, is flanged (bolted or screwed down for support), meets UL 1121 and ABYC standards, has a lever handle that moves through 90 degrees so you can see if it's open or closed, and is mounted strongly enough to take a heavy sideways load on the hose fitting (ABYC's figure is 500 pounds).
When it's time to replace:
- A seacock that is frozen and can't be freed by servicing. BoatUS says frozen or stiff seacocks should be serviced right away and replaced if they can't be repaired.
- Any gate valve (round wheel handle) or hardware-store brass valve below the waterline. BoatUS calls gate valves notorious troublemakers: often brass, prone to sudden failure, and they don't show whether they're open or closed.
- A through-hull that looks pink, bright coppery or crumbly, a sign of dezincification. SAIL's author replaced his through-hulls for just a faint pink tinge.
- An inline ball valve screwed straight onto a through-hull. Many valves have tapered (NPT) threads and most through-hulls have straight (NPS) threads; BoatUS and SAIL both explain the mismatch makes a weak joint held by only a few threads.
- Cracks, leaks, broken bedding, a rotten wooden backing block, or a length of hose or pipe between the through-hull and the valve.
Bronze or Marelon? BoatUS says seacocks should be marine-grade bronze or a suitable marine composite such as Marelon. Bronze is strong and traditional; composites don't corrode and don't need bonding. The key rule: the seacock and through-hull must be the same material. BoatUS warns that plastic-to-metal connections can crack because the materials expand differently, and SAIL notes it's not wise to put a Marelon seacock on a bronze through-hull. That's why BoatUS also recommends replacing the through-hull whenever you replace the seacock.
You may see conflicting advice here: Forespar, which makes Marelon, sells flanged Marelon seacocks with straight (NPSM) threads that it says accept bronze or stainless through-hulls. Treat the same-material rule as the safe default, and only mix materials if the seacock maker's own instructions list that exact through-hull as compatible. Forespar also states its Marelon valves and through-hulls meet ABYC H-27 and ISO 9093-2, the seacock standards; whichever brand you buy, look for a seacock sold as meeting ABYC H-27.
Is this a DIY job? For an experienced owner with the boat on the hard, often yes. But it involves cutting out old fittings, drilling the hull, possibly sealing a cored laminate, and a mistake can sink the boat. Many owners have a yard do it, or do the prep and let the yard install and inspect.
Steps
Make a list of all the seacocks that need work (see the seacocks inspection guide) and do them in one haul-out. Order the parts in advance: matched seacock and through-hull sets, backing blocks, hose, clamps and sealant. Check the yard allows owner work and ask about their rules for grinding and dust.
- A flanged seacock with its matching through-hull from a reputable maker, sized to the existing hose and pump.
- If you must use an inline ball valve, use one with a proper flange adaptor under it. Groco, for example, makes a flanged adaptor that takes a standard through-hull below and a standard inline valve above, to avoid the thread mismatch.
- For a high-speed intake that needs a scoop strainer, buy the version made for that.
- Check the through-hull length suits your hull thickness plus the backing block.
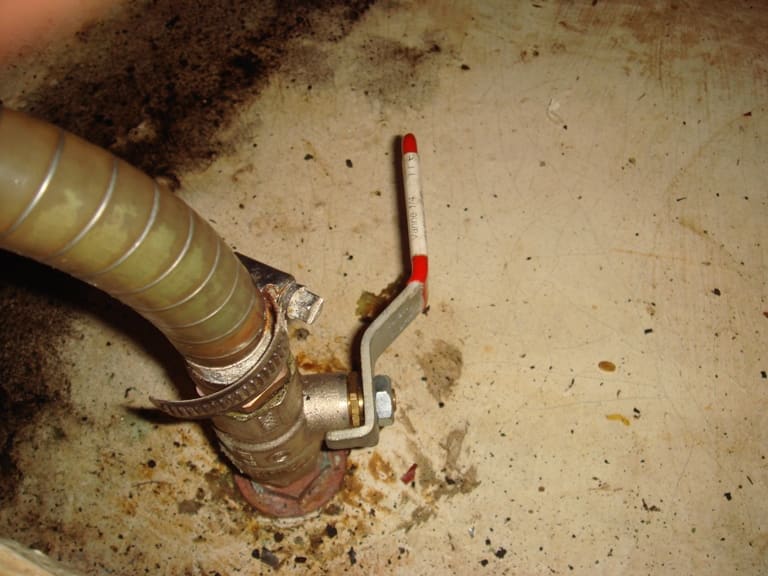
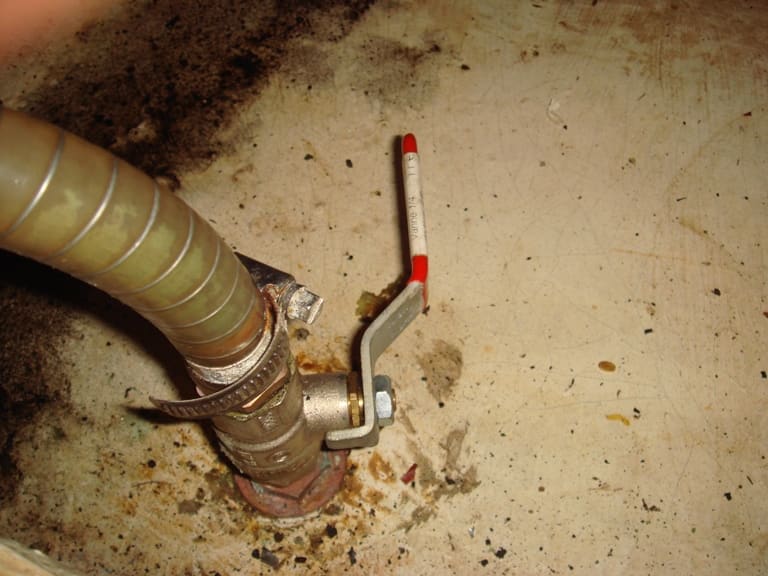
A ball valve screwed onto a through-hull with no mounting flange, and only one clamp on the hose. A flanged seacock on a matching through-hull is the stronger choice. Photo: PHGCOM / Wikimedia Commons · CC BY-SA 3.0 With the boat blocked securely, set up so one person can work outside under the hull and another inside. Remove any panels or gear in the way. Disconnect and label the hose from the old seacock. If the old seacock is bronze, note how the bonding wire is attached so you can reconnect it.
Try unscrewing the valve from the through-hull with a large pipe wrench while your helper holds the through-hull from outside with the right tool. In SAIL's project the old gate valves spun off once the wheels were cut away. Don't lever against the hull so hard you crack the laminate.
If the flange nut won't come off, the usual method is to cut the old fitting out. SAIL's author cut through the stem from outside with a reciprocating saw and knocked the pieces out from inside. Work carefully so you cut the fitting, not the hull. Heat and a scraper help release old bedding.
Clean off all old sealant inside and out. Look at the laminate: is it solid and dry, or is there a core (balsa, foam or plywood) showing in the hole? If the hull is cored where the fitting goes, the core must be dug back and sealed with epoxy so water can never reach it; that's a job many owners leave to a yard. Check that the old backing block (if wood) is not soft or split. BoatUS says backing plates should be solid, leak-free and larger than the seacock flange.
The backing block spreads the load and gives the seacock flange a flat, solid surface on a curved hull. Options include fiberglass sheet epoxied to the hull (SAIL's choice), a marine-grade composite block made for the purpose (Groco sells one that conforms to minor hull curvature), or what your seacock maker specifies. SAIL's author avoided plywood and timber spacers because they absorb moisture. Size it larger than the flange, shape it to the hull, and bond or bed it as the maker instructs.
If the new through-hull is a different size, enlarge the hole carefully to fit. Dry-fit the through-hull, backing block and seacock together before any sealant goes on. Check that the seacock handle can swing through its full 90 degrees without hitting anything, and that the hose can run to its destination without a sharp kink.
Use the bedding compound the seacock and through-hull maker recommends, and follow their instructions exactly; some fittings are bedded with a sealant you can remove later, others are bonded permanently. Apply it under the outside flange, in the hole and on the inside face. From outside, push the through-hull into the hole; from inside, your helper threads on the nut or the seacock, depending on the design. Tighten evenly so sealant squeezes out all around. Don't overtighten plastic fittings: SAIL notes Forespar recommends hand-tightening its Marelon seacocks onto the through-hull.
Fasten the seacock flange through the backing block (and hull, if the maker specifies through-bolts) with the fasteners the maker supplies or specifies. This is what lets the seacock resist a sideways blow to the hose fitting. An unflanged valve can turn and loosen from vibration, BoatUS warns, so make sure the flange can't rotate.
Install the hose tail with the thread sealant the maker recommends. Fit new marine hose of the right type and push it fully onto the hose tail. Use all-316 stainless clamps; two where the hose tail is long enough (see the hose clamp guide). On a bronze seacock that was bonded, reconnect the bonding wire with a clean, tight terminal. Composite seacocks don't need bonding.
Clean excess sealant outside so the flange is smooth and flush. Let the sealant or epoxy cure for the time the maker says before launching. Open and close the seacock several times. From outside, shine a light through the fitting while your helper works the handle, to confirm it opens fully and closes completely. Tie a softwood plug of the right size to the new seacock.
As soon as the boat is in the water, and before the travel lift slings are removed, check every new fitting for drips. Check again after an hour, after the first run, and over the next few days. Log the job, parts and date in your BoatMend boat profile.
Common mistakes
- Screwing a hardware-store ball valve onto a through-hull. Wrong threads, often brass, no flange: it's not a seacock.
- Mixing a Marelon seacock with a bronze through-hull (or the reverse). Different expansion rates can crack the plastic.
- Reusing an old through-hull with a new seacock. Thread mismatch and hidden dezincification are common.
- Skipping the backing block or using plywood that rots. The seacock can work loose or tear out under load.
- Leaving a short length of hose between the through-hull and the valve. That piece can fail with nothing to close.
- Installing the valve where its handle can't swing fully because of a cabinet, engine or generator.
- Overtightening composite fittings or using a sealant the maker doesn't approve.
When to call a pro
- The boat is in the water: seacock replacement is always a haul-out job
- The hull is cored around the fitting, or the laminate is damp, soft or cracked
- The fitting is a high-speed intake, a large engine intake, or in a hard-to-reach spot under the engine or generator
- You aren't sure what material your existing through-hulls are, or how your bonding system is wired
- After launch, any new fitting weeps or the bilge pump runs more than usual: haul out again and fix it, don't wait
- Water is coming in faster than you can pump: call USCG on VHF 16 or 911 and your tow service
Tips
- Replace all seacocks of the same age at once; if one is failing, the others aren't far behind.
- Paint or label each handle with what it serves so anyone aboard can close the right one fast.
- Photograph every new fitting inside and out for your records and your next survey.
- BoatUS suggests replacing seacock hoses at 10 years old regardless of how they look; doing them now saves a second haul-out.
Official references
We read these to write this guide. Your engine's own manual always wins.
- BoatUS – Show Your Seacocks Some Respect (2025)
- BoatUS – Seacock Maintenance
- SAIL Magazine – Keeping the Sea Out
- SAIL Magazine – Keeping the Sea Out, page 2 (step-by-step)
- SAIL – Surveyor's Notebook, Using the Proper Seacock
- Groco – Backing Blocks
- Groco – IBVF Flange Adaptor
- Forespar – Marelon Flange Mounting Seacocks
- Forespar – Marelon ABYC & ISO
Safety: BoatMend is for information only and does not replace a certified marine technician. You are responsible for your safety and your boat. Read the full disclaimer.
Last updated 2026-10-25
Related guides
How to Inspect and Exercise Seacocks, Through-Hulls and Hose Clamps
Check every hole in your hull below the waterline, work each seacock open and closed, and inspect the hoses and clamps attached to them. A single failed fitting or hose is one of the most common reasons boats sink at the dock.
Hose Clamps on Boats: Choosing, Installing and Inspecting Them
A rusted or wrong hose clamp can sink a boat at the dock, leak fuel or let exhaust into the cabin. Learn which clamps belong on a boat (all-316 stainless, embossed band, T-bolt where needed), when to double them, how tight is tight enough, and how to find the ones that are about to fail.
Boat Bonding System Explained: How to Inspect Bonding Wires, Through-Hulls and Anodes
Understand what the green bonding wires on your boat do, how they tie through-hulls, running gear, tanks and engines to your anodes and DC negative, how to inspect and test the connections yourself, and which corrosion warning signs mean it's time for an ABYC-certified technician.

Launch Day and Haul-Out Checklist for Trailer Boats
A step-by-step checklist for getting your boat off the trailer and back on again safely and quickly, from the drain plug and tie-downs to the blower and ramp etiquette. Following it in order prevents the classic mistakes that sink boats and back up the ramp.
Storing a Boat on Stands and Blocks: Keel Blocking, Stand Placement and Safety Chains
Learn how a boat should sit on keel blocks and boat stands for winter or a haul-out, so you can check the yard's work, spot dangerous setups, and keep your boat from settling, distorting or falling over in wind, rain or a storm.
Marine Sealants Explained: 5200, 4200, 4000UV, Polysulfide, Silicone and Butyl Tape
Pick the right sealant before you bed a cleat, a through-hull, a window or a transducer. The wrong goo either leaks in a year or glues a part on so hard you damage the boat getting it off.
How to Inspect and Clean a Raw-Water (Sea) Strainer
The sea strainer is the cheap screen that keeps weeds, shells and plastic out of your engine, generator and A/C pumps. Learn how to clean it safely with the seacock closed, reseal the lid so it can't suck air, spot a cracked bowl before it floods the boat, and winterize it.
How to Build a Damage-Control Kit: Plugs, Patches and a Plan for Leaks
Put together a labeled kit that can slow or stop water coming into your boat - softwood plugs tied at every through-hull, rescue tape, spare clamps, rubber and plywood patches, plastic sheeting, underwater sealant, a manual pump and the tools to reach a hidden leak - and practice with it so your crew knows where everything is.
What to Do When Your Boat Is Taking On Water: Emergency Steps and Prevention
A step-by-step emergency plan for water coming into the boat - life jackets on, call for help early on VHF 16, find and slow the leak, pump, and head for shallow water if needed - plus the maintenance checklist that prevents most sinkings.