How to Mount Rod Holders, Fish Finders, Cleats and Antennas Without Causing Leaks
Add accessories to your boat the right way, with through-bolts, backing plates, sealed core and proper wire pass-throughs, so every new hole stays dry and strong. Also learn where you should never drill.
Time
3 h
Shop would charge
$100-400
Applies to
All engines
Safety first: Before you drill anything, know exactly what is on the other side. Fuel tanks, fuel lines and fuel vents often run under the deck and inside consoles; drilling into them causes a fuel leak and a fire risk. If you smell fuel or see fuel after drilling, stop, keep sparks away, ventilate, and call a pro (or USCG on VHF 16 / 911 if you are on the water). Also watch for wiring harnesses, battery cables, hydraulic steering lines and bilge pump hoses. Never drill below the waterline for an accessory; that is a job for a pro (see the transducer and through-hull guides). Disconnect the battery before running new wiring.
Owners often ask
- How do I mount rod holders or a fish finder without causing leaks?
- How do I run electronics wires through the deck without a leak?
This guide walks you through it. Still stuck? Ask the AI Mechanic about your engine.
Tools
- Drill with sharp bits, including a small pilot bit
- Countersink bit
- Hole saw (for flush rod holders and some cleats)
- Bent nail or small hook bit for reaming core
- Wrenches and screwdrivers
- Painter's tape and a fine marker
- Flashlight and an inspection mirror
- Small syringe for epoxy
- Utility knife
- Nitrile gloves, safety glasses and a dust mask
Parts & supplies
- The accessory and its mounting template
- Stainless through-bolts, washers and nylon-insert lock nuts (sized for the accessory)
- Backing plate (G10 fiberglass, aluminum, stainless or epoxy-sealed marine plywood) or large stainless fender washers
- Marine epoxy and colloidal silica thickener
- Marine bedding sealant suited to the job (butyl tape or polysulfide for parts you may remove)
- Cable gland or clam-shell cable cover sized for your wires (for electronics)
- Isolating or anti-seize compound for stainless fasteners in aluminum (aluminum boats)
Before you start
Every hole is a future leak. Most decks, consoles and many hull sides are cored: a sandwich of two fiberglass skins with balsa, foam or plywood in between. Water that gets into the core through a screw or bolt hole causes rot, soft spots and expensive repairs. Writing for BoatUS, Don Casey says core problems end the life of more boats than any other single cause, and the job is to make sure your new hole never lets water reach it.
Screws or bolts? Small, lightly loaded items (a clip, a small light, a cable tie mount) can go on with screws if the hole is sealed. Anything that takes load, such as cleats, rod holders, grab handles, antenna bases and electronics mounts, should be through-bolted with a backing plate underneath. Loads you might not expect: a fish on a rod in a rod holder, a wave hitting an antenna, a dock line snubbing in a gust.
Check underneath first. You need to reach the underside to hold the nut and fit the backing plate. If you cannot get a hand and a wrench there, choose another spot.
Places not to drill:
- Below or near the waterline, or into the bottom of the hull
- Into or near fuel tanks, fuel fills, vents and fuel lines
- Through stringers, the transom below the motor, or the hull-to-deck joint without knowing what is there
- Where wires, hoses or steering cables run behind the panel
- Into flotation foam compartments or sealed air chambers (including pontoon tubes)
- Through a tower, T-top or rail tube without the maker's approval
Steps
Hold the accessory in place and check reach, clearance and how it will be used (where a rod will swing, where you will see a screen from the helm). Look and feel underneath with a flashlight and mirror. Confirm there is a flat, solid surface for the backing plate and nothing behind the panel you could hit.
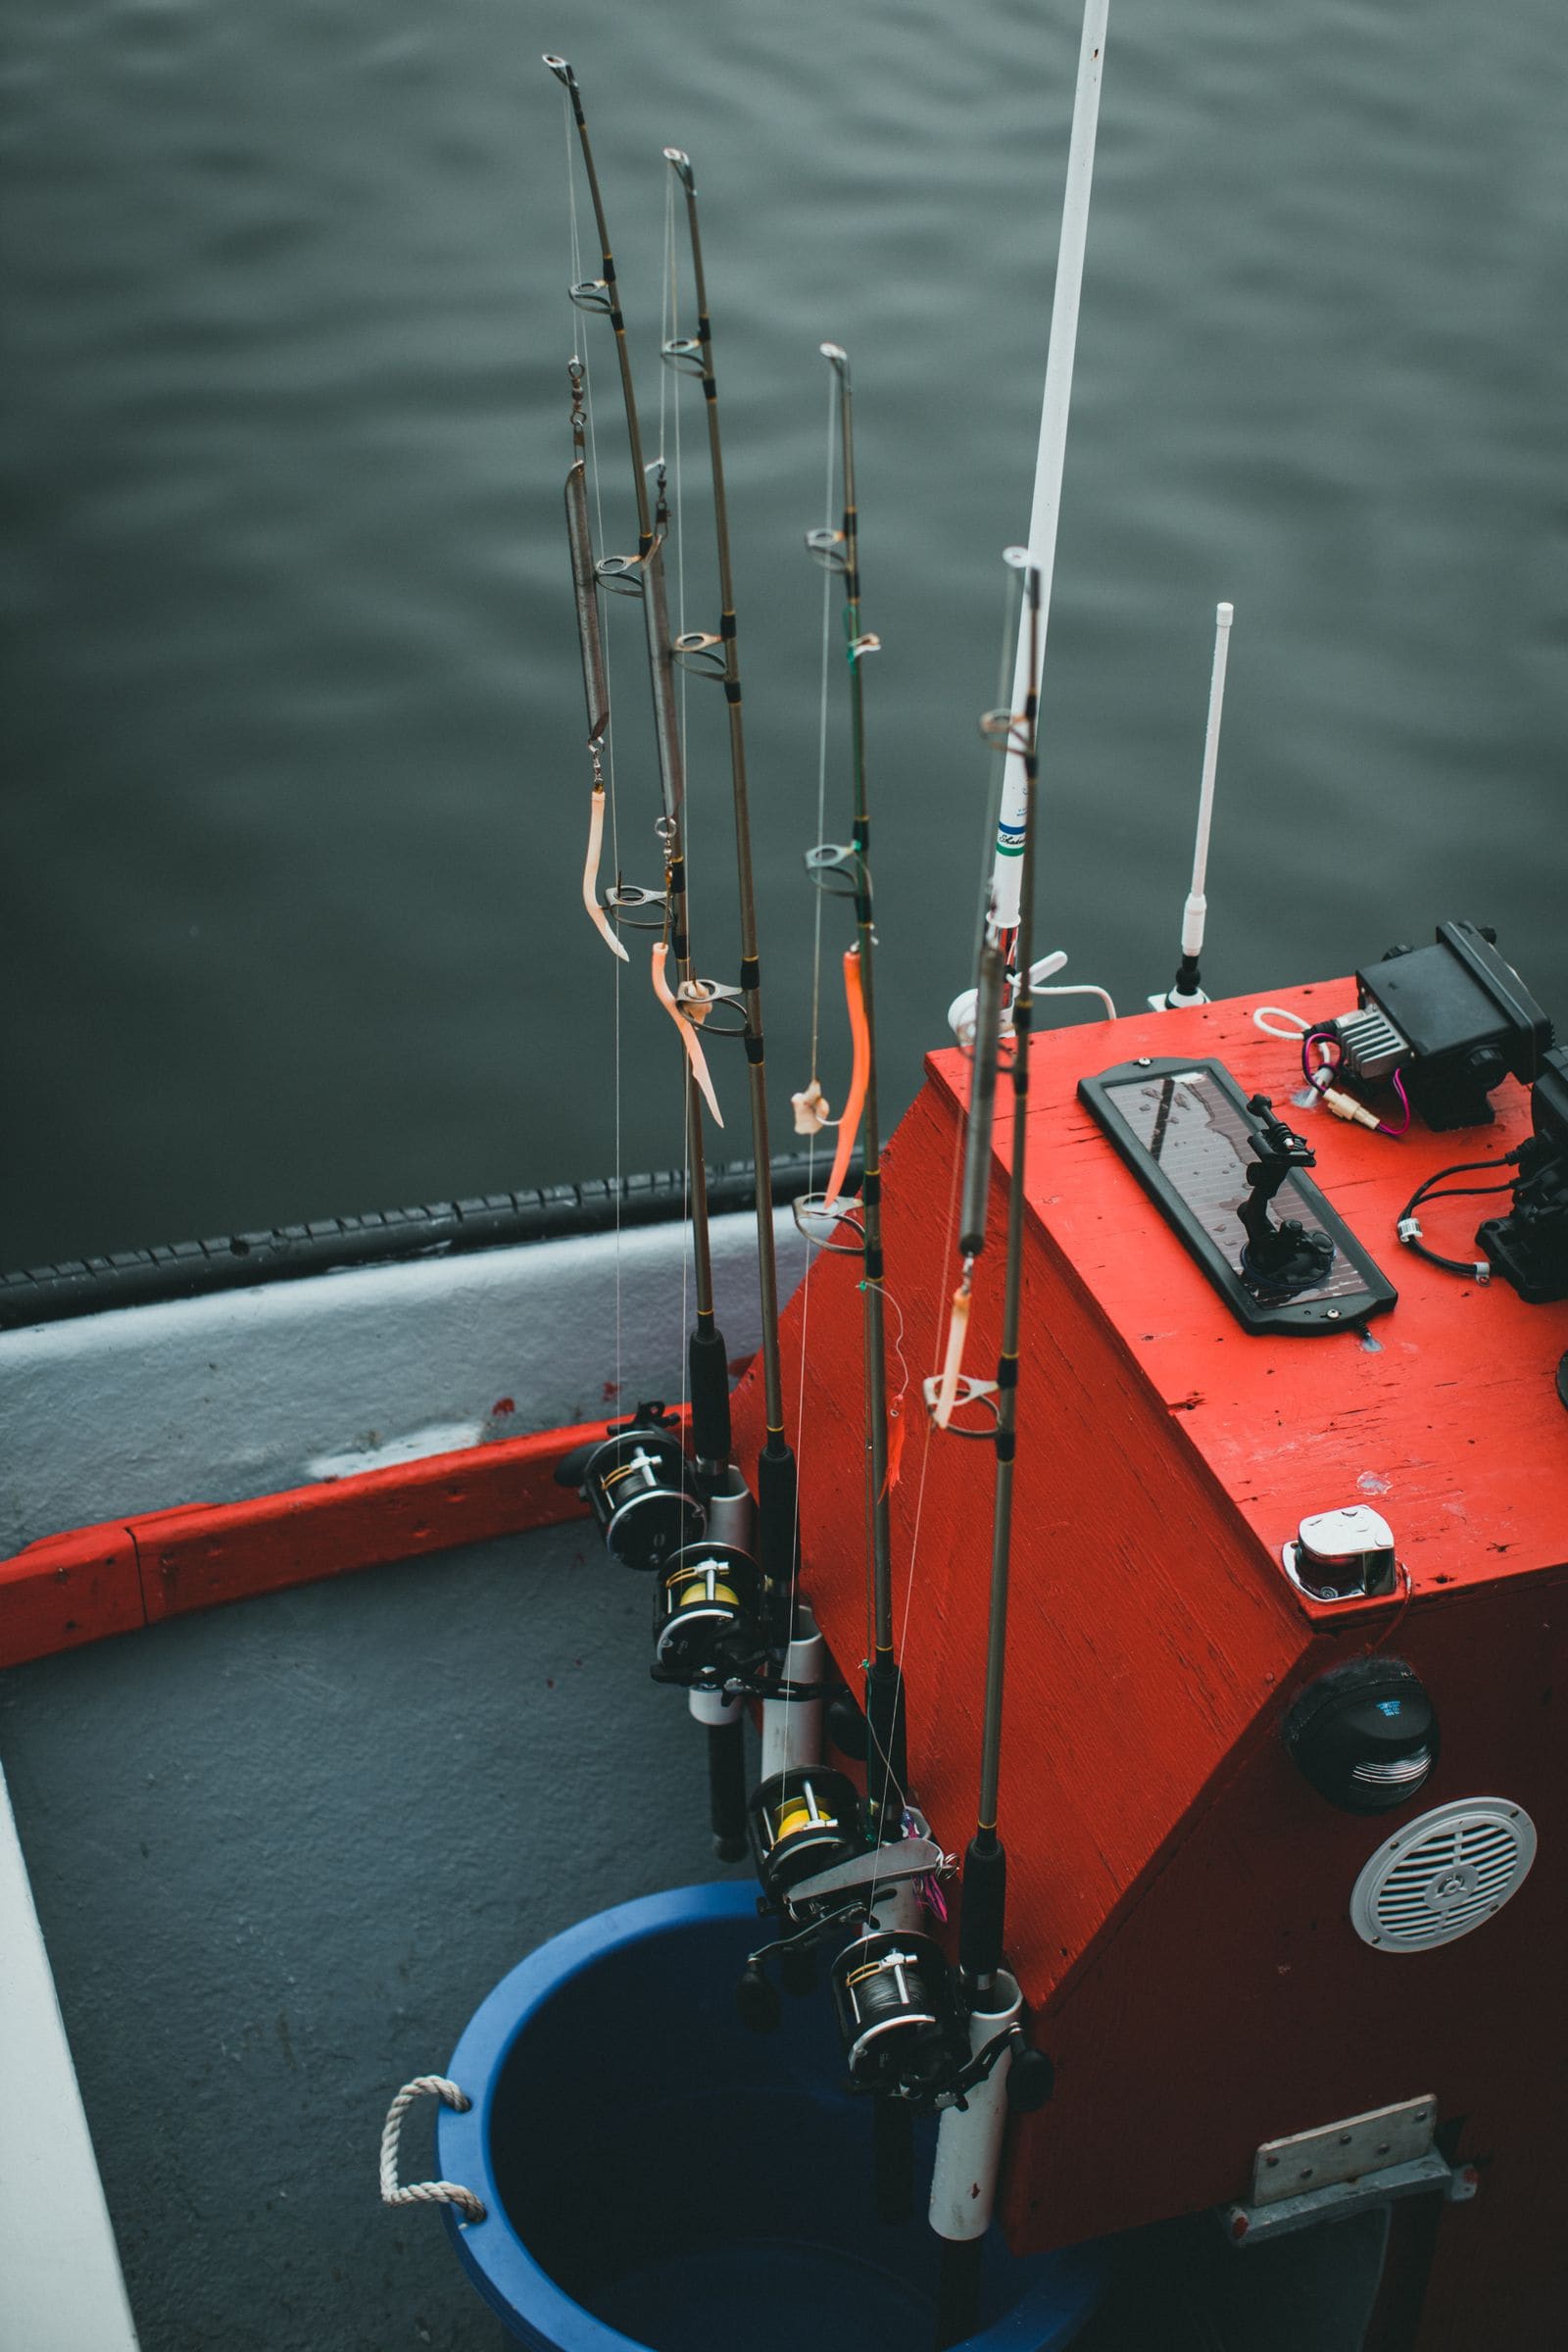
Rod holders, antennas, electronics, a light and a speaker: every accessory added to a console is another set of holes to seal and fasten properly. Photo: Jonathan Cooper / Pexels Use the template or the accessory base to mark holes on painter's tape. BoatUS suggests drilling a tiny pilot hole (about 1/16 inch) first. That lets you check from below that the bolt and nut will clear everything, and if you need to move it, a tiny hole is easy to fill with epoxy.
Keep the tape on to protect the gelcoat. Run the drill in reverse until you are through the gelcoat to reduce chipping, then switch to forward. Look at the shavings: if you hit wood, balsa or foam, the panel is cored. Wet or black shavings mean the core is already wet; stop and get advice.
For a cored deck or panel, do not just bolt through the bare core:
- Tape the bottom of the hole.
- Remove the core around the hole (a bent nail in a drill, or drill oversize through the top skin and core only), and vacuum out the dust.
- Flood the cavity with unthickened epoxy for a few minutes so it soaks into the core, then let the excess drain.
- Fill flush with epoxy thickened to about mayonnaise with colloidal silica.
- After it cures, drill the bolt hole through the center of the plug.
BoatUS notes that if the core is marine plywood, coating the raw edges with a few coats of epoxy is usually enough, while soft cores like balsa should be removed and replaced with an epoxy plug. The plug also keeps the deck from crushing when you tighten the bolts.
Put a slight bevel on the top edge of each hole. BoatUS says this helps prevent gelcoat cracking around the fastener and leaves a small pocket for sealant to seal around the bolt.
A backing plate spreads the load so the bolts do not pull through or crack the deck. Good materials (per BoatUS):
- G10 fiberglass board: strong, stiff and cannot corrode or rot. Often the best choice.
- Aluminum plate: easy to cut and drill.
- Stainless plate: strongest and stiffest, harder to cut.
- Marine plywood: works if it is sealed with epoxy on all faces and edges.
Avoid plastic lumber like StarBoard as a backing plate: BoatUS warns it slowly squishes under bolt pressure and the fitting loosens. If the underside is rough, bed the plate in thickened epoxy so it sits flat (put petroleum jelly on the bolts so they do not get glued in). Large stainless fender washers are the minimum for light items.
Put the accessory, bolts, backing plate, washers and nuts together without sealant. Check that everything lines up, the bolts are long enough for a full nut, and the plate sits flat. Fix problems now; it is much harder once sealant is out.
Mask around the base. Coat the whole base of the accessory with a marine bedding sealant and put a ring under each bolt head, or use butyl tape on bolted fittings. Choose a sealant you can remove later (polysulfide or butyl) for anything you may want to move or replace; avoid permanent adhesives like 5200. For sun-exposed topside fittings, 3M sells its 4000 UV as a medium-strength, color-stable sealant that resists UV and still lets parts come apart later; whatever you pick, check the label says it suits your surfaces (some sealants attack certain plastics). BoatUS advises not sealing the nuts, washers or backing plate underneath, so if the top seal ever leaks you will see a drip inside rather than trapping water in the core.
Tighten in a criss-cross pattern until sealant squeezes out evenly around the base. A common method (used in the BoatUS cleat article) is to snug the nuts, let the sealant set overnight, then tighten to the final torque the next day. Do not overtighten: you can crush the laminate or bend the accessory. Use the torque in the accessory's instructions if it gives one. Trim the squeeze-out with a blade once it is firm and peel the tape.
For fish finders, antennas, lights and cameras, use a proper deck fitting instead of a bare hole stuffed with sealant:
- Cable gland: a fitting with a rubber seal sized to the cable. BoatUS notes the hole in the seal must match the cable diameter; split glands let you install cables without cutting off the plugs.
- Clam-shell or gooseneck cover: a hood that faces away from the weather and takes several cables. Seal around the wires with a removable sealant. Seal and epoxy-protect the core around the pass-through hole like any other hole (step 4). Below deck, leave a drip loop (a low U in the cable) before any connection so water runs off the bottom of the loop instead of into the plug.
Disconnect the battery before connecting anything. Use marine tinned wire, a fuse or breaker sized for the device close to the power source, sealed connectors, and support the wires every so often so they do not chafe. Follow the electronics maker's instructions (see the electrical corrosion and connections guide).
Stainless bolts in an aluminum hull or deck can cause galvanic corrosion where the metals touch in salt or brackish water. Coat the fasteners with an isolating or anti-seize compound made for stainless in aluminum, and use isolating washers or pads where the accessory maker recommends them. Avoid copper or brass hardware against aluminum. When you take old hardware off an aluminum boat or pontoon, note any plastic or fiber washers between the stainless and the aluminum; they are there on purpose as isolators, so put new ones back rather than leaving them out.
After the sealant has cured, give the accessory a firm tug, check there are no gaps, and hose the area while someone looks underneath. Recheck the nuts after the first few trips. Record what you installed, where and with which sealant in BoatMend.
Common mistakes
- Screwing load-bearing items into a cored deck. Screws pull out and let water into the core. Through-bolt with a backing plate.
- Drilling blind. Holes in fuel lines, wiring or steering cables are dangerous and expensive.
- Leaving bare core in the hole. Without an epoxy plug, the core soaks up water around every bolt.
- Small or no washers underneath. The bolts pull through or the deck cracks around the fitting.
- A hole stuffed with silicone for the wires. It leaks within a season. Use a cable gland or clam-shell cover with a drip loop.
- Permanent adhesive under accessories. You will want to move that fish finder someday.
- Overtightening. It crushes the deck, cracks gelcoat and squeezes out all the sealant.
- Mounting a transducer on the transom with no sealing plan. Follow the transducer guide and the maker's instructions; transom holes below the waterline need special care.
When to call a pro
- Anything that needs a hole below or near the waterline, or through the bottom
- Thru-hull transducers, sea chests, raw-water pickups or trim tab installs
- Drilling near fuel tanks, fuel lines or fuel fills
- Shavings come out wet or rotten, or the deck around the spot is soft
- Heavy items: towers, T-tops, outriggers, davits, windlasses, large antennas or anything that carries people or big loads
- High-current wiring (trolling motors, inverters, windlasses) or anything you are not sure how to fuse
Tips
- Buy the backing plate material when you buy the accessory; a small piece of G10 is cheap insurance.
- Keep a small stock of stainless bolts, nylon-insert nuts and fender washers aboard in the sizes your boat uses.
- When you remove an accessory, fill the old holes with thickened epoxy right away rather than leaving them open or just plugging them with sealant.
- Photograph the underside before you close up liners or panels, so you know where the bolts and wires are later.
- Planning to add or move transom-mount transducers over the years? A rigger in a Mercury quick tip suggests a transducer mounting plate: a small block of tough plastic fastened to the transom with two small sealed screws. The transducers then mount to the plate, so you can adjust or swap them without drilling the hull again. Seal those two holes as carefully as any other below-waterline hole.
Official references
We read these to write this guide. Your engine's own manual always wins.
- BoatUS – How to Install a Cleat
- BoatUS – The Critical World of Backing Plates
- BoatUS – The 'Hole' Story (deck glands and cable fittings)
- BoatUS – Bedding Deck Hardware (Don Casey)
- BoatUS – Rebedding Deck Hardware
- 3M – Marine Adhesive Sealant 4000 UV (product page)
- Mercury Marine – Quick Tip, How to Install a Transducer Mounting Plate on Your Boat
Safety: BoatMend is for information only and does not replace a certified marine technician. You are responsible for your safety and your boat. Read the full disclaimer.
Last updated 2026-10-24
Related guides
How to Find and Fix Leaking Deck Hardware (Rebedding Cleats, Stanchions and Tracks)
Track down the cleat, stanchion base or track that is dripping into the cabin, then remove it, seal the deck core and bed it again with the right sealant so the leak stops for years instead of weeks. Catching it early protects the deck core from rot.

Fish Finder and Depth Sounder Transducers: Mounting, Fixing Bad Readings and Cleaning
Where and how to mount a transom-mount transducer so it reads cleanly at speed, how to track down lost bottom readings and noisy screens, how to clean and paint a transducer without ruining it, and why thru-hull transducers are a haul-out job for a pro.
How to Check a Boat for Transom and Stringer Rot
Many older fiberglass boats have wood inside the transom, stringers and deck, and water that gets in slowly rots it. Learn the tap test, the flex test, how to read a moisture meter and the other warning signs, and why a rotten transom or stringer is a structural job for a pro, not a weekend patch.
How to Inspect Your Boat's Fuel Tank, Fill, Vent and Hoses
A leaking gas tank is one of the most dangerous problems a boat can have, and it usually starts out of sight. Learn how to inspect portable and built-in tanks, spot aluminum tanks corroding from below, know the ethanol risk for old fiberglass tanks, and check the fill, vent, hoses, clamps and sender, plus why tank replacement is a job for a pro.

How to Find and Fix Corroded Electrical Connections on a Boat
Track down the green crust and loose terminals behind flickering lights, dead gauges and slow cranking with a simple voltage-drop test, then remake the connection the marine way: tinned wire, a proper crimp, adhesive-lined heat shrink and a protective coating.
How to Spot and Prevent Corrosion on an Aluminum Boat
Aluminum hulls and pontoon tubes are tough, but they lose almost every fight with other metals. Learn the warning signs of galvanic and stray current corrosion, keep copper and loose metal away from the hull, choose the right anodes, touch up paint with the proper primer and know when a repair needs a welder.
How to Inspect and Exercise Seacocks, Through-Hulls and Hose Clamps
Check every hole in your hull below the waterline, work each seacock open and closed, and inspect the hoses and clamps attached to them. A single failed fitting or hose is one of the most common reasons boats sink at the dock.
How to Repair Small Gelcoat Chips and Scratches
Fill and blend small chips, dings and scratches in your boat's gelcoat with a repair kit so they stop letting water into the fiberglass and look close to new. Also learn to spot damage that is structural and needs a pro.