Fuse Keeps Blowing? How to Troubleshoot a Boat Fuse Block or Breaker Panel
Work through a blown fuse or tripping breaker the safe way: confirm it, tell a short from an overload, isolate the device or wire at fault, replace a worn breaker or panel switch with the same rating, and label every circuit, without ever fitting a bigger fuse.

Time
1 h 30 min
Shop would charge
$150-500
Applies to
All engines
Safety first: A fuse that blows is doing its job: it just stopped a wire from overheating. Never replace it with a bigger fuse, wrap it in foil or hold a breaker on. Turn the battery switch OFF before you unplug, unbolt or rewire anything, and wear safety glasses. If you see smoke, smell burning plastic, find melted insulation or a hot fuse holder, switch the battery off and call a marine electrician; if there is fire underway, use your extinguisher and call USCG on VHF 16 or 911. This guide covers the 12-volt DC side only. Leave AC breakers, shore power and the main battery cables to a pro.
Owners often ask
- A fuse keeps blowing as soon as I turn the switch on. Can I just put in a bigger fuse?
- How do I find a short circuit in my boat wiring?
This guide walks you through it. Still stuck? Ask the AI Mechanic about your engine.
Tools
- Digital multimeter with continuity/ohms setting
- Fuse puller or needle-nose pliers
- Insulated screwdrivers and a small wrench set
- Flashlight or headlamp
- Phone camera and masking tape or wire labels
- Safety glasses
Parts & supplies
- Spare fuses of every rating used aboard (same type and rating only)
- Replacement breaker or rocker switch of the identical rating and type, if needed
- Heat-shrink crimp terminals and tinned marine wire for any repair
- Rubber terminal boots and cable ties
- Marine corrosion-inhibiting spray
Before you start
A fuse or breaker opens for one of three reasons:
- A short circuit: a positive wire or terminal touching ground (the negative side, the engine, or a metal part connected to them). The fuse usually blows instantly when you switch on.
- An overload: the device is drawing more than it should, for example a bilge pump with a jammed impeller, or too many things added to one circuit. The fuse usually lasts a few seconds or minutes, then blows.
- A tired or wrong part: an old breaker that trips early, a corroded fuse holder that heats up, or a fuse that is smaller than the circuit was designed for.
Your job is to figure out which, and fix the cause. Have spare fuses of the correct rating, a meter and your boat's wiring sketch if you have one (see our 12-volt wiring basics guide).
Steps
Write down which device quit, what you were doing (switching it on, hitting a wave, trimming, running for an hour) and whether anything else misbehaved. "Blows the moment I flip the nav lights on" and "blows after the livewell runs for 20 minutes" point to completely different faults.
Check the label at the panel or fuse block. If nothing is labeled, follow the device's positive wire back. Many helm fuse blocks sit behind the dash; small accessories may have an in-line fuse holder close to the battery or battery switch.
On a breaker panel, a tripped breaker usually sits in a middle or "off" position. Push it fully off, then back on.
- Look: a blade fuse has a clear body. A blown one shows a broken or melted metal link, often with a dark smudge.
- Meter it in place: with the circuit switched on, touch the meter's black lead to a good negative and the red lead to the two little test points on top of the fuse. Voltage on both sides means the fuse is good; voltage on one side only means it is open.
- Out of the holder: set the meter to continuity. A good fuse beeps; a blown one doesn't.
If the fuse is good, your problem is elsewhere (switch, wiring, connection or the device itself). The voltage-drop test in our corroded connections guide is the next step.
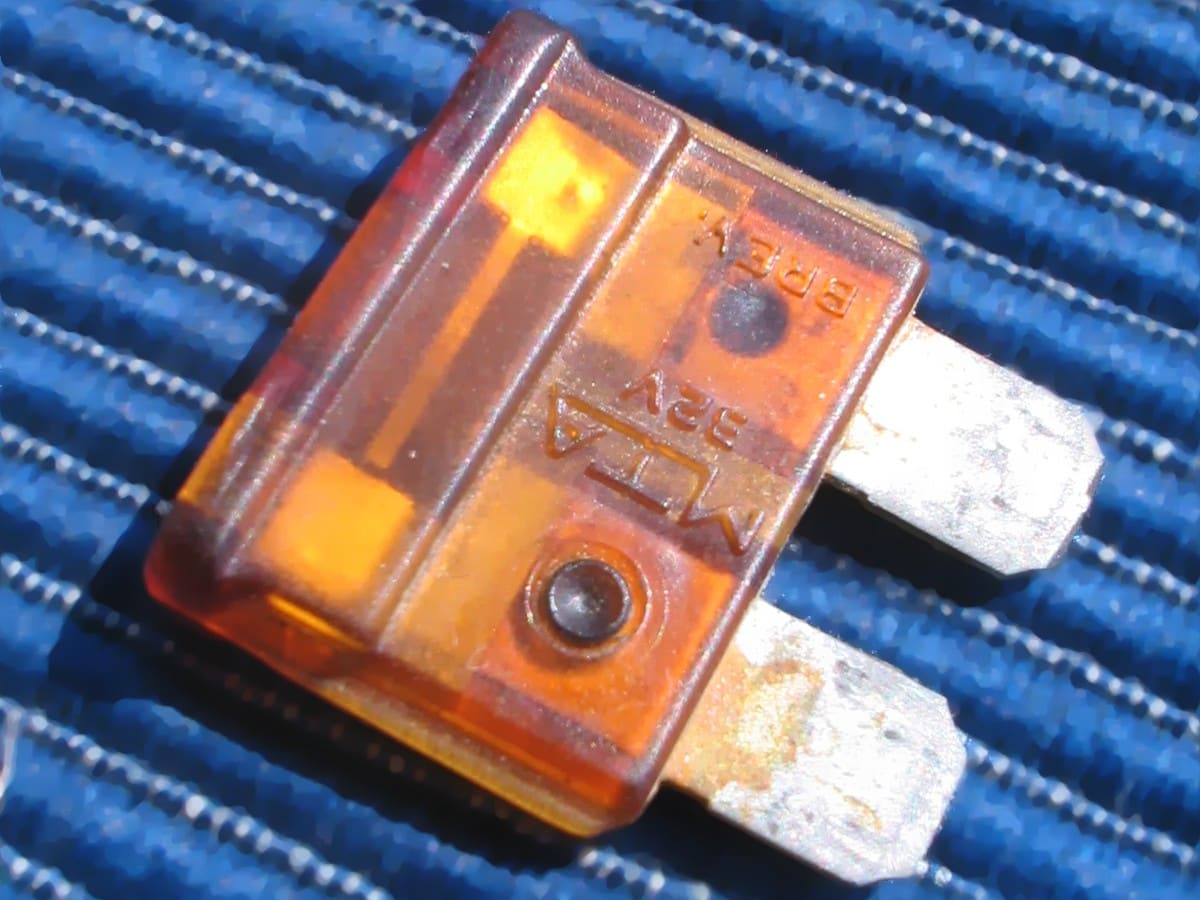
A blown blade fuse: the metal link inside has melted through. Replace it only with the same rating. Photo: A7N8X / Wikimedia Commons · CC BY-SA 3.0 Switch the device OFF, fit a new fuse of the same type and amp rating (the number on top), then switch the device on and watch:
- Blows instantly: a short. Stop replacing fuses and go to step 6.
- Blows after a while, or when the device works hard: an overload. Go to step 5.
- Holds and the device works normally: it may have been a one-off (a wave splashing a connector, a momentarily jammed pump). Inspect the device and wiring anyway and keep an eye on it.
Feeding it fuse after fuse only heats the wiring and damages switches.
- Read the device label. Compare the device's amp draw and any maximum fuse rating printed on it with the fuse in the circuit.
- Check motors first. Pumps, blowers, macerators, trim motors and windlasses draw far more current when they are jammed, dry or failing. Clear debris from a bilge or livewell pump intake and spin the impeller if you can.
- Count what's on the circuit. Previous owners often add a light, a USB charger and a fish finder to one fuse. If the total draw is close to or above the fuse rating, the extra loads need their own properly sized circuits; that may be a job for an electrician.
- Feel for heat (power off): a warm fuse holder or a discolored breaker terminal points to a loose or corroded connection (step 10).
With the battery switch OFF:
- Disconnect the device at its plug or terminals. Tape the loose ends so they can't touch anything.
- Fit a new fuse, switch the battery and circuit on.
- Fuse holds: the short is in the device (or its own pigtail). Repair or replace the device.
- Fuse still blows with the device unplugged: the short is in the wiring or the switch between the panel and the device.
Lights with several fixtures on one circuit: disconnect them one at a time until the fuse stops blowing.
Switch the battery OFF and remove the fuse. With the device still disconnected:
- Set the meter to ohms or continuity.
- Put one lead on the circuit's positive wire (at the device end or the panel end) and the other on a good ground (the negative bus or engine block).
- A reading near zero, or a steady beep, means that positive wire is touching ground somewhere. Boating Magazine uses the same test for chafed trailer wiring.
Now walk the wire run with a flashlight. Classic spots: where wires pass through bulkheads or under hatches and seat bases, behind the dash near screws you or a previous owner drove in, rub points on the steering cable or engine, the tilt and trim area, rod holders and T-top legs, and anywhere a light is mounted with a screw that could pierce a wire. Wiggle sections while watching the meter; a reading that jumps tells you you're close.
Cut out the chafed or pinched piece and splice in tinned marine wire of the same gauge or larger with adhesive heat-shrink butt connectors, or replace the whole run if it's damaged in several places. Protect the rub point with split loom or a grommet and support the wire so it can't move back. Don't settle for electrical tape over a bare spot.
Rocker and toggle switches fail too. A switch with water inside, a cracked body or a burnt terminal can short internally or overheat. With the battery off, disconnect the switch and test it with the meter: continuity in ON, none in OFF, and no continuity from any terminal to the switch's ground terminal (on lighted switches) unless the wiring diagram shows one. A switch that feels warm, sticks or works only if you wiggle it should be replaced.
Turn the battery off and look behind the panel or under the fuse block cover:
- Loose screws or nuts on bus bars and breaker terminals
- Green or white corrosion on fuse clips, especially in open-boat helm blocks
- Melted or browned plastic around a fuse socket (replace the block; the clips have lost their grip)
- Too many wires on one terminal
BoatUS's Ed Sherman explains why heat at a connection is so sneaky: extra resistance creates heat but actually lowers the current, so a burning connection won't blow the fuse or trip the breaker. Only your eyes, nose and hands catch it.
If a breaker trips with nothing switched on, won't reset, feels loose or trips well below its rating, it can be replaced:
- Battery switch OFF, and disconnect the battery negative if the panel's main feed comes straight from the battery.
- Photograph the back of the panel and label each wire before you remove it.
- Note the old breaker's amp rating and style (push-button, toggle, rocker, panel mount size). Buy the identical rating in a marine-rated, trip-free type made for your panel. Practical Sailor notes that marine breakers are trip-free: they open on overload even if the toggle is held on.
- Move wires one at a time to the new part, crimp new terminals if the old ones are corroded, and tighten firmly.
- Refit any insulating back cover; Boating Magazine's panel install adds one to guard against shorts behind the panel.
- Reconnect, switch on and test each circuit.
Two more things to match when the breaker or fuse holder sits anywhere near the engine or batteries:
- Ignition protection. Blue Sea points out that switches, breakers and fuses can all spark, so any that sit in a space with a gasoline engine or gasoline tank, or where gas or propane fumes can collect, must be ignition-protected types (ABYC and Coast Guard rules). A cheap automotive part there is a fire risk.
- Interrupt rating on main breakers. A main breaker close to a big battery has to be able to break a very large short-circuit current without its contacts welding shut. Blue Sea calls this the breaker's ampere interrupt capacity (AIC); a replacement main breaker must meet or exceed the original's.
Blue Sea also advises keeping fuses, breakers and switches out of the battery compartment itself, where corrosion and battery gases are a problem.
Panel switches with built-in breakers, lighted rockers and multi-pin switch panels vary a lot. Follow the panel maker's instructions, and call a pro if the wiring doesn't match the photos or labels.
Blue Sea Systems explains that a fuse is chosen to protect the wire. A bigger fuse lets that wire carry more current than it can safely handle, so the wire, not the fuse, becomes the weak link, and it fails as heat inside a bundle behind the dash. Motor circuits are worse: if a pump jams, an oversized fuse never blows, the motor overheats and can catch fire. BoatUS calls over-fusing small motor circuits one of the most common problems surveyors find. Match each motor's fuse to the maximum on its label exactly.
The only time a fuse should change is when a professional resizes the wire for a new load. If a device's maker specifies a smaller fuse than the wire would allow, Blue Sea says to use the smaller one.
Once the problem is fixed:
- Label each fuse and breaker at the panel with what it feeds and its rating.
- Keep a written chart (laminated, or in your BoatMend boat profile) listing every fuse location and size, as Boating Magazine recommends, and carry spares of each rating.
- Make the list complete. Mercury's quick tip on boat fuses suggests inventorying every fuse the boat uses, from the engine's own fuses to aftermarket gear such as the trolling motor, chartplotter and fish finder, noting each type and amp rating from the owner's manuals, then carrying spares for all of them. Mercury also suggests a small 12-volt repair kit (wire cutter/crimper, a short spool of wire and a few connectors) for those comfortable using it.
- Spray fuse blocks and terminals with a marine corrosion inhibitor, especially on open boats.
Run the repaired circuit for a while, including whatever made it fail before: underway in chop, with the pump running, or with everything on. Recheck the fuse holder and repaired connections for warmth afterward.
Common mistakes
- Installing a 20-amp fuse where a 10 lived "to stop it blowing."
- Replacing fuse after fuse without unplugging anything to find the short.
- Using an automotive breaker or a household part instead of a marine, trip-free breaker of the same rating.
- Putting a fuse in the negative wire.
- Covering chafed wire with electrical tape instead of repairing it and protecting the rub point.
- Adding new accessories to an existing circuit until it overloads.
- Not noticing a hot, discolored fuse holder because the fuse never blew.
- Leaving circuits unlabeled so the next person (or you, at night) guesses.
When to call a pro
- Melted wiring, a burning smell, scorched panel parts or any fire, even a small one
- The main battery fuse, main breaker, battery cables, starter, windlass, thruster or inverter circuits
- A short you can't find after isolating the device, or one that is intermittent
- Any AC breaker that trips (shore power, generator, water heater, air conditioning)
- Replacing an entire panel, or adding circuits to one that is already full
- A breaker that trips while the boat is plugged into shore power and nothing else explains it
Tips
- Turn a misbehaving circuit off and leave it off until you can troubleshoot calmly at the dock. Use a handheld light or VHF in the meantime.
- Carry an assortment of spare fuses in a small waterproof box, plus a cheap meter.
- An intermittent blow while running in waves usually means a wire chafing or a connector shorting when the boat flexes. Look along the run near the hull sides and bow.
- After any fix, update your wiring sketch.
- When you pull or check a fuse with the power on, use a plastic fuse puller, not a screwdriver: Mercury warns that a metal tool can short the circuit. Mercury also says a circuit that keeps blowing fuses, especially the same one, can mean a chafed wire and is a job for your dealer or technician.
Official references
We read these to write this guide. Your engine's own manual always wins.
- Blue Sea Systems – Part 2, Select a Fuse and Fuse Holder for Your DC Product Installation
- Blue Sea Systems – Part 1, Choosing the Correct Wire Size for a DC Circuit
- Blue Sea Systems – DC Circuit Protection (AIC rating, ignition protection, placement)
- BoatUS – Avoiding Boat Electrical Mistakes (over-fusing motors, stacked terminals)
- Practical Sailor – Breaker Panels (trip-free breakers, what breakers protect)
- eCFR – 33 CFR 183.455, Overcurrent protection
- Boating Magazine – Quick Fixes for Trailer-Light Troubles (ohmmeter short-to-ground test)
- Boating Magazine – Electrical Repairs Checklist
- Mercury Marine – Quick Tip, Understanding Boat Fuses
- Boating Magazine – Adding a Distribution Panel
- BoatUS – Understanding The Green Ground Wire (DC fault current)
Safety: BoatMend is for information only and does not replace a certified marine technician. You are responsible for your safety and your boat. Read the full disclaimer.
Last updated 2026-10-24
Related guides

12-Volt Boat Wiring Basics: Circuits, Color Codes, Fuses and Wire Size
Learn how your boat's 12-volt system is laid out, what the ABYC wire colors mean, how fuses and breakers protect the wiring, why voltage drop and tinned wire matter, and how to read a wiring diagram, so you can troubleshoot smarter and know which jobs belong to a marine electrician.

How to Find and Fix Corroded Electrical Connections on a Boat
Track down the green crust and loose terminals behind flickering lights, dead gauges and slow cranking with a simple voltage-drop test, then remake the connection the marine way: tinned wire, a proper crimp, adhesive-lined heat shrink and a protective coating.

How to Wire a Bilge Pump Correctly (Automatic Float, Panel Switch and Fuse)
Wire your bilge pump so the automatic float works even with the battery switch off, the helm switch gives you a manual override, and every circuit has the right fuse, wire size and connections kept above the bilge water. A pump that is wired wrong can leave the boat unprotected exactly when nobody is aboard.
How to Test and Clean Your Bilge Pump and Float Switch
Make sure your bilge pump actually moves water overboard, both on the manual switch and automatically through the float switch. A working bilge pump is one of the most important safety systems on any boat that stays in the water.
How to Test and Fix Your Boat's Navigation Lights
Learn which navigation lights your boat must show and when, then test them and fix the usual culprits such as corroded sockets, loose pole-light plugs and blown bulbs. Working lights are legally required at night and in poor visibility and are how other boats see which way you are heading.
How to Use a 1-2-Both Battery Switch and Run Two Batteries
Learn what the 1, 2, Both and Off positions really do, a simple routine that keeps one battery ready to start the engine, how to check that both batteries are charging, and when an automatic charging relay makes life easier. Rewiring high-current cables is a job for a marine electrician.
Battery Goes Dead While the Boat Sits - How to Find a Parasitic Drain
If your boat battery is flat every time you come back, something may be quietly drawing power while you are away. Learn how to tell a bad battery from a drain, find the circuit with a multimeter and the fuse panel, and fix the usual culprits without disabling your bilge pump.
Jet Ski Electrical Problems: Dies in Waves, Low Voltage and Bad Connections
A personal watercraft that cuts out when it hits chop, shows low voltage, flickers its display or blows fuses usually has a corroded or loose connection, not a dead computer. Work from the battery and grounds to fuses, relays and module plugs, and learn when the job needs a dealer's diagnostic tool.