How to Wire a Bilge Pump Correctly (Automatic Float, Panel Switch and Fuse)
Wire your bilge pump so the automatic float works even with the battery switch off, the helm switch gives you a manual override, and every circuit has the right fuse, wire size and connections kept above the bilge water. A pump that is wired wrong can leave the boat unprotected exactly when nobody is aboard.

Time
2 h 30 min
Shop would charge
$150-450
Applies to
All engines
Safety first: Disconnect the battery (or pull the pump's fuse) before you cut or join any wire: a short on a battery cable can melt wire and start a fire. Never "fix" a blowing fuse with a bigger one. If the boat is taking on water right now, don't start rewiring: run the pump on manual, use a manual pump or bucket, and call TowBoatUS, Sea Tow or the Coast Guard on VHF 16 (or 911) if you can't keep up.
Owners often ask
- Should my automatic bilge pump still work when the battery switch is off?
- I wired a new three-wire bilge pump and now it runs nonstop. What did I do wrong?
This guide walks you through it. Still stuck? Ask the AI Mechanic about your engine.
Tools
- Digital multimeter
- Ratcheting crimper made for insulated terminals
- Wire stripper and cutters
- Heat gun (not a lighter or torch)
- Screwdrivers and nut drivers
- Flashlight or headlamp
- Bucket or garden hose (for the water test)
- Phone camera (photograph the old wiring first)
Parts & supplies
- Tinned, stranded marine wire in the size your pump and run length need (red or brown for positive, black or yellow for negative)
- Inline fuse holder (waterproof) or a breaker, plus fuses of the rating the pump maker specifies
- Three-way bilge pump panel switch (manual / off / auto) or a separate manual switch
- Adhesive-lined heat-shrink crimp connectors and ring terminals
- Wire ties, cable clamps and a little dielectric grease
- New float switch, only if testing shows the old one is bad
Before you start
A bilge pump has two jobs, and the wiring has to support both:
- Automatic: a float switch (or a sensor built into the pump) turns the pump on when water rises and off when the bilge is dry. This circuit must stay powered when nobody is aboard and the battery switch is off, so it gets its own fused wire from the battery side of the system, not from the main switch or the main breaker panel.
- Manual: a switch at the helm runs the pump on demand, so you can empty the bilge or keep pumping if the float fails.
Many pumps, including Rule's automatic models, come with three wires. Xylem (Rule's maker) identifies them as brown = automatic (through the built-in float), brown/white = manual override and black = negative. Pumps with a separate float switch have two wires at the pump, and the float sits in the positive wire between the fuse and the pump.
Know your boat before you buy parts: count the pumps (main, backup, shower or fish-box sumps), note each pump's current rating from its label, and photograph the existing wiring.
Steps
Two layouts work well:
- Float wired straight to a fused, always-on feed, plus a separate helm switch for manual. The auto circuit can't be switched off by accident.
- A three-way panel switch (MANUAL / OFF / AUTO), which Xylem recommends for its three-wire pumps because it gives you auto, manual and an off position for maintenance in one switch. Its feed must also be fused and always on.
With a three-way switch, OFF really means off: the pump will not run on its own. Leave it in AUTO whenever the boat is unattended. Use OFF only while you work on the pump, or when the boat is on a trailer or lift and a stuck float would only flatten the battery.
The feed for the automatic circuit has to stay live with the main battery switch off. The usual options are a dedicated fused wire from the battery's positive terminal, or a fused feed from a terminal on the battery side of the main switch. BoatUS describes both and prefers the battery switch's always-energized terminal over stacking wires on the battery post, partly because on some switches it can draw from both batteries. Whatever you choose, it must not pass through the main breaker panel, or someone flipping the main breaker kills the pumps. Many owners label the pump fuses or breakers "do not turn off".
If the battery post is already crowded, don't keep stacking ring terminals on it. BoatUS notes that ABYC standards allow no more than four terminals on a single battery stud; a small separate fuse panel wired straight to the battery, used only for bilge pumps and alarms, keeps those circuits live without overloading the post. Blue Sea Systems calls these "24-hour circuits" and lists what makes a good one: fed directly from a battery bank, not through the battery switch; no on/off switch of its own, so nobody turns it off by accident; in one central, easy-to-find place, so you can replace a fuse without hunting; and clearly labeled.
Every positive wire that starts at a battery or battery-switch terminal needs its own fuse or breaker, mounted as close to that terminal as practical (ABYC's rule is a few inches; your installer will know the exact distance). Use the rating the pump maker specifies, often printed on the pump or in its instructions. Xylem tells you to fuse the pump to match the amperage printed on it. Blue Sea Systems explains why this matters: fuses are normally sized to protect the wire, but a pump maker may call for a smaller one so a jammed pump blows the fuse instead of overheating. In Blue Sea's worked example, the wire could have taken 12 to 15 amps, but the pump maker's recommended fuse was 5 amps.
Use a waterproof fuse holder and mount it where it stays dry and you can reach it.
Wire that is too small drops voltage (the pump runs slower and moves less water) and can overheat. Size it from two numbers: the pump's current draw and the round-trip length (battery to pump and back). Blue Sea's DC wire chart, based on ABYC E-11, uses a 3% voltage-drop column for critical circuits and a 10% column for things like general lighting. Treat the bilge pump as critical. In Blue Sea's bilge pump example, a 4.2-amp pump with a 20-foot round trip needs 16 AWG wire; longer runs or bigger pumps need heavier wire.
Use tinned, stranded marine wire, which Blue Sea notes is what ABYC specifies, not solid household wire or bare-copper automotive wire. Run the negative wire the same size as the positive.
Following Xylem's guide for a three-way switch:
- Brown (auto) goes to the switch's AUTO terminal (or, in the always-on layout, straight to the fused always-on feed).
- Brown/white (manual) goes to the MANUAL terminal.
- Black goes to the negative bus or battery negative.
The switch's power terminal gets the fused feed from Step 2. Every switch is a little different, so follow the diagram that comes with it.
If you have no panel switch (a dinghy, for example), Xylem says to use only brown and black, fuse the brown wire, and seal off the brown/white wire with heat shrink and silicone. Never join brown and brown/white together: Xylem calls this one of the most common mistakes, because it bypasses the float and the pump runs nonstop until it burns out or flattens the battery.
BoatUS advises keeping connections above the highest bilge water you're likely to see and away from spray from the stuffing box. Practical rules:
- Use adhesive-lined heat-shrink crimp connectors and shrink them with a heat gun. No electrical tape, no household twist-on connectors.
- If the copper is green when you strip a wire, cut back until you reach clean, shiny strands, as BoatUS describes.
- Leave a little slack so wires aren't under tension, but don't let them drape into the bilge or tangle in moving parts. Clamp them every foot or so.
- Rule's pump leads are silicone-blocked to stop water wicking up the wire; make your splice up where the lead reaches, not down in the sump.
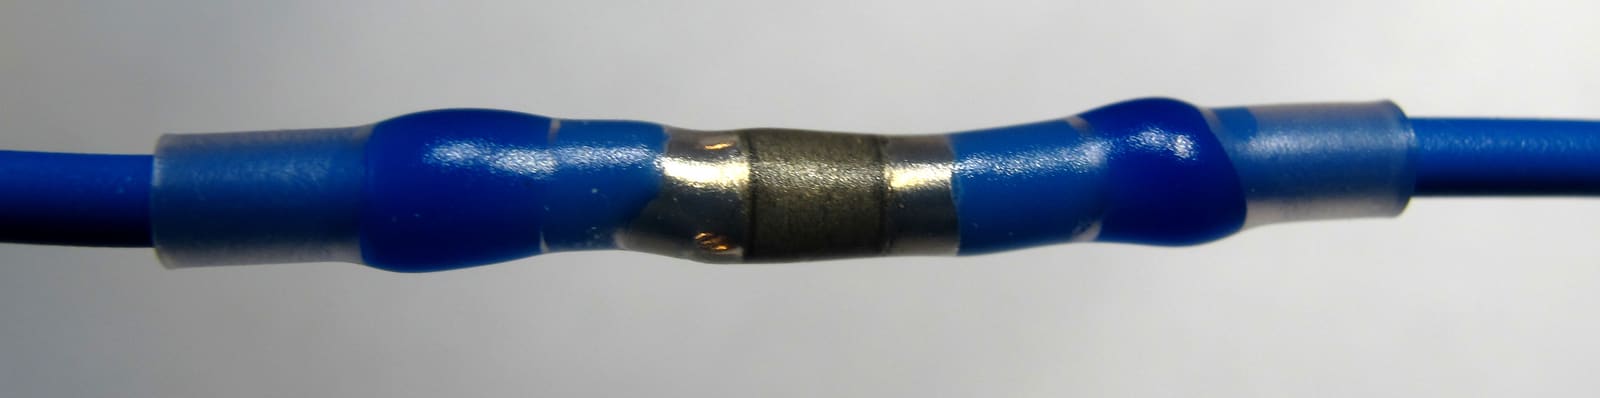
Photo: wdwd / Wikimedia Commons · CC BY-SA 4.0 A separate float switch has to swing freely, clear of hoses and wires. BoatUS recommends facing it toward the stern: if it faces forward, the surge of water as the boat gets on plane makes the pump cycle and can break the switch. Use stainless fasteners only.
Reconnect the battery. Put a little water in the bilge, select MANUAL (or press the manual switch) and confirm the pump runs and water comes out of the overboard fitting.
This is the test that matters. Turn the main battery switch off, set the panel switch to AUTO, and pour water into the bilge (or lift the float by hand). The pump should start on its own and stop when the water is gone. If it only works with the battery switch on, the auto circuit is fed from the wrong place: go back to Step 2.
With the pump running, measure the voltage at the pump's connections and compare it with the battery voltage. A big difference points to wire that's too small, a corroded connection or a tired fuse holder. Find the connection that is warm or shows the biggest voltage drop and redo it.
A second automatic pump and a loud alarm buy you time to find a leak, put on life jackets and call for help. BoatUS's 2026 how-to suggests:
- Mount the backup pump and its float about 2 to 3 inches above the point where the primary pump switches on. The small primary handles everyday water; the bigger backup only runs when something is wrong, and it doesn't sit in dirty bilge water seizing up.
- The backup and the alarm can share one float switch, wired straight to the battery through its own fuse so they work with the battery switches off.
- Give the backup its own overboard fitting, high above the waterline, with a riser loop or vented loop. Never tee it into the primary pump's discharge hose: that cuts the flow and can let water run back in through the other pump.
- Put the horn or buzzer where you'll hear it at the helm or the dock, ideally with a cutoff switch.
A new discharge fitting means a new hole in the hull, so have a pro do that part if you're not sure.
Label the fuse, the switch and both ends of each wire. Note the pump's model, current draw, fuse rating and wire size in your BoatMend log. A small diagram taped inside the console saves time later.
Common mistakes
- Feeding the automatic float through the main battery switch or the main breaker panel, so the boat is unprotected when you leave.
- Joining the brown and brown/white wires of a three-wire pump, which makes it run all the time.
- Using a fuse bigger than the pump maker specifies "so it stops blowing". A fuse that keeps blowing usually means a jammed pump or a chafed wire.
- Splicing in the bottom of the bilge, or using tape and twist-on connectors.
- Using thin wire on a long run, so the pump only gets part of the battery voltage.
- Leaving a three-way switch on OFF after cleaning the bilge.
- Mounting the float facing forward, so it cycles or breaks every time the boat gets on plane.
When to call a pro
- The boat is taking on water faster than the pump can handle: get help on VHF 16 or call 911 first, rewire later
- A fuse or breaker blows again right after you replace it, or any wire is melted or smells burnt
- Your boat has a complex panel, battery bank or charger setup and you aren't sure which terminal stays live with the switch off
- Adding a second, high-water pump or alarm that needs new holes through the hull for the discharge
- The boat lives on a mooring or at a dock unattended and you want an independent check of the whole bilge system
Tips
- Ask for, or add, a panel switch with an indicator light or a pump counter. A pump that runs more often than usual is your first warning of a new leak.
- Keep a spare fuse of the right rating taped next to the fuse holder.
- A float switch is a wear item; BoatUS calls them notoriously unreliable after a few years. Test it every time you visit the boat.
- When you test, make sure water actually goes overboard; a pump that hums but doesn't pump (clogged intake, cracked hose, stuck check valve) isn't protecting anything. BoatUS suggests testing all pumps and alarms at least every three months and looking over the pump mounts once a year for hairline cracks.
- Keep the bilge clean. Oily sludge and construction debris jam pumps and floats.
- Once a year, unplug the pump at its connector and take it apart while you're working back there. Mercury's bilge pump quick tip: most small pumps twist off their strainer base with about a quarter turn, then the top twists out of the housing. Clear out debris (cut up any fishing line wrapped inside), replace the pump if the impeller is cracked or broken, put a thin coat of grease on the O-ring and twist it back in the same direction it came out so the hose lines up. Don't crank the hose clamp so tight it crushes the pump outlet.
- On the trailer, put the drain plug in and add a few gallons through an access hatch (not over the wiring) to test auto and manual. Switch off as soon as the water is gone: running dry is hard on the pump. A little water left behind is normal, since the pump can't sit at the very lowest point.
- Keep the battery that feeds the pumps charged. The best wiring in the world can't run a pump from a flat battery.
Official references
We read these to write this guide. Your engine's own manual always wins.
- Xylem (Rule) – How to Wire a Rule Automatic Bilge Pump, the 3-Wire Guide
- BoatUS – How To Replace A Bilge Pump Switch
- BoatUS – Everything You Need To Know About Your Boat's Bilge Pump
- BoatUS – Double Duty (installing a backup bilge pump and high-water alarm, 2026)
- Blue Sea Systems – Choosing the Correct Wire Size for a DC Circuit
- Blue Sea Systems – Using the Circuit Wizard to Size Main and Branch Circuits (bilge pump example)
- Blue Sea Systems – Select a Fuse and Fuse Holder for Your DC Product Installation
- Blue Sea Systems – 24 Hour Circuit Solutions
- Mercury Marine – Quick Tip, Bilge Pump Maintenance
Safety: BoatMend is for information only and does not replace a certified marine technician. You are responsible for your safety and your boat. Read the full disclaimer.
Last updated 2026-10-24
Related guides
How to Test and Clean Your Bilge Pump and Float Switch
Make sure your bilge pump actually moves water overboard, both on the manual switch and automatically through the float switch. A working bilge pump is one of the most important safety systems on any boat that stays in the water.

Marine Battery Care: Test, Charge and Store for Winter
Check your boat battery's health, charge it the right way for its type (flooded, AGM or lithium), and store it so it is ready in spring. Most "boat won't start" calls start with a neglected battery.
How to Use a 1-2-Both Battery Switch and Run Two Batteries
Learn what the 1, 2, Both and Off positions really do, a simple routine that keeps one battery ready to start the engine, how to check that both batteries are charging, and when an automatic charging relay makes life easier. Rewiring high-current cables is a job for a marine electrician.

How to Find and Fix Corroded Electrical Connections on a Boat
Track down the green crust and loose terminals behind flickering lights, dead gauges and slow cranking with a simple voltage-drop test, then remake the connection the marine way: tinned wire, a proper crimp, adhesive-lined heat shrink and a protective coating.
Battery Goes Dead While the Boat Sits - How to Find a Parasitic Drain
If your boat battery is flat every time you come back, something may be quietly drawing power while you are away. Learn how to tell a bad battery from a drain, find the circuit with a multimeter and the fuse panel, and fix the usual culprits without disabling your bilge pump.

What to Do When Your Boat Is Taking On Water: Emergency Steps and Prevention
A step-by-step emergency plan for water coming into the boat - life jackets on, call for help early on VHF 16, find and slow the leak, pump, and head for shallow water if needed - plus the maintenance checklist that prevents most sinkings.
How to Clean and Maintain Shower Sump and Macerator Pumps (and Stay Legal)
The shower sump pump fights hair and soap scum every day, and the macerator empties the holding tank, but only where that is legal. Learn how to clean the sump and filter, test the float switch, avoid burning out pumps by running them dry, follow the 3-mile and no-discharge rules, and winterize both.