Electric Linear Actuators on Boats: Kicker Lifts, Towers, Hatches, Tables and Seats
Electric actuators raise kicker brackets, fold wake towers, lift engine hatches and move tables and helm seats. Learn how they work, why water and side load kill them, how to fuse and test one directly on 12 volts, and how to replace one safely.
Time
1 h 30 min
Shop would charge
$150-900
Applies to
All engines
Safety first: An actuator can push or pull hard enough to crush fingers, and when it fails, whatever it was holding can drop. Never put your head, hands or body under a raised engine hatch, tower, table or seat that is held only by an actuator; prop it with a rod, strap or block first. Disconnect power (pull the fuse or turn off the breaker) before you unbolt anything. Keep everyone's hands clear of pinch points when anyone is near the switch. If you smell burning insulation, see melted wiring, or a hatch over the engine room won't close and you smell fuel, shut off the battery switch and call a marine electrician; if fuel vapor or fire is involved, get everyone off and call 911 or the Coast Guard on VHF 16.
Owners often ask
- My wake tower motor just clicks and won't raise the tower. Is the actuator dead?
- Can I test a boat hatch lift actuator by hooking it straight to a battery?
- Only one of my electric trim tabs works. How do I tell if it's the actuator or the switch?
This guide walks you through it. Still stuck? Ask the AI Mechanic about your engine.
Tools
- Digital multimeter
- Fused jumper leads with alligator clips (an inline fuse holder on the positive lead)
- A charged 12-volt battery or the boat's battery (for direct testing)
- Screwdrivers, hex keys and a socket set
- Wire stripper and a ratcheting crimper for heat-shrink terminals
- Heat gun
- A prop rod, strap or block of wood to hold a hatch or tower open mechanically
- Flashlight or headlamp
- Safety glasses and gloves
Parts & supplies
- Replacement actuator matched to the old one (stroke, retracted length, force rating, voltage, mounting ends, wiring)
- New clevis pins, clips or mounting bolts if the old ones are worn or corroded
- Heat-shrink crimp connectors or sealed connectors
- Dielectric grease for connector pins
- Fuse or circuit breaker sized to protect the wire
- Marine grease, if the actuator maker calls for it
Before you start
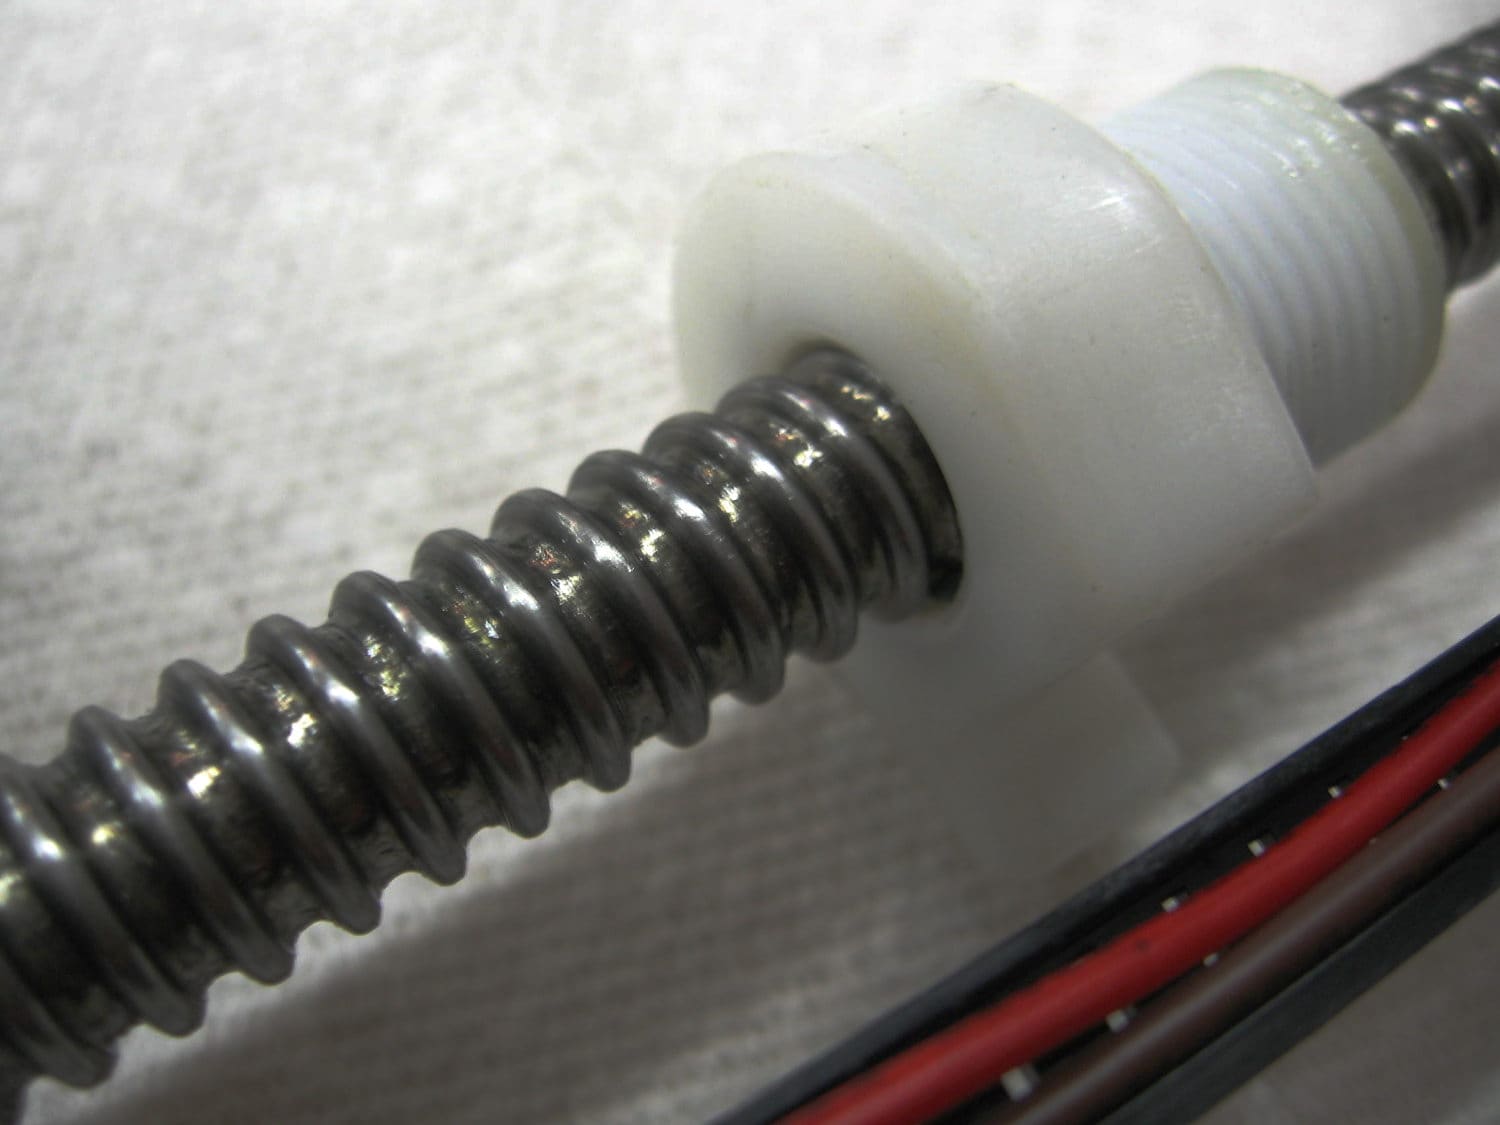
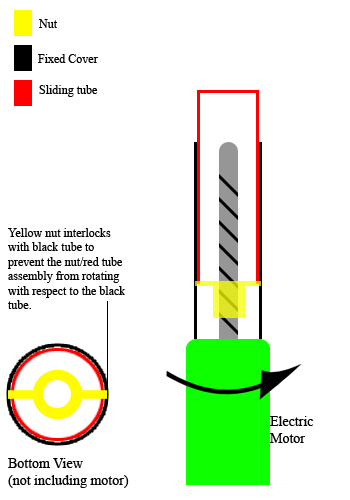
What it is: an electric linear actuator is a small 12-volt (sometimes 24-volt) DC motor driving a gearbox and a threaded screw. A nut on the screw pushes a rod in or out. Reverse the polarity of the two motor wires and it runs the other way. Most hold their position when the power stops.
Where you'll find them aboard:
- Power-lift kicker brackets and some jack plates
- Folding wake towers and powered T-tops or hardtops
- Engine-room and storage hatch lifts
- Electric trim tabs and wake-shaping tabs
- Rising tables, TV lifts, helm and bolster seats, and some swim platforms
Two kinds of wiring:
- Two-wire actuators: just the motor. A rocker switch or a relay box flips polarity to change direction. Limit switches inside stop it at each end.
- Actuators with extra wires (three or more): these have position feedback (a sensor that tells a control box where the rod is) or built-in electronics. Trim-tab and wake-surf systems, auto-leveling hatches and synchronized pairs use them. Do not put battery power straight on a multi-wire actuator; follow the maker's test procedure.
What kills them: water getting inside, loads pushing sideways on the rod, low voltage from undersized or corroded wiring, and running against a jam. Panther, which makes power-lift kicker brackets, says its actuators can't be repaired once the screw inside breaks; they're replaced as a unit. Expect the same from most small actuators.
Steps
Find the label on the actuator body: maker, model, voltage, stroke and sometimes force and duty cycle. Photograph it before it gets scraped off. Count the wires and note their colors. Look up the boat builder's or system maker's manual for that item (tower, hatch lift, tabs). Write it all in your BoatMend log, because replacements must match.
If nothing moves at all, start at the power: battery switch on, battery charged, fuse not blown, breaker not tripped. Blue Sea Systems explains that U.S. Coast Guard rules and the ABYC standard call for circuit protection on every positive wire (except engine starting), and that the fuse is chosen to protect the wire. If the maker specifies a fuse rating, use it. A fuse that blows again right away means a short or a jammed actuator; don't keep replacing it or install a bigger one.
With everyone clear, press the switch and watch the whole travel.
- Smooth, steady and quiet: healthy.
- Slow, or slows down under load: usually low voltage (weak battery, long thin wire, corroded connection). Go to step 4.
- Hums or clicks but doesn't move: low voltage, a stuck mechanism or a failed relay.
- Motor runs but the rod doesn't move: stripped gears or a broken internal screw. Panther lists "coming apart" and a broken internal screw as the common failure and the fix as a new actuator.
- Moves one way only: often the switch or relay for that direction.
- A short whir at the very end of travel: on some lifts this is by design. Lenco says the ball screw in its hatch lifts spins freely once the hatch is fully open or closed instead of stalling. Check your maker's description before calling it a fault.
- Grinding, jerky or the bracket flexes: binding or side load (step 6).
Set your meter to DC volts. Back-probe the actuator's connector (or the relay output) while a helper runs it. Compare with battery voltage at the same moment. A big difference means voltage drop in the wiring, switch, relay or connections. Clean or replace corroded terminals and connectors, and check that the wire is big enough for the current and length (the 12-volt wiring basics guide shows how). Weak power makes actuators slow, hot and short-lived.
This separates a bad actuator from bad wiring or controls.
- Turn off the circuit and unplug the actuator from the harness.
- Prop whatever it moves so nothing can fall. If you can, unpin the actuator at one end so it moves free.
- With fused jumper leads, touch positive to one motor wire and negative to the other for a second or two. It should move.
- Swap the leads. It should move the other way.
- Let it reach its end stop and release. Don't hold power on it there.
If it runs both ways on the battery, the actuator is fine and the fault is upstream (switch, relay, wiring, control box). If it won't run with good voltage on its own wires, the actuator is bad. Panther's troubleshooting for its electric steering motors works the same way: unplug the motor, power it straight from the battery, then test the relay and switch separately. Multi-wire actuators with electronics need the maker's own test procedure.
An actuator is built to push and pull in a straight line. The hinges, pivots and bracket arms should carry the weight, and the actuator should only move them. With power off, look at both mounting ends:
- Is the rod in line with its mounting points through the whole travel, or does it bend or rub at some point?
- Are the clevis pins, bushings and brackets worn, oval or loose?
- Does the hatch, tower or seat hinge move freely by hand (with the actuator unpinned)?
Fix stiff hinges, bent brackets and worn pins before blaming the actuator. A new actuator mounted crooked fails the same way the old one did.
Water inside is the most common killer. Check:
- Seals and the rod: a scored or pitted rod lets water past the wiper seal.
- The breather or vent tube, if yours has one: Panther says its breather tube must be routed upright and inside the engine cowling so water can't enter, and that actuators that come apart are often a sign water got in that way. Never leave a vent hanging down in spray.
- Cable entry: a nick in the cable jacket near the actuator lets water wick inside. Inspect the first foot of cable closely.
- Drain path: don't let an actuator sit submerged in a hatch gutter, a bilge or a flooded locker. Many are only splash-rated.
Rinse with fresh water after saltwater use (gently; don't pressure-wash seals).
Crimp with heat-shrink terminals or sealed connectors and shrink them fully. Put a thin coat of dielectric grease on connector pins. Leave a drip loop so water runs off below each connector instead of into it. Leave enough slack at moving parts for full travel without stretching or pinching the cable. Support the wire every foot or so and protect it at sharp edges. A sealed gland is needed wherever the cable passes through the transom or deck; the Boating Magazine trim-tab install uses a gland seal on the actuator cable at the transom.
Some actuators have a grease fitting; many are sealed for life. Panther's schedule for its kicker actuators: marine grease at the fitting each season, a few more pumps mid-season if used heavily, and never more than four pumps at once. Over-greasing can push seals out. For storage, Panther has owners spray fogging oil into the outer cylinder and reseal the set screw. Other brands differ, so follow your manual. Lubricate the hinges, pins and pivots the actuator drives, too.
Small actuators are rated for short bursts (a duty cycle), not continuous running. Let go of the switch when travel stops. Don't run a tower or hatch up and down repeatedly for fun. Don't force it against a jam, ice, a strap you forgot or a cover that's still snapped on. If it gets hot or slows down after several cycles, let it cool. Panther notes its electric steering motors have a thermal cutoff that trips from holding the button past the end of travel, binding and heavy continuous use; actuators can overheat for the same reasons.
Before you need it, find out how to move the item if the actuator dies. Options vary: unpin the actuator and lift or lower by hand (with a helper and a prop), a manual release, or removing the actuator. For trim tabs, BoatUS notes that if a tab is stuck down you can usually unbolt the actuator arm or housing as a get-home fix. For a kicker lift, the motor's own tilt still works on the bracket. Keep the tools for this aboard.
When you buy a replacement, match:
- Voltage (12 or 24 volts)
- Stroke (how far it travels) and retracted (closed) length, pin to pin
- Force rating (equal or higher than the original)
- Mounting ends (clevis, eye, pin size) and orientation
- Wiring (two-wire or feedback) and connector
- Water rating, if listed (marine or splash-rated)
- Control system generation: makers often pair actuators only with their own controls. Lenco, for example, says its SD Pro trim actuators work only with Pro Control keypads and its 100 Series actuators only with 100 Series switches and controls. A "newer" actuator on an older switch may not work at all.
The original's model number is best. A wrong length can over-travel and break a hatch or tower; a weaker unit stalls under load.
- Turn off power and prop the item securely.
- Remove the old actuator's pins or bolts and connector; keep the parts in order.
- Before mounting the new one, run it with fused leads to roughly the same extension as the old one so the pins line up without forcing.
- Mount it with new pins and clips if the old ones are worn. Make sure the cable can't be pinched through the full travel.
- Reconnect with sealed connectors and dielectric grease.
- Restore power and run several full cycles, watching for binding, rubbing and anything hitting at either end.
- Log the date, part number and anything you changed.
Common mistakes
- Standing or reaching under a hatch or tower held up only by its actuator.
- Holding the switch after it stops, cycle after cycle.
- Putting a bigger fuse in when the fuse keeps blowing.
- Ignoring a crooked rod or worn pins and replacing the actuator again and again.
- Leaving a breather tube hanging down or a cable jacket nicked near the actuator.
- Pressure-washing the rod seals.
- Buying a replacement by "looks about the same" instead of stroke, length and force.
- Putting battery voltage straight on a multi-wire actuator with built-in electronics.
When to call a pro
- The item is heavy and overhead (a tower, hardtop or large engine hatch) and needs to be supported while the actuator is swapped
- The actuator is part of a computer-controlled trim, wake-surf or leveling system that needs calibration
- Wiring is melted or scorched, or a fuse or breaker keeps tripping with the actuator disconnected
- The mounting points in fiberglass are cracked, soft or pulling out
- You'd have to cut into the boat's structure or run new wire through bulkheads
Tips
- Keep a spare fuse and the fused jumper leads aboard; they solve half of all "won't move" days.
- Mark the actuator's normal extension with a tape flag before you remove it.
- On a matched pair (two trim tabs, two hatch lifts) with identical plugs, swapping the two actuators' connections at the switch or control is a quick test: if the fault moves to the other side, it's the switch or control; if it stays put, it's that actuator or its cable.
- Many problems show up first as slower movement; note how long a full cycle takes when it's healthy.
- Close covers and unsnap canvas before lowering a tower; check for people, rods and lines in the path every time.
Official references
We read these to write this guide. Your engine's own manual always wins.
- Panther Marine Products – FAQs (actuator breather tube, grease, fogging, broken screw, thermal cutoff)
- Blue Sea Systems – Select a Fuse and Fuse Holder for Your DC Product Installation
- Lenco Marine – Trim Tab Actuators (SD Pro, 100 Series and legacy)
- Lenco Marine – Hatch Lifts
- BoatUS – How Trim Tabs Change the Game (2026)
- Boating Magazine – Installing Electric Trim Tabs
Safety: BoatMend is for information only and does not replace a certified marine technician. You are responsible for your safety and your boat. Read the full disclaimer.
Last updated 2026-10-26
Related guides
Power-Lift Kicker Brackets: Wiring, Waterproofing and Actuator Care
An electric kicker lift raises and lowers your trolling motor at the push of a button, but its actuator, relay and wiring live in the wettest spot on the boat. Learn how to check the load rating, wire and fuse it properly, keep water out of the actuator, grease and fog it the way the maker says, and what to do when it won't move.

12-Volt Boat Wiring Basics: Circuits, Color Codes, Fuses and Wire Size
Learn how your boat's 12-volt system is laid out, what the ABYC wire colors mean, how fuses and breakers protect the wiring, why voltage drop and tinned wire matter, and how to read a wiring diagram, so you can troubleshoot smarter and know which jobs belong to a marine electrician.

Fuse Keeps Blowing? How to Troubleshoot a Boat Fuse Block or Breaker Panel
Work through a blown fuse or tripping breaker the safe way: confirm it, tell a short from an overload, isolate the device or wire at fault, replace a worn breaker or panel switch with the same rating, and label every circuit, without ever fitting a bigger fuse.

How to Find and Fix Corroded Electrical Connections on a Boat
Track down the green crust and loose terminals behind flickering lights, dead gauges and slow cranking with a simple voltage-drop test, then remake the connection the marine way: tinned wire, a proper crimp, adhesive-lined heat shrink and a protective coating.
How to Inspect and Troubleshoot Hydraulic and Electric Trim Tabs
Keep your trim tabs working with a simple seasonal check of the blades, anodes, fluid, lines and wiring, and track down the usual faults when a tab won't move, only one side works, or the tabs stay stuck down.
How to Replace Gas Struts on Boat Hatches, Seats and Consoles
Measure, buy and fit the right gas struts (lift supports) so hatches, seat lids and console doors stay open safely instead of dropping on your head or fingers.
How to Inspect Wakeboard Tower, T-Top and Bimini Hardware
Towers, T-tops and biminis carry tow ropes, speakers, boards, electronics and wind loads, all on a handful of bolts. Learn how to check the welds, bases, backing plates, bolts, folding hinges and accessory loads before a crack or a loose bolt becomes an accident.
How to Fix a Loose Boat Seat Pedestal, Base or Leaning Post
Find out why seat pedestals and leaning posts work loose, through-bolt the base with a proper backing plate, deal with soft or rotten floor under it, and keep swivels and slides working smoothly so your helm seat stays solid in rough water.