How to Replace Gas Struts on Boat Hatches, Seats and Consoles
Measure, buy and fit the right gas struts (lift supports) so hatches, seat lids and console doors stay open safely instead of dropping on your head or fingers.
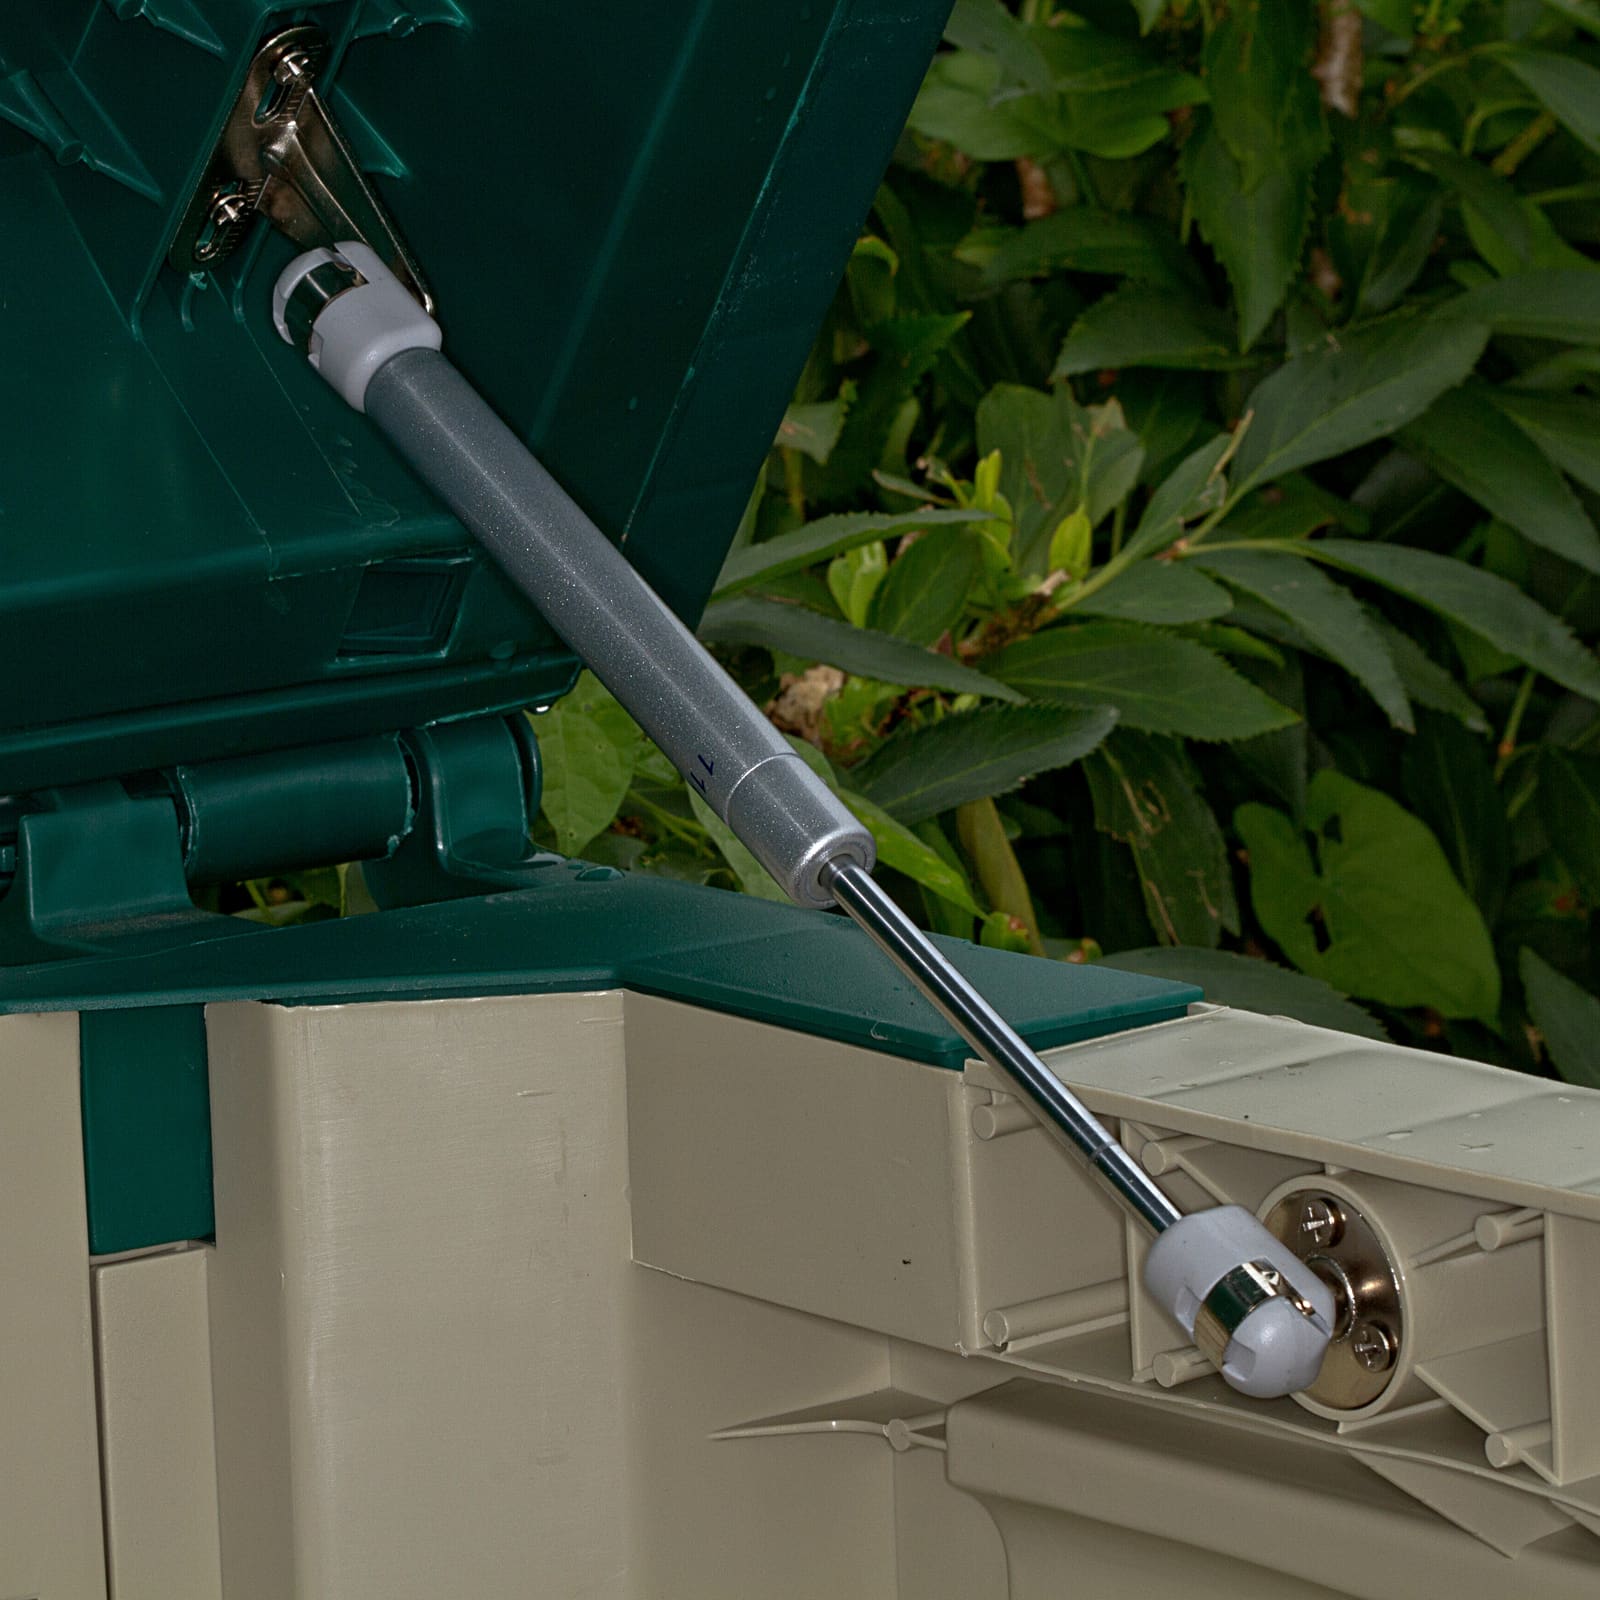
Time
45 min
Shop would charge
$100-300
Applies to
All engines
Safety first: A gas strut is a sealed cylinder of high-pressure nitrogen. Never cut, drill, crush, heat or try to open one, and never throw it in a fire. A hatch or seat with a weak strut can slam shut without warning: always prop it securely before you unclip a strut, and keep fingers and heads out from under it. Big engine hatches and heavy cockpit decks can weigh more than you can hold; if a lid is that heavy or is part of a powered lift system, get help or a pro.
Owners often ask
- My hatch won't stay open anymore. How do I measure and buy the right gas strut?
- Should a gas strut be installed with the shiny rod end up or down?
This guide walks you through it. Still stuck? Ask the AI Mechanic about your engine.
Tools
- Tape measure or ruler with millimeters
- Small flat screwdriver (to lift retaining clips)
- Wrenches or sockets for the ball studs or brackets
- A sturdy prop (wood stick or a helper) to hold the hatch open
- Safety glasses and gloves
- Phone camera to photograph the old setup
Parts & supplies
- Replacement gas struts matched in length, stroke, force and end fittings (stainless for salt water)
- Ball studs or brackets if the old ones are corroded or a different size
- Stainless fasteners and a little marine sealant if you re-mount brackets
Before you start
What they do: gas struts (also called gas springs, gas props or lift supports) push a lid open and hold it there. Inside is nitrogen under pressure plus a little oil that lubricates the seal and slows the last bit of travel. Over time the gas slowly escapes past the seal, so the strut gets weaker. You notice when a hatch won't stay up, drifts down, or needs a push to open.
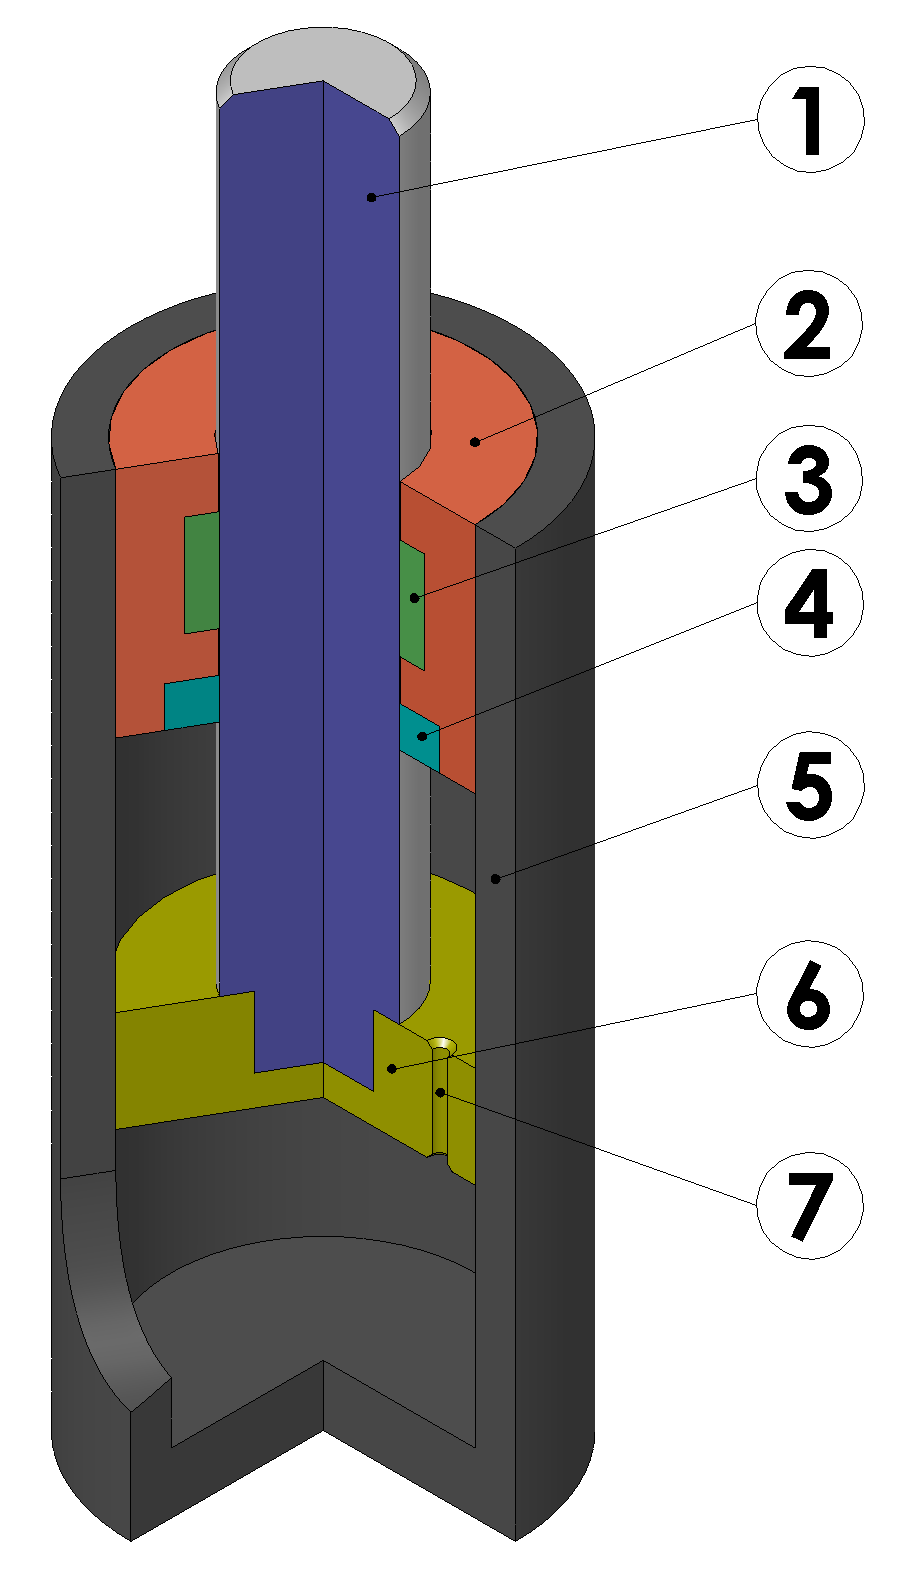
The seal (4) is what keeps the gas in, and it rides on the shiny rod (1). That is why a scratched, dirty or salty rod is the start of most leaks.
Why they fail on boats:
- Normal loss of pressure with age and use (SUSPA says gas springs "lose" force during use)
- Scratches, dirt or salt on the shiny rod, which wear the seal and cause leaks
- Rusted end fittings and ball studs, especially on plated-steel struts in salt water
- Cold weather: the push drops as the temperature falls, so a tired strut often shows up first in spring or fall
- Side loads from a twisted hatch or bent bracket
How long they last: Taylor Made's product page at West Marine says the struts fitted on new boats typically last about five years before the lid has to be lifted and propped by hand. Treat that as a rough guide; sun, salt and how often the hatch is used all change it.
Can it be repaired or refilled? Not on normal struts. SUSPA says its gas springs are sealed by deforming the tube during manufacture and cannot be opened without destroying them. Replace them.
Replace in pairs: if a lid has two struts, replace both at once so they push evenly and the lid doesn't twist.
Steps
Open the hatch fully and prop it with a solid stick or have a helper hold it. Photograph each strut: which end is up, where the brackets sit, and the angle. Note whether the shiny rod end points up or down.
Most struts have a printed or stamped label on the body. It often includes the force (in newtons "N" or pounds "lb") and sometimes a part number you can search with the maker or a marine supplier. Write down everything you see. If the label is gone, you'll measure instead.
Measure from the center of one end fitting to the center of the other with the strut fully extended. Measure center to center, not the outside edges. Note it in both inches and millimeters; many struts are sold in metric sizes.
Stroke is how far the rod travels, usually the length of exposed shiny rod when fully extended. If the strut is off the boat you can also measure compressed length. Length and stroke both need to match, or the hatch won't open as far or won't close fully.
If the force is printed, use it. If not, a supplier can help you choose from the hatch's weight, size, hinge position and where the strut mounts; SUSPA, for example, asks for a sketch with the pivot point, weight, center of gravity and opening angle when it sizes a strut. Too weak and the lid drops; too strong and it slams open, strains the hinges and is hard to close. When in doubt between two ratings, ask the supplier, and remember the push gets weaker in the cold.
The printed rating is usually the force the strut pushes with when it is fully extended (often labeled "P1"). Taylor Made advises basing a replacement on the original strut's rating for that hatch, not on a guess, because too little won't hold the lid and too much strains hinges and brackets.
Most boat struts use snap-on ball sockets on ball studs; others use eyelets, clevises or threaded ends. Measure the ball stud diameter and check the thread on any stud you might replace. Buy struts with matching ends, or plan to replace the studs too.
For salt water or open decks, stainless steel struts and stainless ball studs last much longer than painted or plated steel. Stainless costs more but avoids the rusty end fittings that are the usual reason boat struts get stuck or snap off.
With the lid securely propped, lift the small retaining clip on each ball socket with a flat screwdriver and pull the socket off the stud. Don't pry the whole socket sideways hard; if it's seized, a little penetrating oil helps. Some struts have eyelets held by a bolt and nut instead.
Look for rust, cracked plastic or loose screws. Tighten loose screws; if a screw spins in the fiberglass, the hole is stripped (see the through-bolting guide for proper repairs). Replace corroded studs with stainless, and bed any new fastener holes with a little marine sealant so water doesn't reach the core.
Fit the strut in the same orientation as the original. In general, SUSPA recommends installing gas springs with the piston rod facing down, which keeps the rod seal lubricated and slows gas loss. Press each socket onto its stud until it clicks, then make sure the retaining clip is seated. Don't twist the strut or force it in at an angle.
Remove the prop gradually while holding the lid. It should rise smoothly, stay up on its own and close with a reasonable push. Watch that the strut doesn't rub on anything and that the lid closes fully and latches.
Don't drill, cut or burn them. Ask your parts supplier or local scrap or hazardous-waste program how they accept gas springs; rules vary by area.
Common mistakes
- Unclipping a strut without propping the lid. The hatch can crash down on hands or heads.
- Measuring edge to edge instead of center to center, then buying a strut that's too long.
- Matching length but ignoring force, so the new hatch slams open or won't stay up.
- Replacing only one of a pair. The weak one makes the lid twist and wears both out.
- Wiping the rod with abrasive pads or painting it. Any scratch or coating on the rod damages the seal.
- Buying plated-steel struts for a saltwater boat. The ends rust and seize within a season or two.
- Using a strut as a handle or step, or letting kids hang on a lid. Struts aren't built for side loads.
When to call a pro
- Heavy engine hatches, big cockpit decks or lids on powered lifts
- Hatches with hinge or frame damage, or a lid that's out of square
- The ball studs or brackets mount into soft, wet or delaminated fiberglass
- You can't identify the right force and the lid is heavy enough to injure someone
- Struts that are part of a T-top, tower or helm-seat mechanism with other moving parts
Tips
- Keep the shiny rods clean with fresh water and a soft cloth; protect them from scratches.
- Store spare struts rod-end down in a clean, dry place; SUSPA says storage doesn't harm them if the rod points down and stays clean.
- Expect a little stiffness on the first stroke after a long layup; it usually goes away after one cycle.
- Write the length, stroke, force and end-fitting size inside the hatch with a marker so next time you can order without measuring.
- In cold climates, a strut that barely holds in fall may fail on the first cold morning; replace it before winter work.
Official references
We read these to write this guide. Your engine's own manual always wins.
Safety: BoatMend is for information only and does not replace a certified marine technician. You are responsible for your safety and your boat. Read the full disclaimer.
Last updated 2026-10-25
Related guides
How to Fix Leaking Hatches and Portlights
Find out whether a leaking deck hatch or portlight is failing at the gasket, the lens or the frame, then fix it with the right seal or sealant. Learn when crazed or cracked acrylic needs a new lens and what never to put on plastic windows.
How to Replace Folding Boat Seat Hinges and Fix Back-to-Back Seats
Fix flip-up seats, fold-down fishing seats and back-to-back lounge seats that sag, jam or rip loose. Replace rusted or bent hinges with stainless hardware, rebuild a rotten plywood base so the new screws actually hold, and adjust the latches so the seat stays put.
How to Clean, Protect and Inspect Stainless Steel Boat Hardware
Remove tea stains and rust from rails, cleats and fittings without scratching them, passivate stainless so it stays clean longer, understand why 304 and 316 behave differently, and spot the hidden crevice corrosion that weakens fittings from underneath.
How to Mount Rod Holders, Fish Finders, Cleats and Antennas Without Causing Leaks
Add accessories to your boat the right way, with through-bolts, backing plates, sealed core and proper wire pass-throughs, so every new hole stays dry and strong. Also learn where you should never drill.
How to Find and Fix Leaking Deck Hardware (Rebedding Cleats, Stanchions and Tracks)
Track down the cleat, stanchion base or track that is dripping into the cabin, then remove it, seal the deck core and bed it again with the right sealant so the leak stops for years instead of weeks. Catching it early protects the deck core from rot.