Upgrading Boat Trailer Hubs: Grease-Through Spindles, Oil Bath, Protectors and Pre-Packed Kits
Choose the right hub setup for how you use your trailer, swap in a pre-packed hub kit, adjust it correctly and know when the axle itself is the real problem. Better hubs mean fewer roadside bearing failures and less time with greasy hands.
Time
2 h 30 min
Shop would charge
$150-450
Applies to
All engines
Safety first: Never put any part of your body under a trailer held up only by a jack. Chock the wheels on the other side, set a jack stand under the axle or frame, and work on firm, level ground. A hub that is badly adjusted can overheat or let the wheel come off at highway speed, so if you are not sure the job is right, have a trailer shop check it before you tow.
Owners often ask
- Should I switch my boat trailer to oil bath hubs or stick with grease and Bearing Buddies?
- Can I buy pre-packed hubs instead of repacking my trailer bearings?
This guide walks you through it. Still stuck? Ask the AI Mechanic about your engine.
Tools
- Floor jack rated for your trailer and two jack stands
- Wheel chocks
- Lug wrench and a torque wrench
- Channel-lock pliers, needle-nose pliers and a flat screwdriver
- Rubber or dead-blow mallet
- Manual grease gun (not air or battery powered)
- Tape measure and a notebook or phone for photos
- Rags, nitrile gloves, safety glasses and parts cleaner
Parts & supplies
- Pre-packed hub or hub-drum kit that matches your spindle, bearings, bolt pattern and axle rating
- Grease or oil type your axle maker approves
- New cotter pins or nut retainers (never reuse old ones)
- Bearing protectors or caps that fit the new hubs
Before you start
Boat trailer hubs live a hard life: a hot drive to the ramp, then a dunk in cold (often salty) water. As hot hubs cool under water, they can pull water in past the seal. That is why bearing failure stays near the top of trailer breakdowns: BoatUS reports it was 11% of mechanical trailer failure claims (not counting collisions) filed with GEICO in 2021.
This guide is about choosing and installing a better hub setup. For the routine repack of the hubs you already have, see our trailer wheel bearings guide.
The main options, in plain terms:
- Standard hub with a plain dust cap: cheapest and simplest. Grease is packed by hand. Dexter says its ordinary hubs (without E-Z Lube) are not designed to be submerged and the bearings should be repacked after each immersion. For a boat trailer that goes in the water, that is a lot of repacking.
- Bearing protector (spring-loaded cap with a grease fitting): keeps light pressure on the grease to help keep water and dirt out, and makes topping up easy. BoatUS calls spring-loaded protectors "always a good move" for boat trailers.
- Grease-through spindle (Dexter's E-Z Lube is the best-known): a grease fitting on the end of the spindle sends new grease through a passage to the back of the inner bearing, pushing old grease out the front. Dexter says the E-Z Lube design is meant to allow immersion.
- Oil-bath hub: the bearings run in gear oil behind a cap with a clear window, so you can see the level and spot milky (wet) oil. BoatUS notes they suit trailers used often, but on a trailer that sits for months the oil settles and the upper parts of the bearings can rust; the caps can also be damaged if you clip a curb.
- Sealed or "maintenance-free" hub systems: some trailer and hub makers sell sealed or cartridge-bearing hubs meant for launching. Designs differ a lot, so follow that maker's service and inspection rules exactly. Watch out for "maintenance-free" bearings built for road trailers: Dexter's own lubrication page says its sealed NEV-R-LUBE bearings are not designed for immersion in water, such as boat trailer use. Before you buy any sealed or "no-service" hub, confirm in writing that the maker rates it for launching, and in salt water if that's where you go.
One rule for all of them: Dexter states that easy lubrication features (E-Z Lube or oil) do not replace periodic inspection of the bearings. Plan on pulling and looking at them on the schedule in your axle manual (Dexter lists 12 months or 12,000 miles for lubrication).
Steps
Be honest about how you use the trailer:
- Launch in salt water, or launch often: a grease-through spindle with a protector-style cap, or a quality oil-bath system you check every trip, is worth the money.
- Long highway trips: hub heat matters most. Any good setup works if it is adjusted right and checked at every fuel stop.
- Trailer sits most of the year: grease is usually the better choice than oil, per BoatUS.
- Old hubs, pitted bearings or a spun race: a complete new hub kit is often cheaper and faster than rebuilding.
Before you buy anything, look for the axle maker's label or stamp (often on the axle tube) and the trailer's certification label (usually on the tongue). Write down the axle make and rated capacity. Then pull one hub (see our wheel bearings guide) and record:
- The numbers stamped on the inner and outer bearings and on the seal
- Whether the spindle end has a grease fitting (grease-through) or is plain
- The wheel bolt pattern (number of studs and their spacing)
- Whether the hub is a plain hub or a hub-drum (trailer with brakes)
- Whether the hub body itself has a grease fitting (some trailer hubs do, often hidden behind the wheel)
The cap must match the spindle. A dust cap with a rubber plug in the middle is made for grease-through spindles: the plug gives the grease gun access to the fitting on the spindle end. On a plain spindle with no fitting, that cap does nothing extra; that's where a spring-loaded bearing protector belongs. Owners mix these up often.
Take photos. Bring the old parts to the store if you can. Bearings and seals are matched sets; "close enough" is how hubs fail.
Clean the spindle and look closely. A new hub will not survive on a bad spindle. Stop and plan an axle repair or replacement (step 11) if you see:
- Scoring or grooves where the bearings sit
- Blue or straw-colored heat marks
- A bearing race welded or worn into the spindle
- Damaged threads for the spindle nut
- A seal surface that is pitted or rusty
Light surface rust that cleans off is usually fine.
Dexter's pre-greased kits are a good example of what a complete kit includes: hub (or hub-drum) with the seal and greased bearings already installed, both E-Z Lube and standard grease caps, spindle hardware and lug nuts. Dexter says having the seal and bearings pre-installed saves about 30 minutes per hub, and its light-duty kits cover axles from 2,200 to 7,000 lb. Whatever brand you buy, confirm:
- It fits your spindle and bearing numbers (or your axle model)
- The bolt pattern matches your wheels
- It is rated for your axle's capacity
- The cap style suits your choice (protector, E-Z Lube cap or oil cap), and a bearing protector matches the hub's cap bore (measure it; protectors come in several diameters, and buyers often order the wrong one)
- For braked trailers, the drum matches your brake size and type
Galvanized or otherwise corrosion-resistant hubs are worth it for salt water.
Dexter warns against mixing lithium, calcium, sodium and barium-complex greases because some do not get along. If you switch grease type, clean out all of the old grease first. Pre-packed kits come filled with the maker's grease; use the same type when you top up, or check with the kit maker.
Switching an oil-bath hub to grease, or the reverse, is more than changing the cap. The seal, cap and sometimes the hub itself are different. The simplest and most reliable path is usually a complete new hub kit of the type you want. If you plan to convert the parts you have, follow the hub maker's conversion instructions and use their seal and cap.
With the trailer safely supported and the old hub off:
- Wipe the spindle clean and put a light film of the approved grease on the bearing and seal surfaces.
- Slide the new hub straight on, keeping it square so the seal lip is not damaged on the spindle threads.
- Install the outer bearing (if it is packed separately), the washer and the nut.
If your new hub is not pre-packed, pack the bearings fully by hand first. Do not just smear grease on the outside.
This is the step that makes or breaks the job. Too tight and the bearings run hot; too loose and the wheel wobbles and the bearings hammer themselves apart. Axle makers use different nuts and retainers, and each has its own procedure (some include a torque value). Follow the instruction sheet that came with the kit or your axle's service manual to the letter.
When you are done the hub should turn smoothly with no roughness, and you should feel no rock when you grab the hub (or tire) at the top and bottom. Lock the nut with a new cotter pin or the retainer the maker specifies. Never "add a bit" past the locking position to make the pin line up.
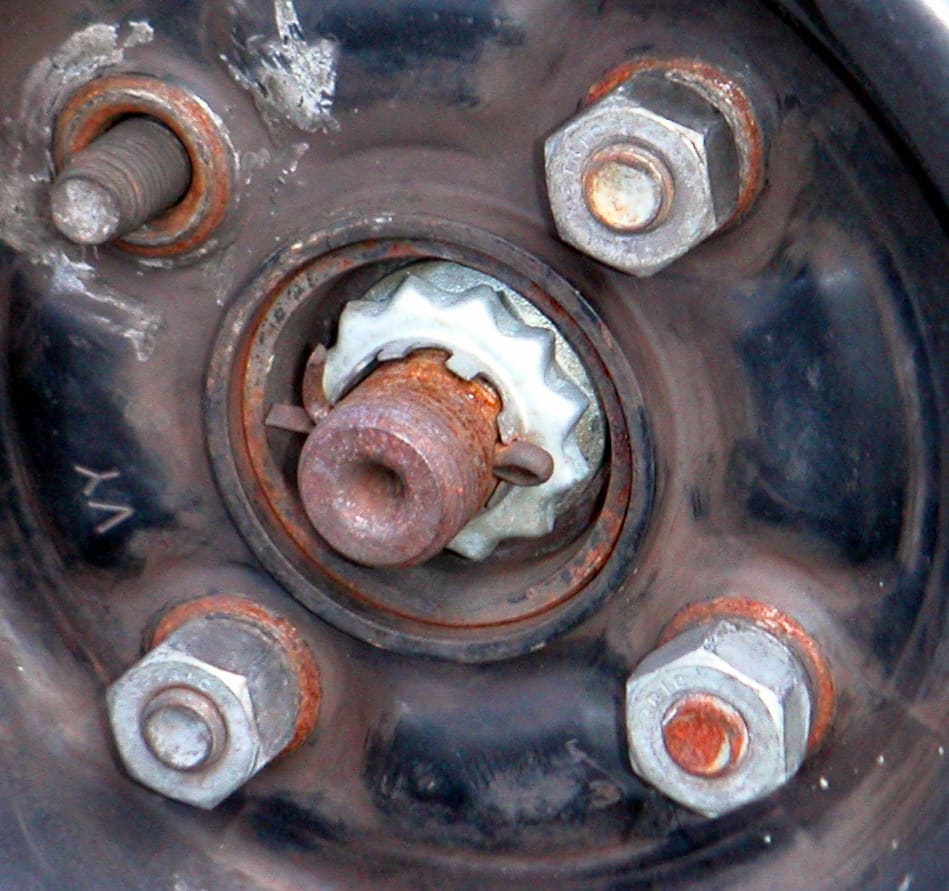
What's under the dust cap: spindle nut, locking retainer and cotter pin. This one is on a car, but many trailer hubs lock the nut the same way. Note the rusted studs and the missing lug nut. Photo: Polyparadigm / Wikimedia Commons · CC BY-SA 3.0 - Bearing protector: use a hand grease gun and add grease slowly until the spring-loaded piston just starts to move out. Stop there. Overfilling can push grease past the inner seal.
- E-Z Lube or other grease-through spindle: Dexter's method is to remove the rubber plug, seat a manual grease gun fully on the fitting, and pump slowly while turning the hub until clean grease appears around the nozzle; then wipe off the excess and refit the plug. Dexter warns that air-powered guns can push grease past the seal or even dislodge it. On E-Z Lube axles, Dexter also says that if a hub has been removed, the seal must be replaced before you grease it, to keep grease off the brakes.
- Oil-bath: fill with the oil type the hub or axle maker names (Dexter specifies hypoid gear oil) to the level mark on the clear cap, through the fill plug in the hub or the rubber plug in the cap. Wipe the cap clean so you can read it later.
Fit the wheels, snug the lug nuts in a star pattern and torque them to the value in your trailer or axle manual. Lower the trailer. Tow a few miles, stop, and feel each hub with the back of your hand: warm and similar is good. One hub much hotter than the others means stop and recheck adjustment (and brakes on braked trailers). Recheck lug nut torque after the first short drive and again as your trailer maker advises. Look behind each wheel for grease or oil leaking past the seal.
New hubs will not fix:
- A damaged spindle (step 3). On many straight axles the spindle is welded on, so the fix is often a new axle.
- A bent axle or spindle. Uneven or fast tire wear, a trailer that tracks to one side, or a wheel that leans at the top are clues. Note that many trailer axles have a slight built-in arch on purpose so the tires sit flat when loaded; that arch is normal. A shop can measure camber and alignment.
- Heavy rust on the axle tube, spring seats or springs, especially rust that flakes or pits deeply.
- An axle rated too low for the boat, motor, fuel and gear. Weigh the loaded rig and compare with the axle and tire ratings on the trailer label.
- A worn torsion axle (rubber suspension inside the tube) that has sagged so the trailer sits low or bottoms out.
When you order a replacement axle, the supplier will typically ask for the axle's rated capacity, the hub face to hub face width, the spring center to spring center distance, the spring type and the bearing numbers. Measure twice.
Record the date, hub brand, bearing and seal numbers and the grease or oil used in your BoatMend log. Keep the kit instruction sheet with the trailer papers. Then set a reminder to pull and inspect the bearings on your axle maker's schedule, and to check hub heat and cap condition every trip.
Common mistakes
- Thinking E-Z Lube or oil means "never touch it again." Dexter says plainly these do not replace inspection.
- Pumping grease with an air gun, or pumping a protector every launch "just in case," until the inner seal blows out and grease coats the brakes or the back of the wheel.
- Ignoring a protector's rubber cover (the "bra") that keeps popping off. Hot hubs push the piston out; a cover that won't stay on is often sun-cracked or the protector's seal is worn. Replace the cover or the protector, and compare hub temperatures at the next stop (step 10) to make sure that hub isn't running hot.
- Fitting sealed "never grease" bearings made for camper or utility trailers. Some, like Dexter's NEV-R-LUBE, are not meant to be dunked at the ramp.
- Treating the protector's grease as the bearing service. BoatUS points out that topping up a bearing protector before launching keeps water out, but it is not the same as cleaning, inspecting and repacking the bearings themselves on the regular schedule. Sources differ on how often: BoatUS writers say every season or every couple of thousand miles, while Mercury notes that with a protector a full repack may only be needed every few years. Follow the axle and protector makers' schedule, and pull a hub sooner if you see milky grease, heat or noise.
- Blaming the bearings for every hot hub. BoatUS notes a dragging brake shoe or pad can make a hub hot too; grease on the hull or frame near a wheel, or a cap that suddenly falls off, points to heat and pressure inside that hub.
- Buying a hub by bolt pattern alone. The bearings, seal and spindle size must all match.
- Mixing grease types when topping up a pre-packed hub.
- Over-tightening the spindle nut like a lug nut, or backing it off too far to line up the cotter pin hole.
- Ignoring a scored spindle and expecting a new hub to last.
- Choosing oil-bath hubs for a trailer that sits most of the year, then finding rusted bearings in spring.
- Backing hot hubs straight into cold water after a long drive. Give them a few minutes to cool when you can.
When to call a pro
- The spindle is scored, heat-damaged or has damaged threads, or a bearing has welded itself to it
- You suspect a bent axle or spindle, or the trailer tracks crooked
- The trailer has surge or electric brakes and the drum, shoes or brake lines need work
- You need a new axle, or want to raise the trailer's capacity (springs, tires, frame and certification label all matter)
- You are not certain the bearing adjustment is right; a trailer shop can check it quickly
- A hub smokes, smells hot or wobbles on the road: pull well off the highway, put on your hazards and call roadside help (BoatUS Trailer Assist or your auto club) rather than driving on
Tips
- Buy one extra complete pre-packed hub (with cap, nut, washer and cotter pin) and carry it with a jack, lug wrench and pliers. A roadside swap beats a tow.
- Before the season, loosen and refit each lug nut even if you aren't touching the hubs. A BoatUS writer broke three studs on corroded nuts; penetrating oil and a soak first, or a shop with an impact wrench, beats finding that out at the roadside. Then torque them to spec again.
- Write the install date on a piece of tape inside the trailer tongue or toolbox.
- Carry an infrared thermometer to compare hub temperatures at fuel stops; it is easier than touching hot parts.
- If one hub keeps getting milky oil or wet grease, replace that seal and check the spindle seal surface; don't just keep topping it up.
- Rinse hubs, caps and brakes with fresh water after salt water launches. Mercury's advice: pressure wash the tires, wheels and brakes if you like, but keep the high-pressure jet off the hub itself so you don't force water past the seal.
- Checking a protector is quick: press on the edge of the piston. Mercury's rule of thumb is that if it rocks slightly, there's enough grease; if it won't move, add grease with a hand gun until the piston just starts to move out.
- The rubber plug in an E-Z Lube style cap only keeps dirt off the grease fitting. Owners often find them cracked or loose after a few seasons; replace a worn plug, but don't count on it to keep water out of the bearings.
Official references
We read these to write this guide. Your engine's own manual always wins.
- Dexter Group – Proper Bearing Lubrication Type (grease, oil and E-Z Lube)
- Dexter Group – Dexter's Pre-Greased Trailer Hub Replacement Kit
- Dexter Group – Grease & Oil Caps (E-Z Lube, NEV-R-LUBE, Vortex, Trailer Buddy)
- Dexter Group – Pre-Greased Hub & Drum Kits
- BoatUS – Greasing the Wheels
- BoatUS – 12 Steps to Repacking or Replacing Your Bearings
- BoatUS – Keeping Bearings and Brakes Tight (2014)
- BoatUS – Hubs and Bearings (2013)
- Mercury Marine – Quick Tip, How to Check and Add Grease to Trailer Wheel Bearings
- Mercury Marine – 5 Tips for Cleaning a Freshwater Boat Used in Saltwater
- Mercury Marine – Basic Boat Trailer Maintenance
- Discover Boating – Boat Trailer Tips
Safety: BoatMend is for information only and does not replace a certified marine technician. You are responsible for your safety and your boat. Read the full disclaimer.
Last updated 2026-10-24
Related guides
How to Inspect and Repack Boat Trailer Wheel Bearings
Check, clean and repack your trailer's wheel bearings so a seized hub does not leave you stranded on the highway. Boat trailers get dunked in water every launch, which makes their bearings fail far more often than those on dry utility trailers.
How to Inspect, Inflate and Replace Boat Trailer Tires
Check your trailer tires the way the pros do: the right type (ST), the right load range, the right cold pressure, and an honest look at their age. Tires are the number one reason boat trailers end up on the side of the highway.
How to Check and Care for Boat Trailer Surge Brakes
Understand how the hydraulic surge brakes on your boat trailer work, check the fluid, use the reverse lockout correctly and rinse salt out of them after every dunk. Simple habits that keep the brakes from seizing, dragging or failing when you need them.
Get Your Boat Ready for the Road: Pre-Trailering Checklist
Most trailering trouble starts in the driveway: an engine left without support, a loose strap, a cover that balloons at 60 mph, gear that blows out or tongue weight that makes the rig sway. Work through this checklist before every trip and do a quick walkaround at each stop.

Launch Day and Haul-Out Checklist for Trailer Boats
A step-by-step checklist for getting your boat off the trailer and back on again safely and quickly, from the drain plug and tie-downs to the blower and ramp etiquette. Following it in order prevents the classic mistakes that sink boats and back up the ramp.
How to Adjust and Replace Trailer Bunks and Rollers So Your Boat Sits Right
Set up your boat trailer so the hull is supported in the right places: bunks and rollers clear of the strakes, the transom fully supported, the bow snug against the winch stop and the weight balanced on the tongue. Also covers replacing rotten bunk boards and worn carpet or rollers.