How to Inspect, Inflate and Replace Boat Trailer Tires
Check your trailer tires the way the pros do: the right type (ST), the right load range, the right cold pressure, and an honest look at their age. Tires are the number one reason boat trailers end up on the side of the highway.
Time
45 min
Shop would charge
$40-120
Applies to
All engines
Safety first: A trailer tire can fail with almost no warning at highway speed. If a tire is bulging, has cords showing, or the trailer starts to sway or pull, slow down gently, don't slam the brakes, and pull well off the road with your hazards on. Change a tire only on flat, solid ground, far from traffic, with the tow vehicle in park, the wheels chocked and a jack stand under the frame. If you are on a busy highway shoulder, call roadside help (such as TowBoatUS Trailer Assist or your auto club) instead.
Owners often ask
- My trailer tires still have plenty of tread. How do I know if they're too old to trust?
- What air pressure should I run in my boat trailer tires?
This guide walks you through it. Still stuck? Ask the AI Mechanic about your engine.
Tools
- Accurate tire pressure gauge that reads up to at least the pressure on your sidewall
- Portable air compressor or access to a shop air line
- Flashlight
- A penny or a tread depth gauge
- Wheel chocks
- Torque wrench and the right socket for your lug nuts
- Jack and jack stand rated for your trailer (for the spare and lug nut check)
Parts & supplies
- Valve stem caps
- Replacement tires of the same type, size and load range (when needed)
- New valve stems when tires are replaced
Before you start
Boat trailer tires rarely wear out. They age out. A trailer can sit for months, then run at highway speed with a full load, then get dunked at the ramp. That is hard on rubber.
ST, LT and passenger tires. A tire made for a trailer has ST (Special Trailer) at the start of the size, or the words "For Trailer Use Only." ST tires have stiffer sidewalls built for the side loads a trailer puts on a tire in turns. BoatUS, Discover Boating and most trailer makers say a boat trailer should run ST tires. Passenger (P) tires are not meant for trailer service. Some owners run LT (light truck) tires; if you do that, the replacement still has to meet or beat the load capacity on your trailer's placard, and you should check with the trailer maker first.
Where the right numbers live. Don't guess and don't use a number from a forum. Look in two places:
- The trailer's capacity placard or VIN sticker (usually on the left front of the tongue or frame). It lists the original tire size and the recommended cold inflation pressure.
- The tire sidewall. It shows the size, the load range letter, the maximum load and the maximum pressure for that tire.
If the two disagree, or the tires are not the original size, ask a tire shop or the trailer maker which pressure to run.
How often: check pressure before every trip (and the spare). Look over the tread and sidewalls before every trip. Do the full inspection in this guide at the start of each season and before any long tow. Dexter, a major axle maker, suggests checking pressure weekly while you are towing regularly. Confirm the schedule for your trailer in its manual.
Steps
Find the size (for example, a code starting with ST), the load range letter (B, C, D, E and so on: higher letters carry more weight and usually need more pressure), the maximum load and the maximum inflation. Then find the placard on the trailer. Write the placard's cold pressure and tire size in BoatMend so you have it at the ramp.
All the tires on the trailer, spare included, should be the same type, size and construction. Never mix radial and bias-ply tires on the same trailer.
Check before you drive, or after the trailer has sat for a few hours. Pressure climbs as the tire warms up, so a reading taken after a drive will look too high. Remove the cap, press the gauge on firmly, and compare with the placard (or the tire maker's guidance if you have non-original tires).
Discover Boating notes that tires naturally lose a pound or two of pressure a month, so a trailer that sat all winter is almost always low. Trailer tires usually need much more pressure than car tires. Mercury and Discover Boating both note it can be 60 psi or more, so a cheap car gauge may not even read high enough. Don't judge pressure by eye: a stiff trailer tire can be badly low and still look fine.
Fill to the placard pressure. Never go over the maximum pressure molded on the sidewall, and never over the pressure rating of the wheel. Recheck with the gauge after filling. Put the caps back on.
Low pressure is the number one cause of trailer tire failures: the tire flexes too much, heats up and can come apart. Overinflation is not the fix either. It makes the tire easier to damage on a pothole or curb.
With the tire inflated, wet the valve stem with soapy water or press it sideways with a finger and listen. Bubbles or a hiss mean a leaking stem or core. Old rubber stems crack too. A slow leak you keep "topping off" is often the stem.
On one side of each tire is a code that starts with DOT. The last four digits are the build date: the first two are the week, the last two are the year. 3517 means the 35th week of 2017. Very old tires may show only three digits, which means they were built before 2000 and are long overdue.
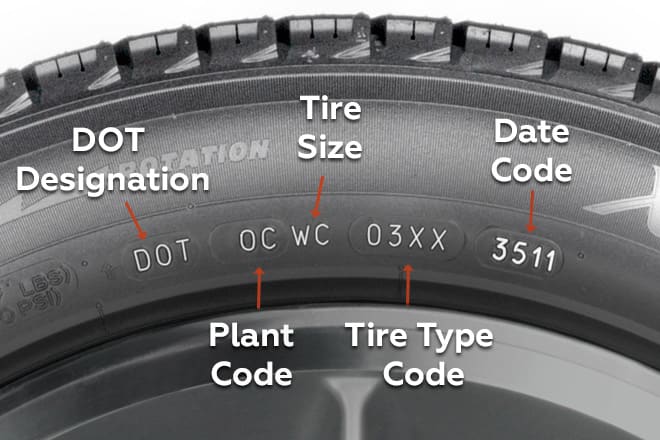
Photo: Chrismeraz / Wikimedia Commons · CC BY-SA 4.0 Check all of them, including the spare. The code may be on the inside face of the tire only, so look on both sides.
Tires age even when they sit in the garage, and the tread will usually look fine long after the rubber has gone weak. Discover Boating's checklist says tires more than six years old should be replaced, citing the National Transportation Safety Board. Many tire makers and trailer shops suggest replacing trailer tires sooner, often somewhere between three and six years, especially if the trailer lives outdoors in the sun. There is no single legal limit. Use the age, the storage conditions and the condition you find in the next steps together, and when in doubt, replace. Check your tire maker's own guidance.
Look closely at both sidewalls and the bottom of the tread grooves in good light. Replace the tire if you see:
- Fine "spiderweb" cracks in the sidewall or between the tread blocks (dry rot or ozone cracking)
- Bulges, blisters or a wavy sidewall
- Cuts or gouges deep enough to show cord or fabric
- Scuffed or chewed sidewalls from curbs or the fender
BoatUS calls spiderweb cracking evidence of dry rot and imminent failure. Don't wait to see if it holds.
Put a penny upside down in a tread groove. If you can see the top of Lincoln's head, the tread is worn out. Then look at how it wore:
- Center worn more than edges: usually overinflation
- Both edges worn: usually underinflation
- One edge, or one tire much worse than the others: a bent axle, bad alignment or a bearing problem. Have the axle checked before you put new tires on, or the new tires will wear the same way.
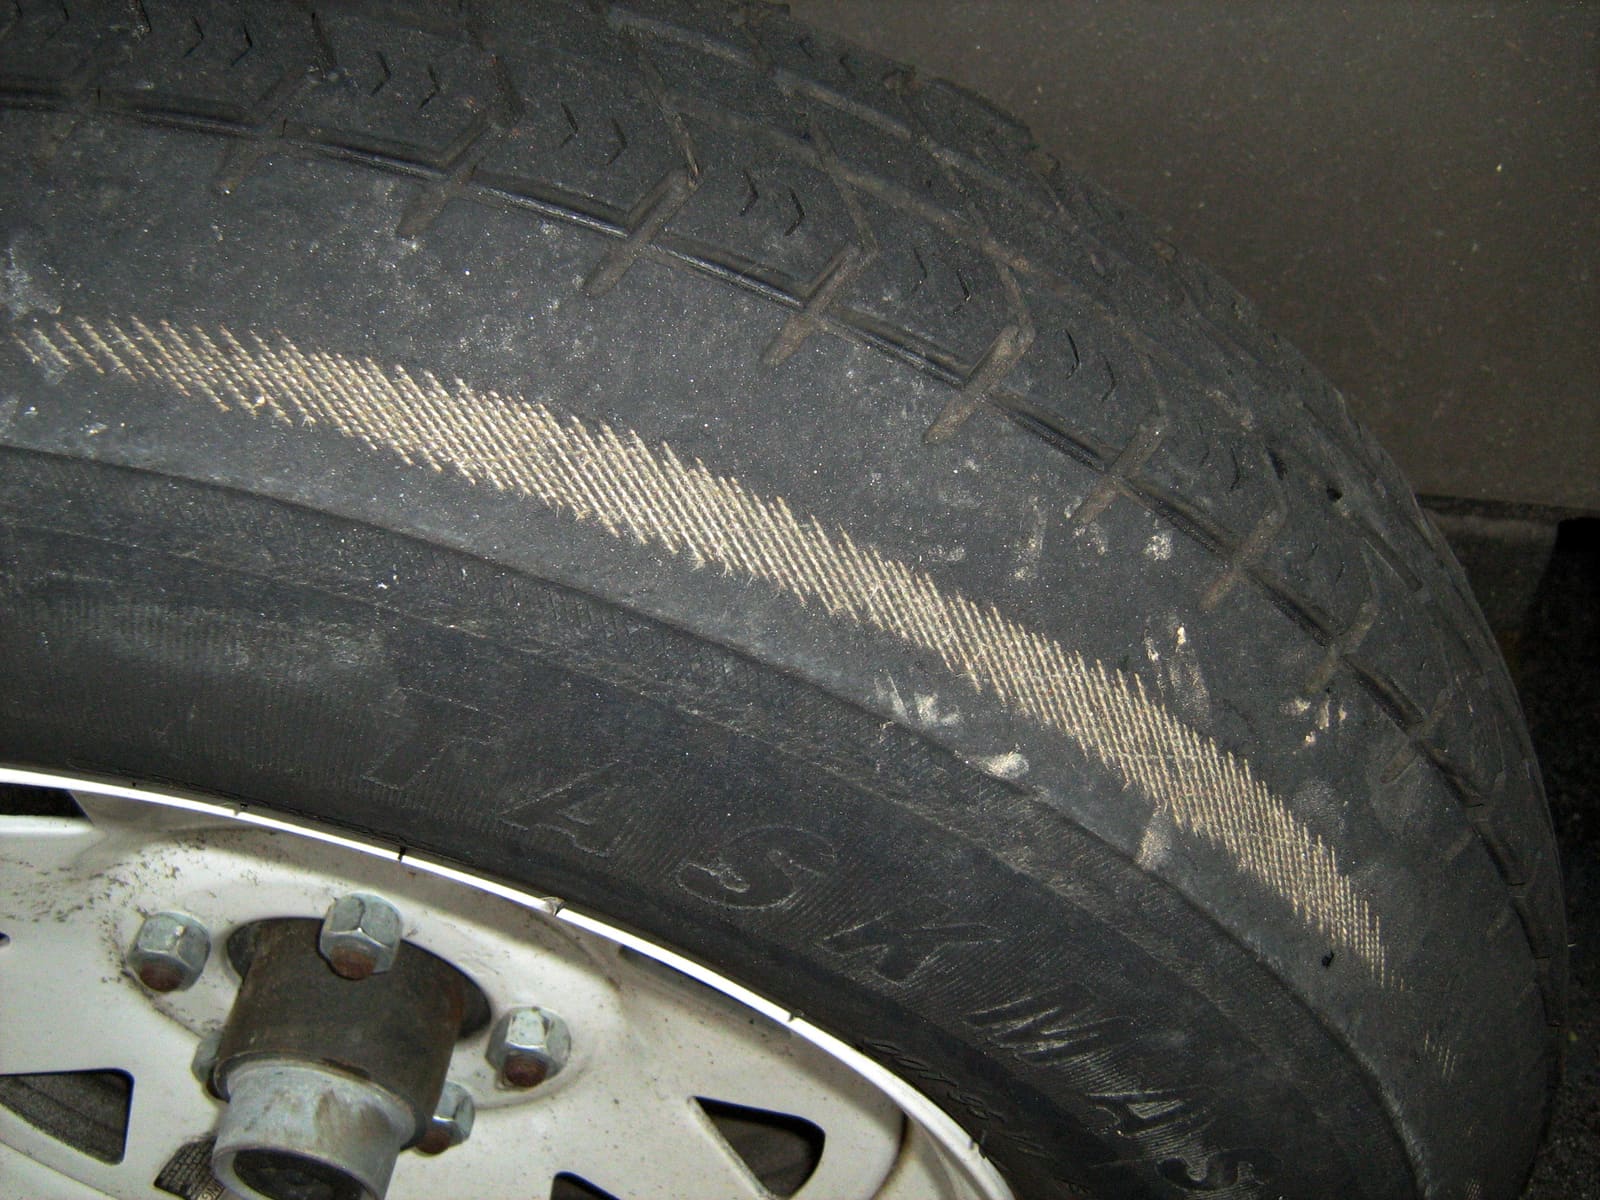
Photo: CZmarlin (Christopher Ziemnowicz) / Wikimedia Commons · Public domain Your loaded rig (boat, motor, fuel, gear and the trailer itself) has to be within what the tires can carry. The total is the load rating on each sidewall times the number of tires, but tandem and triple axles carry less than that simple math suggests, so use the trailer placard and the tire maker's load tables, not a rule of thumb. Weigh the whole loaded rig on a public scale (truck stops and some landfills have them) at least once. Many owners find their boat is heavier than the brochure said. If you're over or close to the limit, talk to a tire shop about the next load range up, and make sure the wheels are rated for it too.
The spare must be the same size and type as the road tires, on a wheel that fits your hubs, inflated to the same pressure and not older than the tires it would replace. Check that its carrier is tight. Pack a jack that fits under your trailer's frame, a lug wrench that fits your nuts, and wheel chocks.
With the trailer on the ground and the wheels chocked, check each lug nut with a torque wrench set to the value in your trailer or axle manual (it depends on the wheel, the nut style and the stud size; don't use a car number). Tighten in a star pattern. Dexter explains that trailer wheels need to be re-torqued several times after they are mounted until the torque stabilizes; follow your trailer maker's re-torque schedule after any wheel or tire change. Never over-tighten: that can damage the wheel.
Switching wheels? Dexter warns that aluminum wheels are thicker where they bolt on and may leave too little stud for the nut to grip, so check stud length and the torque with the wheel maker. Any tire you mount must be approved for that rim size, and neither its load capacity nor its inflation pressure may exceed the wheel's own rating. A mismatched tire and wheel can separate violently.
Between trips, keep the tires out of the sun with tire covers or a shaded spot. BoatUS warns that parking on grass for a long time lets moisture get into the rubber. Park on concrete, or on boards or plywood. For long layups, check the pressure every few weeks and roll the trailer a little now and then so the same spot doesn't carry the load all winter.
Common mistakes
- Judging tires by the tread. Boat trailer tires almost always age out before they wear out. Check the date code.
- Putting a car tire on as the spare or mixing radials with bias-ply tires.
- Setting pressure from the tow vehicle's door sticker or from a number you read online. The trailer placard and the tire sidewall are the only numbers that apply.
- Checking pressure at the ramp after a long drive. Hot tires read high, so you'll think they're fine when they were low.
- Buying new tires with a lower load range because they were cheaper or in stock.
- Forgetting the spare until the day you need it and finding it flat, cracked or the wrong size.
- Skipping the lug nut re-check after a tire shop mounts new wheels.
When to call a pro
- A tire is bulging, has cords showing, or has separated
- One tire wears much faster than the others or the trailer pulls to one side (possible bent axle or alignment problem)
- You need to change to a different size, load range or wheel and aren't sure what your axle, wheels and fenders allow
- Lug studs are stripped, broken or rusted to the nuts
- You can't safely lift the trailer, or the rig is too heavy for your jack
- Any wheel bearing or brake problem shows up while you're checking tires (see the related guides)
Tips
- Replace tires as a set on the same axle, and record each tire's DOT date in BoatMend so you get a reminder when it's due.
- A tire pressure monitoring system made for trailers lets you watch pressure and temperature from the driver's seat. It's not a substitute for the cold check before you leave.
- Most ST tires carry a speed limit lower than car tires (65 mph has long been common). Check the speed rating on your tire's sidewall or the maker's website and tow at or below it.
- Air pressure drops as the weather cools. Recheck in the fall and after the trailer sits over the winter.
- Rinse the wheels and lug nuts with fresh water after salt water launches so the nuts don't rust tight.
- Trailer tires get recalled too. NHTSA's tire page has a recall search; register new tires with the maker (the shop usually gives you a card or link) so you hear about a recall.
Official references
We read these to write this guide. Your engine's own manual always wins.
- BoatUS – 11 Things To Know About Boat Trailer Tires
- Discover Boating – Basic Boat Trailer Maintenance Checklist
- Mercury Marine – Basic Boat Trailer Maintenance
- West Marine – DIY Safe and Trouble-Free Boat Trailering
- Dexter – General Frequently Asked Questions (wheels, tires and re-torque)
- eCFR – 49 CFR 574.5, Tire identification requirements (DOT date code)
- NHTSA – Tire Safety (TireWise) and tire recalls
Safety: BoatMend is for information only and does not replace a certified marine technician. You are responsible for your safety and your boat. Read the full disclaimer.
Last updated 2026-10-24
Related guides
How to Inspect and Repack Boat Trailer Wheel Bearings
Check, clean and repack your trailer's wheel bearings so a seized hub does not leave you stranded on the highway. Boat trailers get dunked in water every launch, which makes their bearings fail far more often than those on dry utility trailers.
How to Check and Care for Boat Trailer Surge Brakes
Understand how the hydraulic surge brakes on your boat trailer work, check the fluid, use the reverse lockout correctly and rinse salt out of them after every dunk. Simple habits that keep the brakes from seizing, dragging or failing when you need them.
How to Inspect and Use the Trailer Winch, Strap, Tie-Downs and Safety Chains
Check the winch, strap or cable, bow safety chain, transom tie-downs and the safety chains to your vehicle, and learn how each one is meant to be used. These parts keep the boat on the trailer and the trailer behind your truck.
How to Fix Boat Trailer Lights That Flicker, Dim or Don't Work
Track down the real cause of dead or flickering trailer lights, from a bad ground to a corroded plug, and fix it so the repair lasts. Working brake, turn and tail lights are required by law and keep the driver behind you from rear-ending your boat.

Launch Day and Haul-Out Checklist for Trailer Boats
A step-by-step checklist for getting your boat off the trailer and back on again safely and quickly, from the drain plug and tie-downs to the blower and ramp etiquette. Following it in order prevents the classic mistakes that sink boats and back up the ramp.