How to Inspect Sailboat Chainplates for Leaks, Cracks and Hidden Corrosion
Check every chainplate above and below deck for leaks, rust, cracks and a wet deck around it, reseal the ones that leak, and know when the plates need to come out for a proper look. Chainplates tie the mast to the hull, and one hidden failure can bring the rig down.
Time
2 h
Shop would charge
$300-2500
Applies to
All engines · Sailboat
Safety first: Never loosen or remove a chainplate while the mast is up without first supporting the mast from another point. With a shroud or stay disconnected, the rig can come down. Pulling chainplates is a job for a rigger, or for an experienced owner working with a rigger's plan, ideally with the mast unstepped. Don't sail a boat with a cracked chainplate, heavy rust at the deck, or a rotten bulkhead under a chainplate: a single failure can drop the mast on the crew. Stay off the boat's rig and out from under the mast if something looks badly wrong, and get a rigger or surveyor aboard.
Owners often ask
- My chainplates leak every time it rains. Do they have to come out?
- How do I know when my sailboat's chainplates need replacing?
- My chainplates disappear into a glassed-in bulkhead. Do I have to pull them out to inspect them?
This guide walks you through it. Still stuck? Ask the AI Mechanic about your engine.
Tools
- Flashlight or headlamp and a small inspection mirror
- Magnifying glass
- Gray nylon scrub pad (no steel wool)
- Phone camera with a close-up setting
- Screwdrivers and wrenches to remove interior trim panels
- Plastic mallet or screwdriver handle for tap testing
- Plastic scraper and razor blades (for resealing)
- Notebook or your BoatMend log
Parts & supplies
- Bedding sealant suited to chainplates (see step 9)
- Acetone or the solvent the sealant maker lists
- Painter's tape
- Cotter pins or rings to replace any worn ones
Before you start
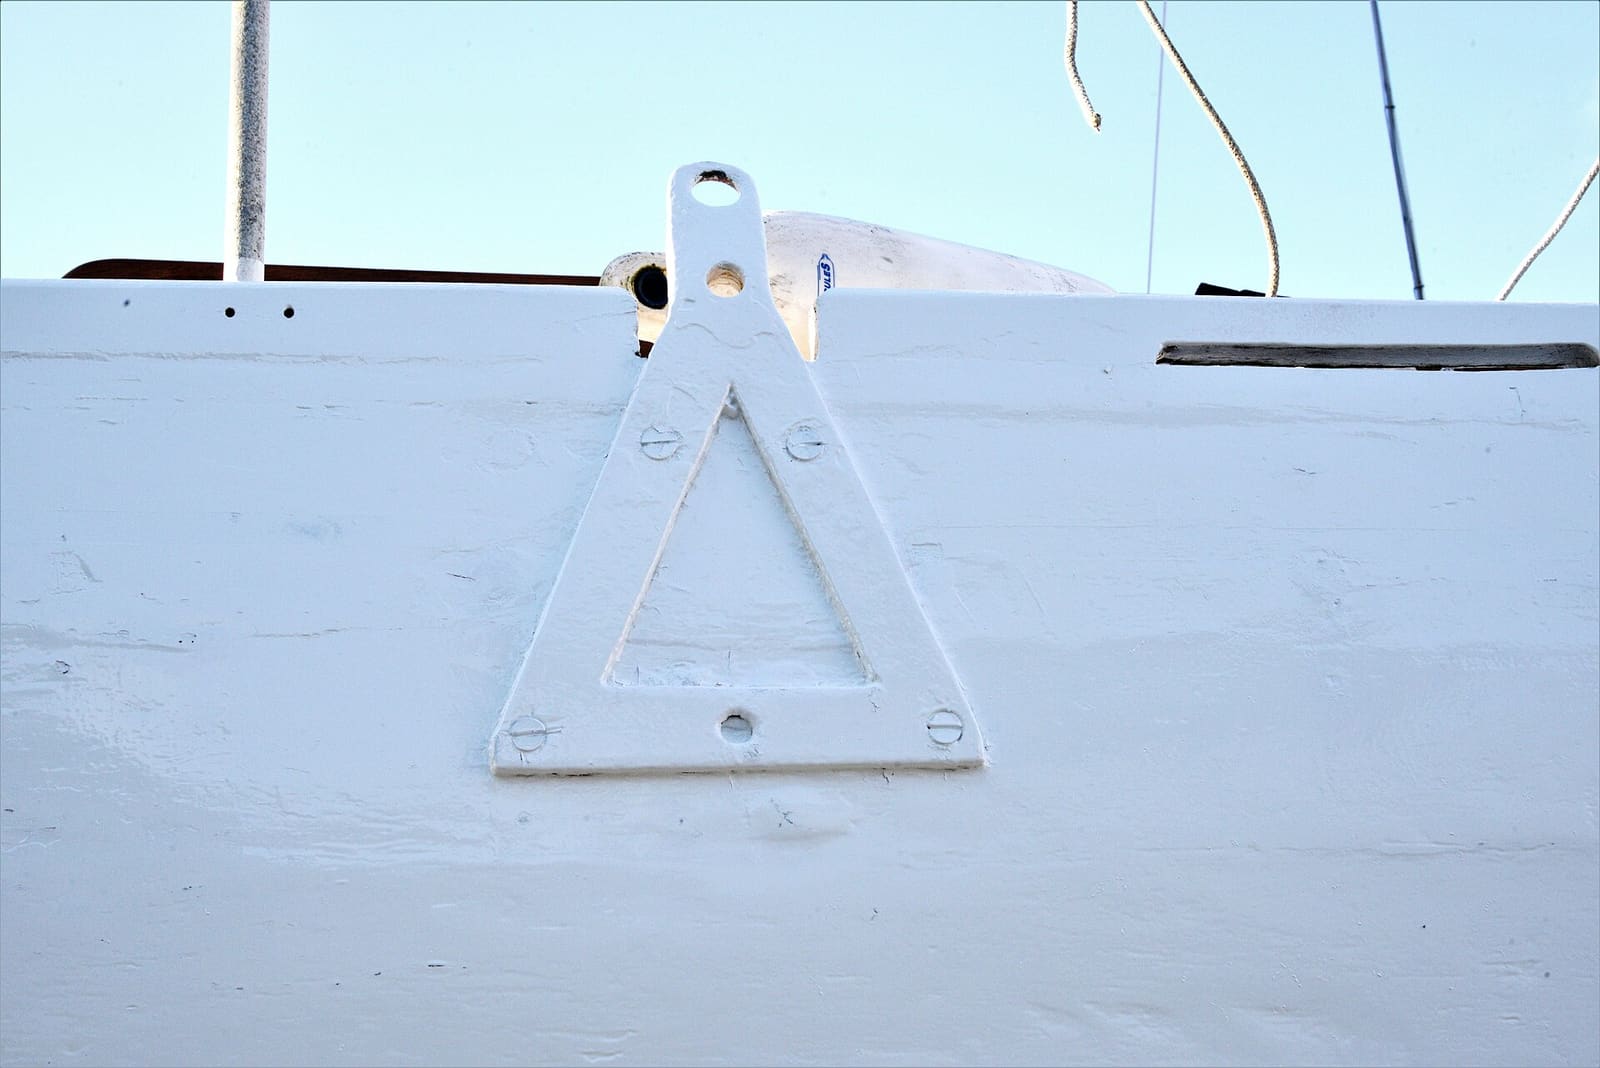
What chainplates do: they are the metal straps (usually stainless steel) that connect each shroud and stay to the hull. Some bolt to the outside of the hull, some come up through the deck and bolt to a bulkhead or knee below, and some are glassed into the hull or a bulkhead.
Why they fail out of sight: stainless steel needs oxygen to protect itself. BoatUS and Practical Sailor both explain that where a chainplate passes through the deck or sits against a wet bulkhead, trapped salt water with no oxygen causes crevice corrosion. The part you can see can look clean and shiny while the hidden part is eaten away. In one BoatUS claim, a 28-foot sailboat lost its mast to a chainplate that was shiny on top and badly corroded below deck.
Why they leak: BoatUS calls chainplates almost impossible to keep permanently watertight, because the rig loads them and they move a little every time the boat sails. That water rots deck core and the bulkheads that hold the chainplates.
How often: a careful look every season, and before any long passage. Practical Sailor suggests a professional rig survey every three to five years for offshore boats. Typical; confirm with your rigger.
Insurers and surveys: some insurers and surveyors ask about the age of the standing rigging and chainplates, or want a rigger's report on older boats. Requirements vary a lot between companies. Read your policy's rigging or survey clause and ask your agent before you assume what applies.
Steps
Count the chainplates on each side and at the bow and stern, and photograph each one on deck. Note the type (through-deck, external on the hull, or glassed in). This list is what you'll compare each year.
Wipe each chainplate and gently scrub any rust with a gray nylon pad. BoatUS stresses that anything more than light rust staining can be a sign of crevice corrosion; you need to see bare metal. Never use steel wool on stainless; it leaves particles that rust.
Look closely, especially at the edges and around the pin hole:
- Hairline cracks, particularly just above the deck and around the clevis pin hole
- Pitting or rust "blooms" along the edges
- A clevis pin hole that has stretched into an oval
- A chainplate that is bent or not lined up with its shroud (Practical Sailor lists bad lead angle as a warning sign)
- Missing or worn cotter pins in the turnbuckle and toggle
Photograph anything suspicious with the camera in close-up mode, then enlarge it later on a bigger screen.
Photo: Prillen / Wikimedia Commons · CC BY-SA 3.0 Look at the sealant or cover plate where the chainplate goes through the deck. BoatUS says it should not be cracked, peeling or pulled away. Gaps, dark staining and dried-out sealant all mean water is getting in.
Tap around each chainplate with a plastic mallet and compare the sound with deck farther away. A dull thud, flexing or gelcoat cracks around the chainplate point to wet or rotten core. See /guides/deck-core-moisture.
Remove trim panels or liners to see where each chainplate bolts on below. Look for:
- Water stains, dark wood, soft or delaminated plywood on the bulkhead
- Rust streaks running down from the chainplate
- Cracks or rust at the edges of the plate and around its bolts
- Bolts that look loose or nuts that are rusted
A rotten bulkhead can let go and release the chainplate even if the metal is sound. BoatUS treats this as just as serious as a cracked plate.
BoatUS warns that painting chainplates hides corrosion; by the time rust shows through the paint, the plate needs replacing. If yours are painted, look extra hard at any bubbling or rust spots and ask a rigger to check them.
If a chainplate is fully glassed into the hull or a bulkhead, you can't see it. Don Casey (SAIL) explains that a leak can leave its base sitting in stagnant water, which is exactly when corrosion starts. X-ray and ultrasonic testing exist but are costly and not certain. His advice is that the reliable fix is to open up the encapsulation, inspect, and attach new or existing plates in a way that can be seen in future. Plan this with a rigger or surveyor.
Small leaks at the deck can often be fixed by resealing the deck opening without removing the chainplate, but the rig must be safe:
- Ask a rigger first if you are unsure. Only work on one chainplate at a time, with the mast supported by a halyard or temporary stay led to a strong point if you must slack its shroud.
- Remove the cover plate (if any), dig out the old sealant completely, clean with the sealant maker's solvent and let it dry.
- If the hole is open to wet core, the core needs sealing first (see /guides/deck-hardware-rebedding for the epoxy fill method).
- Rebed with a flexible sealant meant for hardware that moves. Owners and riggers commonly use butyl tape or polysulfide; avoid silicone, which doesn't keep water out long term and leaves residue new sealant won't stick to. Check what your rigger or the sealant maker recommends.
- Water-test with a hose afterward.
Chainplates should come out for a full inspection (and possibly polishing, dye testing or replacement) when:
- You find any crack, deep pitting, or more than light rust staining at the deck or below
- The bulkhead or knee is wet, stained or soft
- The boat is older and the chainplates have never been pulled. BoatUS's rigging author, marine surveyor Dylan Bailey, says that if you want to be sure, he would replace them after about 20 years of service, or sooner if there is any crevice corrosion, which can appear in under 15 years in harsh conditions.
- You are about to replace the standing rigging or head offshore
There is no single "replace by" age. Experts differ:
- Replace on age: Bailey (BoatUS) leans toward new plates at about 20 years. A Cruising World article quotes surveyor Ross Hubbard: on older boats he prefers pulling the plates completely and inspecting them under strong magnification with dye penetrant, rather than just looking at them in place, and any sign of leaking above or below deck means they should come out.
- Replace on condition: The Rigging Company, a rigging shop based in Annapolis, says to replace chainplates when there is damage or cracking, and to replace all of them if one shows wear (unless the damage clearly came from an impact). It lists extreme age, around 30 years or more depending on region and use, as only one factor, along with heavy miles such as a circumnavigation. It also suggests lifting, cleaning and resealing the deck cover plates every two to three years, give or take.
- What both views agree on: leaks are the real enemy. In the same Cruising World article, a rigger said most of the chainplates he inspects need replacing, mostly because of water getting in. Let your rigger or surveyor make the call for your boat.
Pulling chainplates means taking load off the mast. Have a rigger do it, usually with the mast unstepped or properly supported (see /guides/mast-stepping-unstepping).
Chainplates are part of the whole standing rigging system. Do the swage, wire and turnbuckle checks in /guides/sailboat-rigging-inspection at the same time.
Save your photos and notes in your BoatMend log, labeled by chainplate. Next season, compare side by side. Growing rust, new stains below or a sealant line that keeps cracking all tell you to schedule a rigger.
Common mistakes
- Judging a chainplate by the shiny part on deck. The hidden part at the deck and below is where it fails.
- Smearing new sealant over old. The leak continues under it and the core keeps rotting.
- Using silicone on chainplates.
- Slackening a shroud without supporting the mast.
- Painting over rust stains on chainplates.
- Ignoring a stained bulkhead because the chainplate itself looks fine.
When to call a pro
- Any crack, deep pitting, or a pin hole that has stretched
- A wet, soft or rotten bulkhead, knee or deck around a chainplate
- Glassed-in chainplates you can't see
- Any job that needs a chainplate removed or a shroud disconnected
- You are buying the boat, insuring an older boat, or preparing for offshore sailing: a rigger's survey is worth the cost
Tips
- Practical Sailor notes regular freshwater rinses help slow crevice corrosion on stainless hardware.
- After a hard sail in a breeze, check the overhead below each chainplate for fresh drips. Leaks show up most when the rig is loaded.
- Keep a record of when the chainplates and rigging were last replaced; buyers, surveyors and insurers ask.
Official references
We read these to write this guide. Your engine's own manual always wins.
- BoatUS – Inspecting Sailboat Rigging (chainplates above and below deck)
- BoatUS – Inspecting Older Sailboats (chainplate failure and deck core)
- Practical Sailor – Sailboat Do-It-Yourself Rig Survey
- Practical Sailor – Detecting and Dealing with Stainless-Steel Corrosion
- SAIL – Daisy Chain (Don Casey on inspecting encapsulated chainplates)
- BoatUS – Rebedding Deck Hardware
- Cruising World – Hidden Danger, Is Your Rigging Rotting? (chainplate inspection and replacement)
- The Rigging Company – Servicing The Chain Plates
Safety: BoatMend is for information only and does not replace a certified marine technician. You are responsible for your safety and your boat. Read the full disclaimer.
Last updated 2026-10-26
Related guides

How to Inspect Your Sailboat's Standing Rigging
A step-by-step owner's inspection of the wires, fittings, turnbuckles, pins, chainplates and mast that hold your rig up, plus how to decide when it is time for a rigger and new rigging. Includes what insurers commonly expect for older rigs.
How to Find and Fix Leaking Deck Hardware (Rebedding Cleats, Stanchions and Tracks)
Track down the cleat, stanchion base or track that is dripping into the cabin, then remove it, seal the deck core and bed it again with the right sealant so the leak stops for years instead of weeks. Catching it early protects the deck core from rot.
How to Find Soft Spots and Wet Core in a Fiberglass Deck
Tap, press and meter your deck to find wet or rotting core before it spreads, track down the leaking hardware that let the water in, and decide whether a small DIY injection repair will do or the deck needs a pro to recore it.
Stepping and Unstepping a Sailboat Mast: Trailer Sailers and Yard Cranes
How to raise and lower a sailboat mast safely, whether you step a trailer sailer's mast at the ramp or help the yard crane do it, including power-line checks, mast wiring, basic tuning afterward, and when to leave the job to the yard.
Sailboat Keel Bolts and the Keel-Hull Joint: Signs of Trouble and What to Do
Learn to spot the warning signs at your keel joint and keel bolts, from a "smile" crack and rust weeps to wet bilges and loose nuts, and what to check after any grounding. Explains why re-torquing, pulling bolts and dropping the keel are jobs for a surveyor and a yard.
How to Prepare Your Boat for an Insurance or Condition Survey
Get ready for a marine survey your insurer or lender asked for: what a SAMS or NAMS surveyor looks at, the common findings you can fix beforehand (hose clamps, seacocks, bilge, fire extinguishers, wiring), the paperwork to have ready, and how to handle the recommendations afterward.
How to Inspect a Used Boat Before You Buy
A step-by-step checklist for looking over a used boat, from paperwork and the hull ID number to the transom, engine, compression test, sea trial and trailer. Know what to check yourself, what the red flags mean, and when to pay a marine surveyor.
Marine Sealants Explained: 5200, 4200, 4000UV, Polysulfide, Silicone and Butyl Tape
Pick the right sealant before you bed a cleat, a through-hull, a window or a transducer. The wrong goo either leaks in a year or glues a part on so hard you damage the boat getting it off.