How to Touch Up Paint and Corrosion on an Outboard or Sterndrive
Bare aluminum on a lower unit or sterndrive corrodes fast, especially in salt water. Learn how to find the cause, clean off corrosion, prime and repaint with the right products, and what must never be painted, such as anodes and sensors.
Time
2 h
Shop would charge
$150-500
Applies to
Outboard, Sterndrive (I/O)
Safety first: Paint, primer and solvents are flammable and their fumes are harmful. Work outdoors or with strong ventilation, away from sparks and flames, and wear gloves, eye protection and a respirator rated for paint spray. Remove the key and kill switch lanyard (and on a sterndrive, turn off the battery switch) before you work near the prop. Never sand or scrape old antifouling paint dry: it contains biocides, so follow the label and wet-sand only.
Owners often ask
- The paint on my lower unit is chipped down to bare aluminum. What primer and paint should I use?
- My sterndrive paint is blistering with white powder underneath. Can I just sand and repaint it?
This guide walks you through it. Still stuck? Ask the AI Mechanic about your engine.
Tools
- Propeller wrench or socket and a block of wood
- Plastic scraper and a stiff nylon brush
- Sandpaper in 180, 220 and 320 grit, plus a medium abrasive pad
- Wax and grease remover or naphtha, lint-free rags and a tack rag
- Masking tape and masking paper or plastic sheeting
- Nitrile gloves, safety glasses and a respirator rated for paint spray
Parts & supplies
- Primer for aluminum recommended by your engine maker (often sold as a matching spray can)
- Color-matched topcoat paint from your engine maker
- Paint pen in the factory color (for small scratches)
- Copper-free antifouling made for aluminum drives (only if the boat stays in the water)
Before you start
Outboard lower units and sterndrives are mostly aluminum, protected by a factory paint system and by sacrificial anodes. Once the paint wears through, usually on the skeg, the leading edges and the bottom of the gearcase, bare aluminum starts to corrode. Mercury points out that bare aluminum near a stainless steel prop in salt water is especially at risk of galvanic corrosion. A small touch-up done once a year is cheap protection.
This guide covers small areas: scrapes, chips, blisters and light surface corrosion. Repainting a whole motor, or repairing deep pits, cracks or corrosion around seals, is a different job (see "When to call a pro").
Buy the primer and paint your engine maker sells or recommends for your motor. Engine makers formulate their touch-up paint for the marine environment and match the factory color; Mercury notes that standard hardware-store spray paint usually lacks the UV blockers its paint has. Read and follow the labels on the cans: they override general advice here.
Getting the color right. Many makers have used several grays, blacks and whites over the years, often with similar names, and owners regularly end up with the wrong one. Give the dealer your full model and serial number (see the engine serial number guide) and ask which touch-up color matches that exact part; on some brands the color is tied to the part number of the cowl or gearcase. Even the right color will not perfectly match paint that has faded for 15 or 20 years, so on old motors plan to paint a whole panel or section edge to edge rather than a small patch in the middle.
Steps
- Scuffs and chips from sand, gravel or the trailer, with clean metal underneath: a straightforward touch-up.
- Bubbles or blisters in the paint, often starting on sharp edges below the waterline, with white powder on exposed metal: Mercury describes this as an early sign of galvanic corrosion. Fix the cause (next step) before you repaint, or it will come back.
- Deep pitting, metal that is eaten away, or corrosion around the prop shaft seal, water intakes or drive mounting points: have a dealer look before you paint over it.
Paint only slows corrosion; anodes stop it. Find every anode in your manual (some hide under the anti-ventilation plate or in the trim cylinder area). Mercury recommends replacing an anode when about half of it is gone, and warns that anodes that never wear may mean they are not working at all. On a sterndrive with a MerCathode system, Mercury says it should be tested once a year by a dealer. If you added stainless steel parts (a stainless prop, trim tabs, aftermarket steering), Mercury suggests having your corrosion protection rechecked. See the sacrificial anodes and sterndrive corrosion guides.
Choose a dry day with mild temperatures, within the range on the paint can, and no wind blowing overspray onto the boat, the truck or your neighbors. Put the boat on the trailer, trim the motor or drive down so the area is easy to reach, and lay plastic on the ground to catch dust and drips.
Remove the key and lanyard, wedge a block of wood between a prop blade and the anti-ventilation plate, and take the prop off. Keep all the washers and the nut in order. Wrap the prop shaft in a rag or plastic so no paint gets on the shaft or its seal.
Scrub the area with soap and fresh water and a nylon brush, then rinse. Remove marine growth with a plastic scraper. Wipe the area with wax and grease remover or naphtha on a clean rag. Interlux gives a handy test: when you rinse, clean metal lets water spread out in a sheet; if water beads up in drops, it is not fully degreased yet.
Cover with tape and paper:
- Anodes. Never paint them. Mercury says anodes must be in direct contact with the water to work; mask them or remove them while you paint.
- MerCathode parts on sterndrives (Mercury says not to paint or power-wash them).
- Water intake screens, the telltale outlet and any speedometer pickup holes. Paint can block them.
- Sensors and transducers mounted on or near the drive, such as a trim sender or a transom-mount depth transducer, plus their cables.
- Chrome trim cylinder rods, grease fittings, rubber seals and bellows, the exhaust outlets and the prop shaft.
Boating Magazine's full-repaint project does the same: tape off grease fittings, anodes and anything you could not remove, and wrap wires and trim rods.
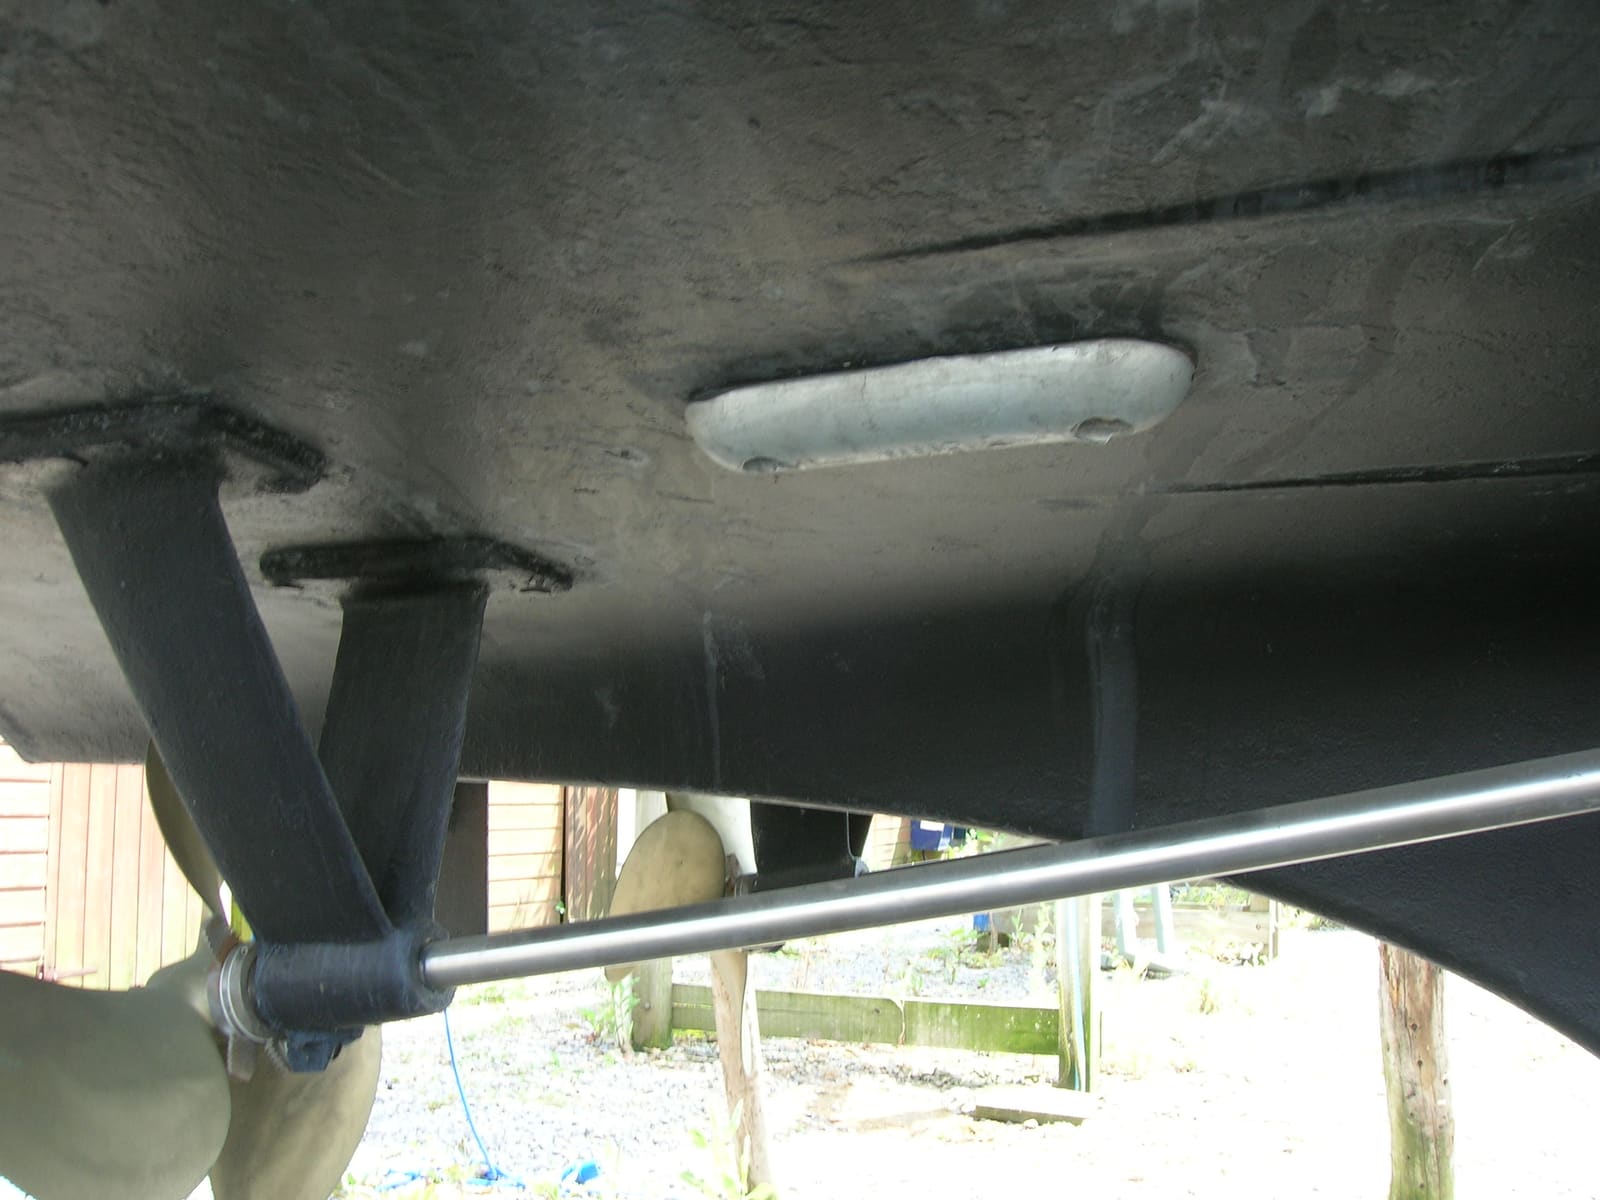
Anodes stay bare metal while the paint goes around them. The same rule applies on your lower unit or drive. Photo: Rémi Kaupp / Wikimedia Commons · CC BY-SA 3.0 Scrape off any paint that is lifting or flaking. Mercury's method: where the aluminum is pitted or blistered, sand the spot with 180 or 220 grit until you reach clean, sound metal, then feather the edges into the good paint around it with 320 grit by hand. Remove all the white powder; painting over corrosion traps it under the new paint. Use abrasives meant for aluminum: avoid steel wool and steel wire brushes, which can leave steel particles behind that rust and stain. Interlux also warns that any blasting must use aluminum-compatible grit, never copper slag (blasting is a pro job).
Scuff the bare metal and the surrounding paint about an inch beyond the damaged area with a medium abrasive pad, so the new paint can grip (Mercury's tip). Wipe again with wax and grease remover or naphtha and let it flash off, then lightly wipe off dust with a tack rag. Do not touch the area with bare hands from now on.
Bare aluminum starts to oxidize as soon as it is exposed, so prime the same day you sand (Interlux says within a few hours). Use the primer your engine maker sells or names for its gearcases; Mercury uses a light gray primer under its color coats. Follow the can for distance, coats and dry time. When the primer is dry, scuff it lightly with the abrasive pad to feather the edges, without sanding through to metal.
Two warnings about primers:
- Do not use anything that contains copper, and do not use copper-based bottom paint as a "primer". Copper next to aluminum in water causes serious corrosion.
- Old how-to articles often recommend zinc chromate primer. Chromate primers contain hexavalent chromium, which is highly toxic. Stick with the primer your engine maker or paint maker specifies today.
Spray the maker's color-matched paint in several thin, even coats rather than one heavy one. Mercury suggests holding the can 8 to 10 inches away and letting each coat set up 10 to 20 minutes before the next; your can's label may differ. Overlap slightly onto the old paint so the edges blend. Mercury also offers a leveler coat that can be applied before the last coat dries to smooth out sanding marks; it is optional.
If a scratch has not gone through the factory primer, you do not need to sand and spray. A factory-color paint pen fills it in neatly. Suzuki's owner FAQ puts the rule simply: inspect the motor often, touch up surface scratches with color-matched paint, and on deeper scratches where bare metal shows, put a quality metal primer on first. Mercury sells pens matched to its colors; other makers offer similar products.
Mercury says to wait at least 24 hours for the final coat to cure before the boat goes in the water; follow your can's label if it says longer. Then remove all the masking, check that every anode is bare and clean, and reinstall the prop with the correct hardware, tightened to the spec in your manual.
If the boat stays in the water and you need antifouling on the drive, use only a copper-free product made for aluminum outdrives and lower units, applied over the primer its maker specifies. When you bottom-paint the hull with a copper paint, keep it off the drive and the transom assembly: BoatUS recommends leaving an unpainted margin around a sterndrive (it mentions about an inch and a half) and says to use a copper-free, drive-specific paint on the drive itself. Mercury lists the wrong type or wrong application of antifouling among causes of corrosion that its warranty does not cover. See the bottom paint guide.
- Flush and rinse with fresh water after every saltwater trip.
- Mercury suggests a corrosion-guard spray on the gearcase, drive and exposed metal, keeping it off the anodes.
- The top of a sterndrive often turns dull from mineral deposits. Mercury's FAQ suggests a bathroom tub and tile cleaner, then a coat of wax.
- Check the paint every haul-out and touch up chips before they spread. Mercury recommends a yearly touch-up.
Common mistakes
- Painting over anodes, or spraying corrosion guard on them. A coated anode stops protecting the motor.
- Using copper bottom paint on an aluminum drive or lower unit, or letting hull paint touch the drive.
- Repainting blisters and white powder without checking the anodes or finding the cause, so they come right back.
- Using generic hardware-store paint that fades and lifts, instead of the engine maker's primer and color.
- Spraying one thick coat that runs and stays soft.
- Painting over salt, oil or white corrosion instead of cleaning down to sound metal.
- Leaving bare, sanded aluminum overnight before priming.
- Covering water intakes, speedometer pickups or sensors with paint.
- Launching before the paint has cured.
When to call a pro
- Deep pitting, holes, cracks, or metal eaten away anywhere on the gearcase or drive.
- Corrosion around the prop shaft seal, the water intakes, the gimbal housing or drive mounting points.
- Blistering that returns quickly even with fresh anodes (have the dealer test for stray current or a faulty MerCathode).
- Paint that peels in sheets over large areas, or a full repaint of the motor.
- Any time you would need to remove the gearcase or drive to do the work.
Tips
- Take photos before and after, and note the date in BoatMend. Patterns of new chips show where the skeg is hitting bottom.
- Keep a paint pen in the boat's tool kit for quick fixes after a scrape.
- Clear the spray nozzle after use by turning the can upside down and spraying until only gas comes out.
- On a used boat, fresh paint on a lower unit can hide damage. Look closely for filled pits or repaired cracks.
Official references
We read these to write this guide. Your engine's own manual always wins.
- Mercury Marine – Quick Tip, How to Touch Up Mercury Gearcase Paint
- Mercury Marine – Maintenance Made Easy, Preventing Corrosion
- Mercury Marine – Owner FAQs (sterndrive paint blistering, anodes and MerCathode)
- Suzuki Marine – FAQs (touching up nicks and scratches)
- Interlux – How to Repair Painted Aluminium That's Corroding
- Boating Magazine – Painting Your Outboard Motor
- BoatUS – The Care and Feeding of Sterndrives
Safety: BoatMend is for information only and does not replace a certified marine technician. You are responsible for your safety and your boat. Read the full disclaimer.
Last updated 2026-10-24
Related guides
How to Inspect and Replace Sacrificial Anodes (Zincs)
Check the anodes on your outboard, sterndrive or inboard running gear, replace them when they are half gone, and choose the right metal for the water you boat in. Fresh anodes are cheap insurance against expensive corrosion damage to your lower unit, drive and prop.
Sterndrive Corrosion: Paint Blisters, Anodes, MerCathode and Galvanic Isolators
Learn to spot the early signs of corrosion on an aluminum sterndrive, check the anodes and the MerCathode or Volvo Penta ACP system, and understand when a galvanic isolator or a hull potential test is needed. Caught early, corrosion costs a few anodes; caught late, it can cost the whole drive.
Saltwater Outboard Care: The After-Every-Trip and Monthly Routine
A simple routine that keeps salt from eating your outboard, built from Honda, Yamaha, Mercury and Suzuki advice. It covers flushing after every trip, washing, where to spray anticorrosion (and where never to), monthly greasing, anodes, and tilting up or storing out of the water.

Bottom Paint (Antifouling): Do You Need It, Which Type, and How to Repaint
Learn whether your boat needs antifouling bottom paint, how ablative and hard paints differ, and how to prep and roll on a fresh coat safely, without poisoning yourself or the water and without ruining an aluminum hull.
How to Flush Your Engine With Fresh Water
Rinse salt, silt and sand out of your outboard or sterndrive cooling system using the built-in flush port, flush muffs or a flush bag. Flushing after every saltwater trip is one of the easiest ways to prevent corrosion and overheating.
Propeller Care: Inspect, Remove, Replace and Choose the Right Pitch
Check your prop for damage, pull it to clear fishing line and grease the shaft, reinstall it correctly, and learn how pitch affects your engine's wide-open-throttle RPM. The right prop in good shape protects your engine and often makes the boat run better and use less fuel.
How to Winterize an Outboard Engine
Protect your outboard from freeze damage, stale fuel and internal corrosion over the off-season. Most owners can do it in an afternoon with basic tools, compared with a shop bill that often runs several hundred dollars.