How to Install an Inspection Port (Deck Plate) in a Deck or Bulkhead
Add a screw-out or pry-out deck plate so you can reach hidden nuts, wiring, hoses and through-hulls, or check a deck core for rot. Learn where it is safe to cut, how to pick and size the port, how to seal a cored deck with epoxy, and how to bed the ring so it never leaks.
Time
3 h
Shop would charge
$200-600
Applies to
All engines
Safety first: Before you cut, know exactly what is on the other side. A hole saw can slice a fuel line, fuel tank, wire bundle or hose in a second; if you cannot see behind the surface, do not cut. Fiberglass dust is harmful to breathe and itches badly on skin, so wear a respirator with a particle filter, eye protection and long sleeves. Never cut into the hull below the waterline, a structural bulkhead, a stringer or the transom; those are jobs for a pro. If you damage a fuel line or smell fuel, stop, ventilate, and call a pro.
Owners often ask
- How do I add an inspection port so I can reach the nuts under my deck?
- Do I need to seal the core when I cut a hole for a deck plate?
This guide walks you through it. Still stuck? Ask the AI Mechanic about your engine.
Tools
- Drill/driver and a hole saw or adjustable circle cutter sized to the plate maker's cutout
- Jigsaw with a fine-tooth or grit-edge blade (for non-round openings)
- Small drill bits for pilot holes and a countersink bit
- Bent nail or small hook bit in a drill, or a dental pick, for removing core
- Screwdrivers (drive the final screws by hand)
- Tape measure, straightedge and pencil
- Inspection camera or mirror and a flashlight
- Small hammer or screwdriver handle for sounding the deck
- Blue painter's tape
- Caulking gun
- Mixing cups, sticks and plastic syringes for epoxy
- Sandpaper (coarse and medium)
- Shop vacuum
- Respirator with particle filters (N95/P95 or better), safety glasses, gloves and long sleeves
Parts & supplies
- Deck plate / inspection port (screw-out or pry-out) sized for the job
- Marine epoxy resin and hardener
- Colloidal silica or another epoxy thickener
- Sealant compatible with the plate's plastic (check the plate maker's instructions)
- 316 stainless pan-head screws, or machine screws, washers and lock nuts for thin liners
- Acetone or isopropyl alcohol and clean rags
Before you start
Why add a port: BoatUS explains that most production boats have their deck or liner dropped onto the hull after the wiring, plumbing and fuel system are installed, which leaves many parts with no way to reach them. A deck plate gives you a permanent hand hole to tighten nuts on a new rod holder or cleat, pull wire, service a hose or through-hull fitting, or look at the core under a suspect deck. The plug you cut out is also a free core sample.
Screw-out or pry-out: BoatUS notes that screw-out plates keep water out better, while plates you can pop open are handier where you need frequent access. For a walking surface, choose a low-profile plate rated for foot traffic.
Size it right: Pick a plate big enough for your hand, a tool and your forearm. Then get the cutout size from the plate maker's instructions; the hole is usually different from the plate's nominal size. Some makers supply a paper template.
Steps
BoatUS stresses a perfectly flat mounting surface, because a plate on a curved deck is hard to seal. Don Casey adds that few decks are truly flat: lay a straightedge across the spot to check. Then figure out what is underneath. Look for stringers, bulkheads, tanks, fuel lines, wire runs and rigging tubes. Ask the builder for a drawing, look from below with a camera or mirror, and tap with a small hammer to find solid and hollow areas. Stay clear of other fittings and edges. If the only spot that reaches your target means cutting structure, call a pro.
For a deck with a cabin or liner below, Casey's trick is to measure from two features that pass through both surfaces (a mast, a bolt, an existing hatch corner) and transfer the outline to the underside. That way you know the hole will not land on a bulkhead, light fixture or wire. If a liner hides the space, you can drill a small hole in the center of the planned cutout and peek through it with a camera first.
Cover the area with blue painter's tape; BoatUS says this helps stop the brittle gelcoat from chipping. Mark the outline on the tape using the maker's template or measurements, square to the boat's centerline so the plate looks straight.
- Round opening: use a hole saw or circle cutter. BoatUS recommends starting with the drill in reverse, which chips the gelcoat less, holding the drill square to the surface and going slowly so the saw does not wander. Stop as soon as you are through.
- Non-round opening: drill a hole in each corner so the hole forms the corner radius, then connect them with a jigsaw. Casey suggests checking first that the saw body will clear nearby fittings all the way around.
Keep the vacuum running to catch dust. If you will seal the core in step 6, BoatUS notes you may want the hole slightly oversized to leave room for the epoxy.
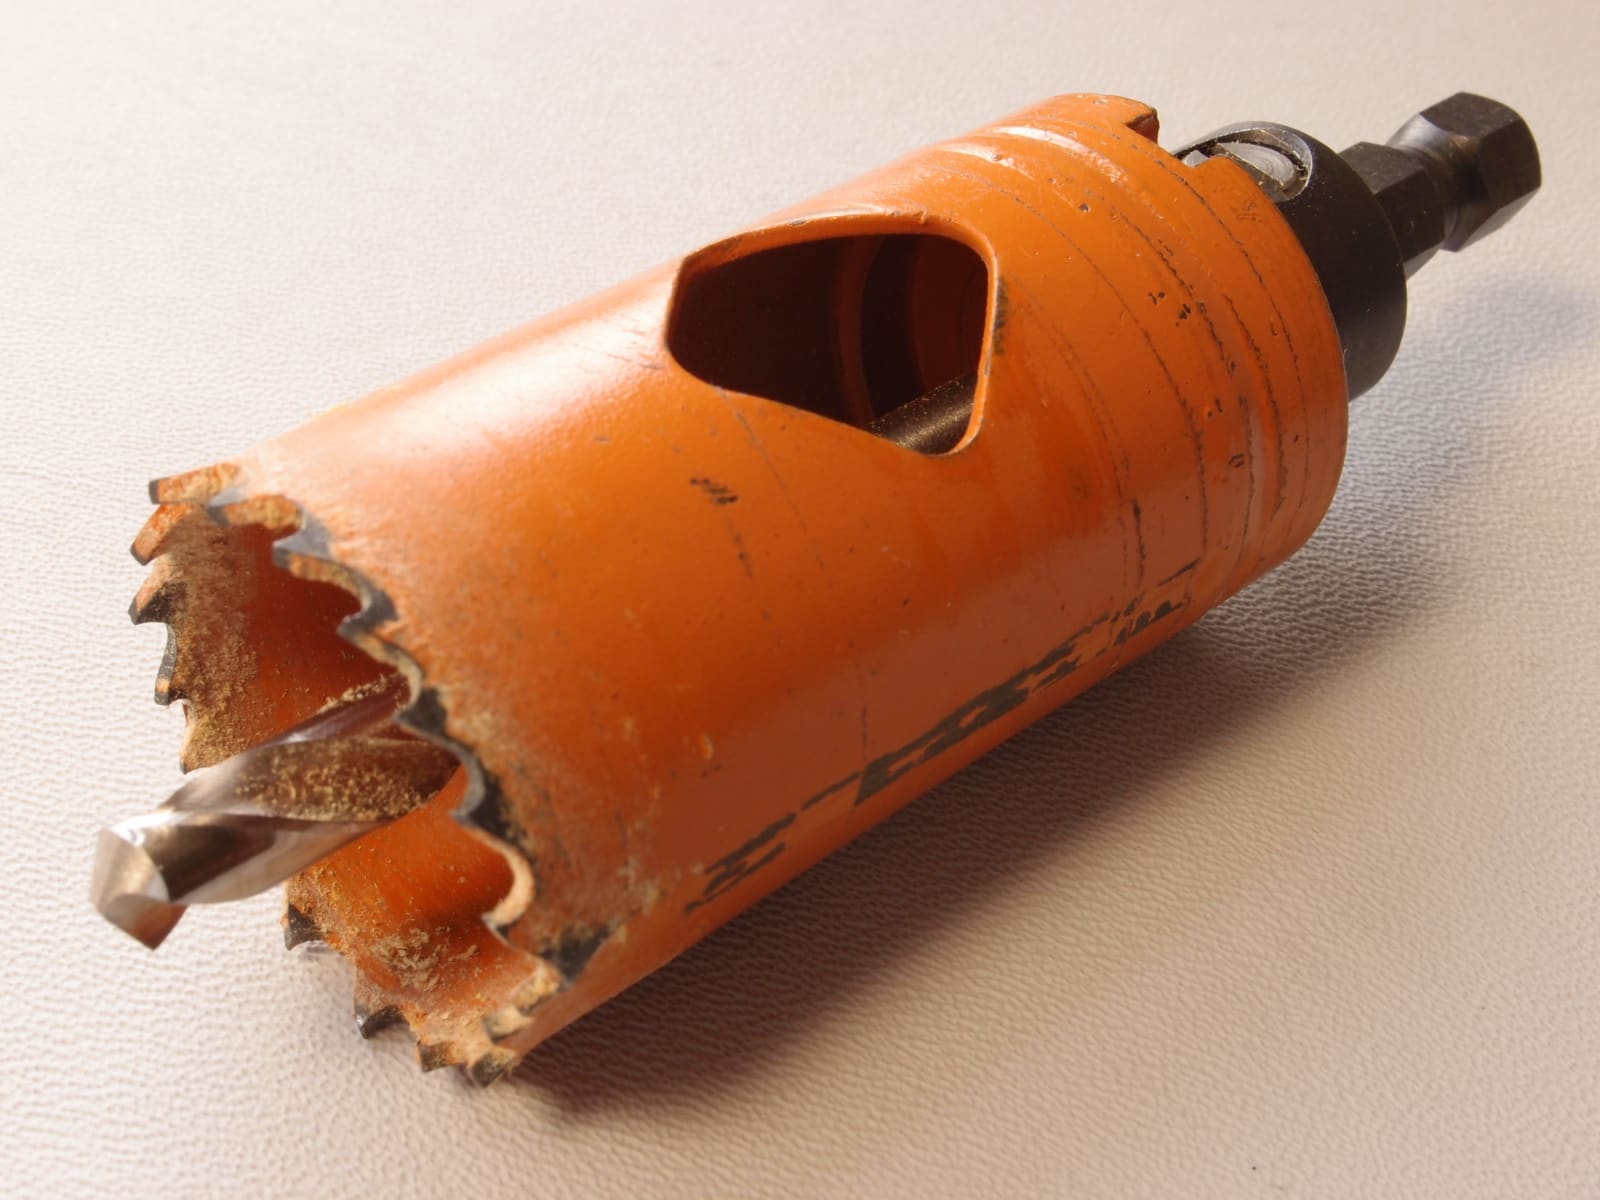
A hole saw with a pilot drill makes a clean round cutout. Start slowly, keep it square, and let the saw do the work. Photo: Junkyardsparkle / Wikimedia Commons · CC0 1.0 Look at the piece you removed and the edge of the hole. You will see either solid fiberglass, or two fiberglass skins with a core between them (balsa, plywood or foam). Dry, light-colored core is good news. Dark, wet, crumbly or smelly core means water has been getting in. Note it, take photos, and see "When to call a pro" before you go further.
Casey is blunt: the sealant under the plate's flange is not enough to protect a cored deck. Water that gets past it will run straight into the core. To seal it:
- Rake out the core between the skins all the way around the hole, about half an inch deep, with a bent nail in a drill or a pick. Vacuum the debris.
- Lightly sand the inside surfaces of both skins.
- Brush or syringe unthickened epoxy into the cavity so it soaks into the exposed core.
- Thicken more epoxy with colloidal silica to about peanut butter consistency and pack the cavity full, smoothing it flush with the cut edge.
- Let it cure fully, then sand the edge smooth.
On solid fiberglass or a thin liner, a coat of epoxy on the raw edge is still a good idea. On a plywood bulkhead, seal the cut wood edge the same way.
Set the plate in the hole and mark the screw holes. Put tape over the spots, then drill pilot holes. BoatUS recommends a bit just slightly smaller than the screw, because fiberglass is hard and a too-tight screw can crack it; try one screw first and step up a bit size if it binds. A light countersink on the gelcoat at each hole helps prevent cracks. If the screws land in the epoxy ring from step 6, they never touch the core.
Wipe the deck around the hole and the back of the plate's flange with acetone or isopropyl alcohol to remove wax and contamination, as BoatUS suggests. Casey masks the deck right around the plate and the flange edge so squeeze-out lands on tape instead of gelcoat.
Most deck plates are plastic, and some sealants attack or will not stick to certain plastics. Casey notes that polysulfide is for metal frames, and plastic hatch and deck plate frames call for silicone or a silicone/polyurethane hybrid such as BoatLIFE Life Seal. BoatUS also names 3M 4200 or Life Seal as semi-permanent choices that still let you remove the plate later. Check the plate maker's instructions; some name a specific sealant type and will not cover damage from others. Avoid permanent adhesives like 5200 on a part you may want to replace.
Lay a continuous bead of sealant around the back of the flange and around each screw hole. BoatUS warns against overdoing it; you want enough to seal the plate and screw holes without a huge mess. Set the plate in place and wiggle it gently to spread the sealant.
Use 316 stainless screws long enough to grip but not long enough to poke through the underside, where they would leave an unsealed hole and a sharp point for your arm. Drive them with a hand screwdriver so you can feel binding, in a criss-cross pattern, getting all of them started before snugging any. Stop when the sealant squeezes out evenly; overtightening squeezes out all the sealant and leaves a leaky joint. On a thin liner where screws will not hold, BoatUS suggests through-bolting with machine screws and nuts (you will need a plate that opens to reach them).
Casey lets the sealant cure for two or three days, then runs a razor around the edge of the flange and peels the tape, taking the squeeze-out with it. Follow the cure time on your sealant's label.
After full cure, soak the plate with a hose, then open it and look for water inside. If water got in, BoatUS says to check that the O-ring or gasket is in good shape and seated, and reseal the plate if needed. Log the location and what is under it in BoatMend.
Years later, when the port starts to drip, it is usually the seal, not the bedding. On most deck plates the seal is a simple O-ring in a groove. BoatUS (Mark Corke) suggests this sequence: have a helper below while you hose the plate, so you know whether water comes through the lid or around the flange. If it is the lid, check the O-ring: it should be soft and pliable, with no cracks or flat spots. Pry the old one out with a flat screwdriver (less likely to gouge the groove than a pick), clean the groove and the underside of the lid, and seat the new ring with a couple of drops of dish soap. Water around the outside of the flange means the plate needs rebedding (steps 8 to 12).
Common mistakes
- Cutting before looking. One blind hole saw cut can hit a fuel line, a wire harness or a stringer.
- Trusting the flange sealant to protect a cored deck. Without an epoxy-sealed edge, the core soaks up water through the hole.
- Using the plate as the cutting template when the maker says otherwise. Many plates need a cutout of a specific size; check the instructions.
- Mounting on a curved surface. The plate rocks, the sealant tears, and it leaks. Find a flat spot or have a pro build a flat pad.
- The wrong sealant for the plastic. Some sealants attack or will not stick to some plastics; read the plate maker's guidance.
- Overtightening the screws. It squeezes out the sealant and can crack the plastic ring or the gelcoat.
- Screws that poke through. They leave an open path into the core and a sharp point below.
When to call a pro
- The only spot that works is in a stringer, structural bulkhead, transom, or near the hull bottom
- You need an opening bigger than a typical deck plate, or several holes close together (Casey notes large openings may need added structural framing)
- The core in the plug is wet, dark, rotten, or the deck around it is soft (see the transom and stringer rot guide)
- Fuel tanks, fuel lines or large wire bundles are right below the spot
- The deck has a lot of crown and needs a custom flat mounting pad
Tips
- Put the port where it gives you access to more than one thing, such as the back of a cleat and a wire run.
- A dab of silicone grease on the O-ring and threads keeps a screw-out lid easy to open, but check the plate maker's guidance first: BoatUS warns that grease and petroleum products can degrade rubber seals, and suggests a dusting of talcum powder for seals that squeak.
- Keep the cut plug; label it with the date and location. It is a record of the core's condition for a future survey.
- Under a seat or in a locker, a plain white plate is fine. In a walkway, pick a non-skid plate.
Official references
We read these to write this guide. Your engine's own manual always wins.
Safety: BoatMend is for information only and does not replace a certified marine technician. You are responsible for your safety and your boat. Read the full disclaimer.
Last updated 2026-10-25
Related guides
How to Find and Fix Leaking Deck Hardware (Rebedding Cleats, Stanchions and Tracks)
Track down the cleat, stanchion base or track that is dripping into the cabin, then remove it, seal the deck core and bed it again with the right sealant so the leak stops for years instead of weeks. Catching it early protects the deck core from rot.

How to Mount Rod Holders, Fish Finders, Cleats and Antennas Without Causing Leaks
Add accessories to your boat the right way, with through-bolts, backing plates, sealed core and proper wire pass-throughs, so every new hole stays dry and strong. Also learn where you should never drill.
How to Fix a Loose Boat Seat Pedestal, Base or Leaning Post
Find out why seat pedestals and leaning posts work loose, through-bolt the base with a proper backing plate, deal with soft or rotten floor under it, and keep swivels and slides working smoothly so your helm seat stays solid in rough water.
How to Run New Wires Through a Boat (Chase Tubes, Pull Lines and Deck Penetrations)
Get a new transducer cable, light or power wire from the stern to the helm or up through the deck without a fight: use the chase tube and a fish tape or pull string, protect the wire from chafe and heat, support it every 18 inches, seal every penetration and label both ends.

How to Check a Boat for Transom and Stringer Rot
Many older fiberglass boats have wood inside the transom, stringers and deck, and water that gets in slowly rots it. Learn the tap test, the flex test, how to read a moisture meter and the other warning signs, and why a rotten transom or stringer is a structural job for a pro, not a weekend patch.

How to Fix Leaking Hatches and Portlights
Find out whether a leaking deck hatch or portlight is failing at the gasket, the lens or the frame, then fix it with the right seal or sealant. Learn when crazed or cracked acrylic needs a new lens and what never to put on plastic windows.
Marine Sealants Explained: 5200, 4200, 4000UV, Polysulfide, Silicone and Butyl Tape
Pick the right sealant before you bed a cleat, a through-hull, a window or a transducer. The wrong goo either leaks in a year or glues a part on so hard you damage the boat getting it off.

How to Repair Small Gelcoat Chips and Scratches
Fill and blend small chips, dings and scratches in your boat's gelcoat with a repair kit so they stop letting water into the fiberglass and look close to new. Also learn to spot damage that is structural and needs a pro.