Shock-Absorbing Boat Seats and Pedestals: Choosing, Installing and Adjusting
Pounding through chop hurts backs and necks, and hard wave impacts can fracture a spine, especially up front. Learn the difference between a shock-absorbing pedestal and a suspension seat base, how to mount one solidly, how to set it for the rider's weight, and the simple care that keeps it working, plus the seating and driving habits that matter just as much.

Time
3 h
Shop would charge
$800-3500
Applies to
All engines · Center console, Fishing boat, Bowrider / runabout
Safety first: No seat makes it safe to slam through waves. Slow down in rough water, and never seat passengers on the bow or in forward seats when it's choppy: that is where the hardest impacts happen. A seat or pedestal that comes loose at speed throws the driver away from the controls, so mount it through-bolted to solid structure and wear the kill switch lanyard. Before drilling, check under the deck so you don't hit fuel lines, wiring or hoses; if you drill into a fuel line or tank, stop, ventilate, keep sparks away and call a pro. Never ride on a suspension seat with the pump still attached or with too little pressure in the shock.
Owners often ask
- Are shock-absorbing boat seats worth it for back pain in rough water?
- How much air pressure should I put in my suspension helm seat?
This guide walks you through it. Still stuck? Ask the AI Mechanic about your engine.
Tools
- Drill with sharp bits and a right-angle drill guide (for new holes)
- Socket set, Allen keys and wrenches
- Tape measure and marker
- Flashlight and inspection mirror for checking under the deck
- Shock pump or air pump with an accurate gauge (often supplied with the seat)
- Spray bottle of soapy water for leak checks
- Clean cloths
Parts & supplies
- Shock-absorbing pedestal or suspension seat base rated for the rider's weight and your boat
- Stainless through-bolts, large washers or a backing plate, and nylon-insert lock nuts sized for the mounting holes
- Marine sealant for bedding the holes
- Threadlocker if the seat or pedestal maker calls for it
- Seat adapter plate if the seat's hole pattern doesn't match the new base
- Corrosion-inhibiting spray recommended by the seat maker
Before you start
Why bother. Repeated wave slams wear out backs, necks and knees, and a single hard landing can do real damage. A French study of 79 motorboat passengers treated for spinal fractures over 14 years found that the typical victim was sitting at the bow and was thrown up and slammed down when the bow rose over a wave. A UK investigation of a sea-safari boat found that a passenger in a forward seat, where shock loads were highest, suffered a spinal fracture that left them paralyzed. Smaller, repeated jolts add up too, as anyone who has spent a day running into a short chop knows.
What you can change. Three things reduce the pounding: how and where people sit, how the boat is driven, and what they sit on. This guide covers the third, and the habits that make it work.
The main types:
- Standard pedestal or box seat: a rigid post or a fixed box with a cushion. All the shock goes through the cushion and into your spine.
- Shock-absorbing pedestal: a pedestal with an air spring or other damper built into the post. Boating Magazine's install of an air-spring pedestal shows that many fit on the footprint of an existing pedestal and take a standard seat plate.
- Suspension seat base (module): a low suspension unit that bolts between the deck or a riser box and the seat, usually with an adjustable air shock. Shockwave says its bases work best on a riser box; on a pedestal only if the pedestal is very stout and wide with a strong rectangular top plate.
- Suspension jockey seats and leaning posts: for center consoles where people ride standing or straddling.
Choosing. Match the product to the rider's weight (each model has a maximum occupant weight), your boat's speed and typical sea conditions, the seat you want to keep, and the mounting space. Measure your seat's bolt pattern and the height you need before ordering; adapters are available for many patterns. A dealer can often let you sit on one before buying.
Steps
Remove the old seat and pedestal and look at the floor. It must be solid. Probe around the old holes for soft, wet or rotten core and check the old fasteners. A shock-absorbing seat passes big loads into the floor, so a weak spot will crack or pull out. Our seat pedestal mounts guide covers repairing a soft floor and making backing plates.
Boating Magazine's installers checked under the deck first so no wires, hoses or other parts would be damaged by the drill. Use a flashlight and mirror through hatches or access plates. Mark anything that runs under the new footprint. Plan how you'll reach the nuts from below; if you can't, see our through-bolting guide for options. BoatUS suggests that if there's no access at all, a deck inspection port nearby (not right next to the seat footprint, which would weaken the deck there) lets you look underneath and reach the nuts. Bolting into a structural beam or stringer under the deck, where there is one, beats relying on thin deck alone.
Most pedestals and bases come with a template. Center it over the old footprint (reusing old holes only if they line up and are sound), orient it the way the maker shows (usually square to the boat's centerline), and mark the holes. Fill and seal any old holes you won't reuse so water can't get into the core. Don Casey, writing for BoatUS about replacement seating on plywood or wood-cored decks, prefers epoxy filler for the old holes (sealant also works) and explains why a screw alone doesn't seal a hole: the loads on a seat slowly crush the wood fibers around the threads, opening a gap that lets water in and starts rot, and he notes it tends to happen quickly. That's one more reason to through-bolt a suspension seat and seal every fastener.
Before marking, sit in the seat position and stand in front of it: BoatUS reminds installers that the driver should reach the wheel and throttle comfortably both ways on a center console. A marine tech's trick from the same article keeps the base from shifting while you drill: drill one hole and fit a fastener, then drill and fasten the hole directly opposite, drill the rest, and only then lift the base off to clean up and seal. The result is straight fasteners that load the deck evenly, which helps the sealant last.
Drill with a sharp bit; a right-angle drill guide keeps holes square to the deck, as in Boating Magazine's install. On a cored deck, seal the exposed core in each hole (our deck hardware rebedding guide explains how) so water can't soak in later.
Bed the holes and the base flange with marine sealant. Through-bolt with stainless bolts long enough to pass through the base, deck and backing plate (or large washers), with nylon-insert lock nuts fully engaged. Use threadlocker if the maker calls for it, and tighten to the maker's spec. Wood screws into a deck are not enough for a suspension seat.
Air-spring pedestals and suspension bases are adjusted through a valve like the one on a car tire (a Schrader valve). Boating Magazine positioned its pedestal so the side fill port was easy to reach, and notes that remote fill kits exist when the valve ends up hidden. Think about this before you tighten everything down.
Bolt the seat to the top plate or adapter with the hardware and threadlocker the maker specifies. Check that swivels, slides and height locks work. On height-adjustable pedestals, Boating Magazine notes you may need to lift the seat while the pin is released, then bounce in the seat to make sure the pin has locked.
A suspension seat moves. Shockwave, for example, says its base moves the seat about 1.5 inches forward when fully compressed. Push the seat down through its full travel (or sit and bounce) and check it can't hit the console, steering wheel, throttle, a cooler or a passenger's knees, and that the driver can still reach every control.
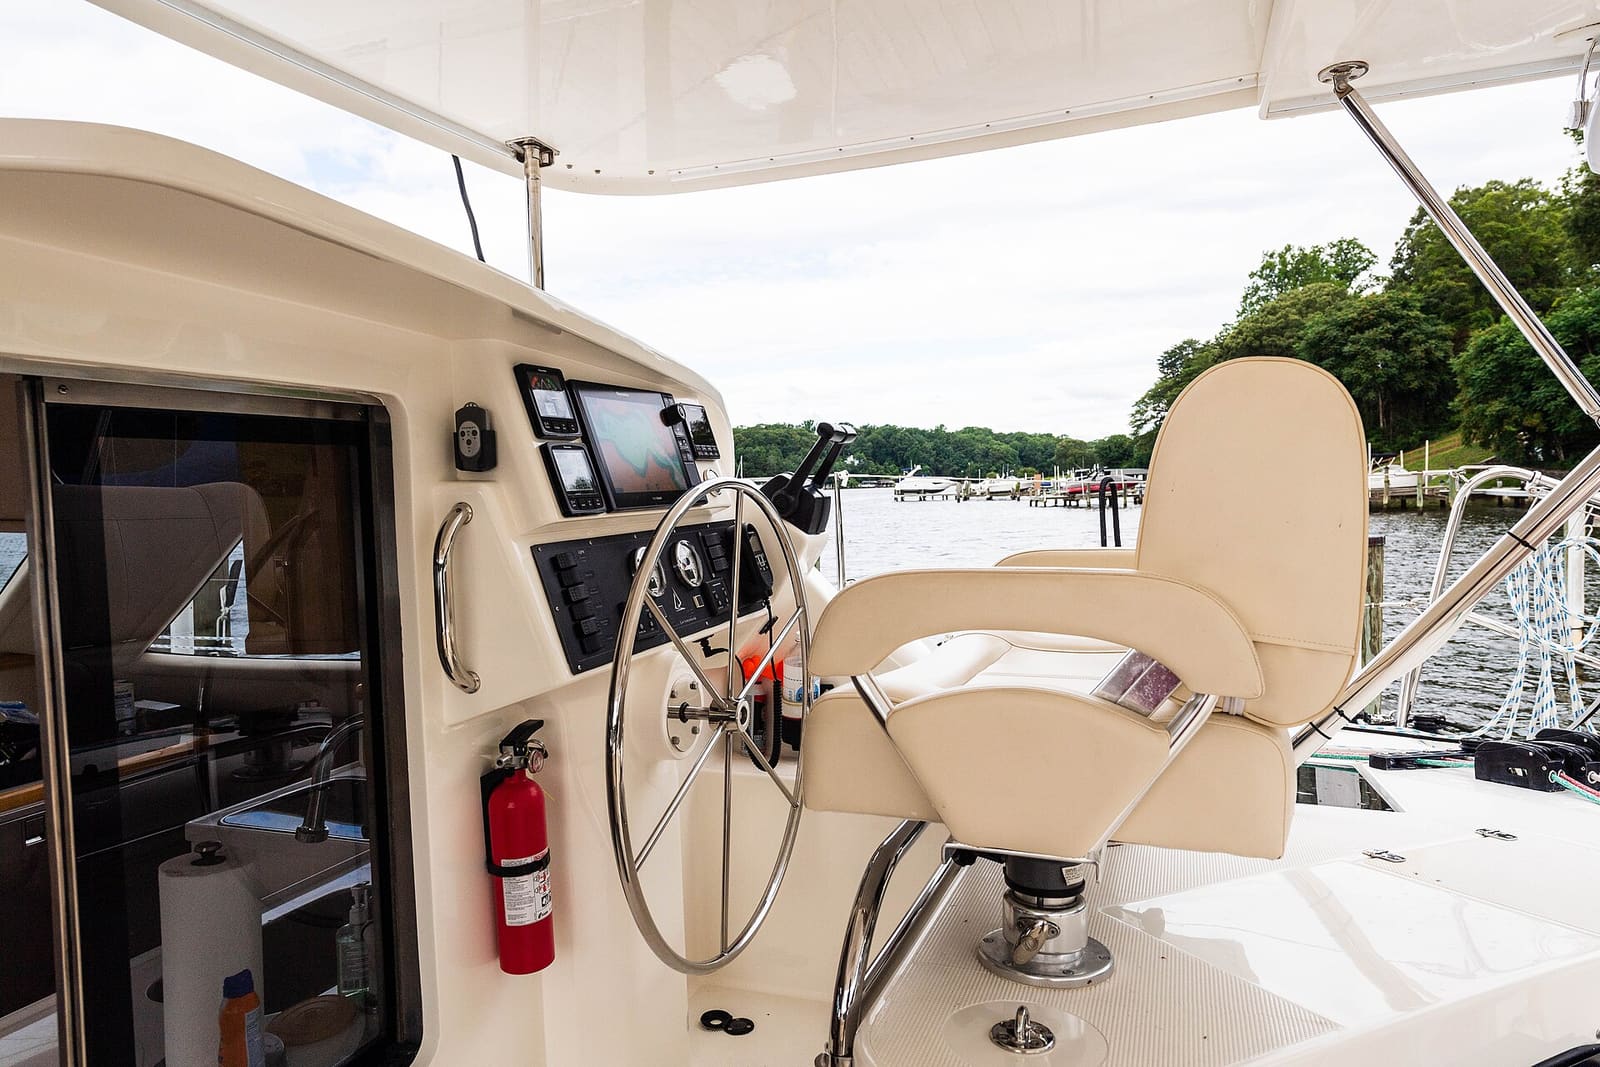
A pedestal helm chair on a round deck plate. Before swapping in a suspension pedestal or base, check the footprint and how close the seat sits to the wheel and throttle. Photo: Craig Stanfill / Wikimedia Commons · CC BY-SA 2.0 This is the step most owners skip, and it decides how well the seat works.
- With the usual driver sitting normally, check the maker's indicator. Boating Magazine's pedestal uses an O-ring on the shaft that should sit at or below a marked line with the rider seated; if not, you add air in small steps until it does.
- Shockwave says the shock should be pressurized to match the occupant's weight, aims for a set amount of "sag" (its FAQ gives about 20 to 25 percent when set correctly), and suggests starting on the soft setting.
- Use a pump with a gauge, add or release air in small steps, and check again after each change.
- Remove the pump before riding. Shockwave's how-to videos specifically warn about this.
Too soft and the seat bottoms out with a bang; too hard and it barely moves. Follow your own seat's instructions for the exact procedure and pressures.
Shockwave recommends keeping a pump aboard and readjusting when someone much heavier or lighter than the usual rider (more than about 50 pounds difference) uses the seat. Mark the usual settings on a small tag or in BoatMend so it's quick to switch back.
Take a short run in moderate conditions first. Listen for knocks or creaks from the base, watch for the seat bottoming out, and feel whether it's too bouncy. Adjust and repeat. Check the mounting bolts again after the first few outings.
Shockwave's cleaning routine for its bases, which suits most suspension seats:
- Wipe or rinse the base with fresh water after use.
- Wipe metal and painted parts, bolt heads and nuts with a corrosion inhibitor on a cloth.
- Give the shock shaft only a thin film and wipe off the excess so grit doesn't stick to it.
- Repeat after every trip, or about every 30 days.
Shockwave recommends checking shock pressure at least once a year. If a seat keeps losing pressure, spray soapy water on the valve and air fittings and look for bubbles; the valve stem is a common leak point and can usually be replaced with the maker's part and tool. A shock that leaks oil, sticks or clunks needs the maker's service or replacement.
Common mistakes
- Never setting the pressure, so the seat bottoms out on every wave or barely moves.
- Riding with the pump still connected to the valve.
- Mounting a suspension base on a skinny pedestal or a soft floor that wasn't built for the load.
- Wood screws instead of through-bolts and backing plates.
- Burying the air valve where nobody can reach it.
- Forgetting to check that the compressed seat doesn't hit the wheel, throttle or console.
- Thinking a good seat makes it OK to keep the speed up in rough water, or to put guests up front.
When to call a pro
- The deck is soft, cored with wet core, or cracked where the seat mounts
- Fuel lines, fuel tanks, wiring or steering run under the planned footprint and can't be moved safely
- You can't reach the underside to through-bolt and need access cut or a new mounting platform built
- The seat or base is for a high-speed or offshore boat and you want help choosing travel and type
- A shock leaks, sticks or won't hold pressure after the valve is replaced
- Anyone aboard has been hurt by a wave impact: get medical care, and seat passengers aft until the cause is fixed
Tips
- In chop, slow down and trim the bow down a little, quarter into the waves rather than hitting them head-on, and seat passengers aft and low, toward the boat's center.
- Tell guests before you leave the dock: stay seated, hold on, and keep your back upright with knees slightly bent. Slumping concentrates the shock on the lower spine.
- On a center console, standing at a leaning post with knees bent lets your legs act as springs; a suspension leaning post or jockey seat adds to that.
- Keep the pump, its gauge and the seat manual in the same dry locker.
- Thicker foam cushions help a little with vibration but do not stop big impacts.
Official references
We read these to write this guide. Your engine's own manual always wins.
- Boating Magazine – Installing a Shock-Absorbing Seat Pedestal
- Shockwave Seats – FAQ (suspension base mounting, pump, pressure checks)
- Shockwave Seats – How To (setup videos, cleaning and leak checks)
- Journal of Clinical Medicine (via PubMed Central) – Spinal Fractures during Touristic Motorboat Sea Cruises
- UK Marine Accident Investigation Branch – Serious injury to a passenger on the RIB Lundy Explorer
- BoatUS – How To Install A Seat Pedestal Base
- BoatUS – Seat Mounting (Don Casey)
Safety: BoatMend is for information only and does not replace a certified marine technician. You are responsible for your safety and your boat. Read the full disclaimer.
Last updated 2026-10-25
Related guides
How to Fix a Loose Boat Seat Pedestal, Base or Leaning Post
Find out why seat pedestals and leaning posts work loose, through-bolt the base with a proper backing plate, deal with soft or rotten floor under it, and keep swivels and slides working smoothly so your helm seat stays solid in rough water.
How to Mount Rod Holders, Fish Finders, Cleats and Antennas Without Causing Leaks
Add accessories to your boat the right way, with through-bolts, backing plates, sealed core and proper wire pass-throughs, so every new hole stays dry and strong. Also learn where you should never drill.
How to Find and Fix Leaking Deck Hardware (Rebedding Cleats, Stanchions and Tracks)
Track down the cleat, stanchion base or track that is dripping into the cabin, then remove it, seal the deck core and bed it again with the right sealant so the leak stops for years instead of weeks. Catching it early protects the deck core from rot.

How to Check a Boat for Transom and Stringer Rot
Many older fiberglass boats have wood inside the transom, stringers and deck, and water that gets in slowly rots it. Learn the tap test, the flex test, how to read a moisture meter and the other warning signs, and why a rotten transom or stringer is a structural job for a pro, not a weekend patch.

Engine Cut-Off Switch (Kill Switch) and Lanyard: The Law, Testing and Daily Use
How the engine cut-off switch (ECOS) and its lanyard or wireless fob work, when federal law requires you to wear it (boats under 26 feet, 3 hp or more, on plane), how to test it before every trip, and why a spare clip aboard matters.
Boat First-Aid Kit and Medical Prep: What to Carry, Day Trips to Offshore
Build and maintain a boat first-aid kit that fits how far from help you go, with the extras boaters actually need for seasickness, fish hooks, cuts, burns, sun, heat and cold, plus a crew briefing, expiration-date checks and training. General preparation only, not medical advice.