NMEA 2000 Network Basics and Troubleshooting (Plus Chartplotter Updates)
Understand the backbone, terminators, power tap and drop cables that tie your chartplotter, engine data, GPS, depth and autopilot together, then track down why a device keeps dropping off. Finish by updating chartplotter and device software the safe way.
Time
1 h 30 min
Shop would charge
$150-450
Applies to
All engines
Safety first: NMEA 2000 runs on low-voltage DC, but it is often wired into the same panel as high-current circuits. Turn off the network breaker before unplugging or adding parts, and never connect the network to more than 12 volts nominal (on a 24-volt boat it needs a proper 12-volt supply). If you find melted connectors, a hot cable, a smell of burning plastic, or a fuse that keeps blowing, stop and call a marine electrician. Never troubleshoot electronics while underway in traffic or bad weather; anchor or tie up first.
Owners often ask
- My engine data keeps disappearing from the chartplotter. How do I troubleshoot the NMEA 2000 network?
- I added a new device and the kit came with terminators. Do I need to plug them in?
This guide walks you through it. Still stuck? Ask the AI Mechanic about your engine.
Tools
- Digital multimeter
- Flashlight
- NMEA 2000 breakout or test cable (optional, makes meter checks easy and safe)
- Phone camera and notepad (to map the network)
- Blank microSD or SD card (for software updates)
Parts & supplies
- Spare NMEA 2000 terminators (one male, one female)
- Spare T-connectors and port caps
- Dielectric grease (for connector threads and seals, if the maker allows)
Before you start
What NMEA 2000 is. It is a plug-and-play data network that lets marine electronics share information: GPS position, depth, speed, wind, heading, engine RPM and temperature, fuel flow, tank levels, autopilot commands and more. Your chartplotter (often called an MFD) usually shows the data and is where you find the network's device list and diagnostics.
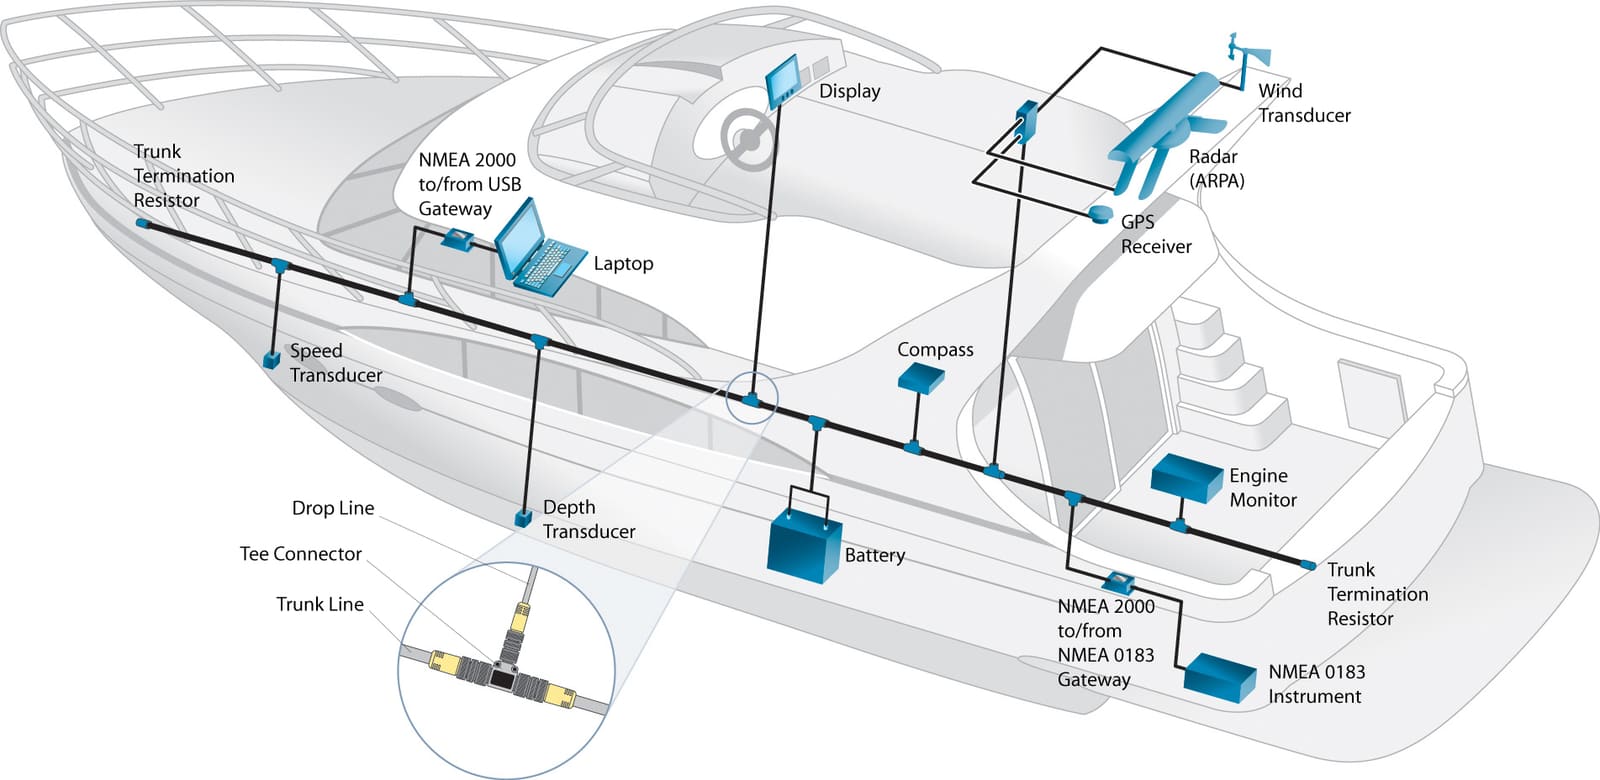
The parts, in plain English.
- Backbone (trunk): the main cable that runs through the boat. It must be one straight line, not a star or a loop.
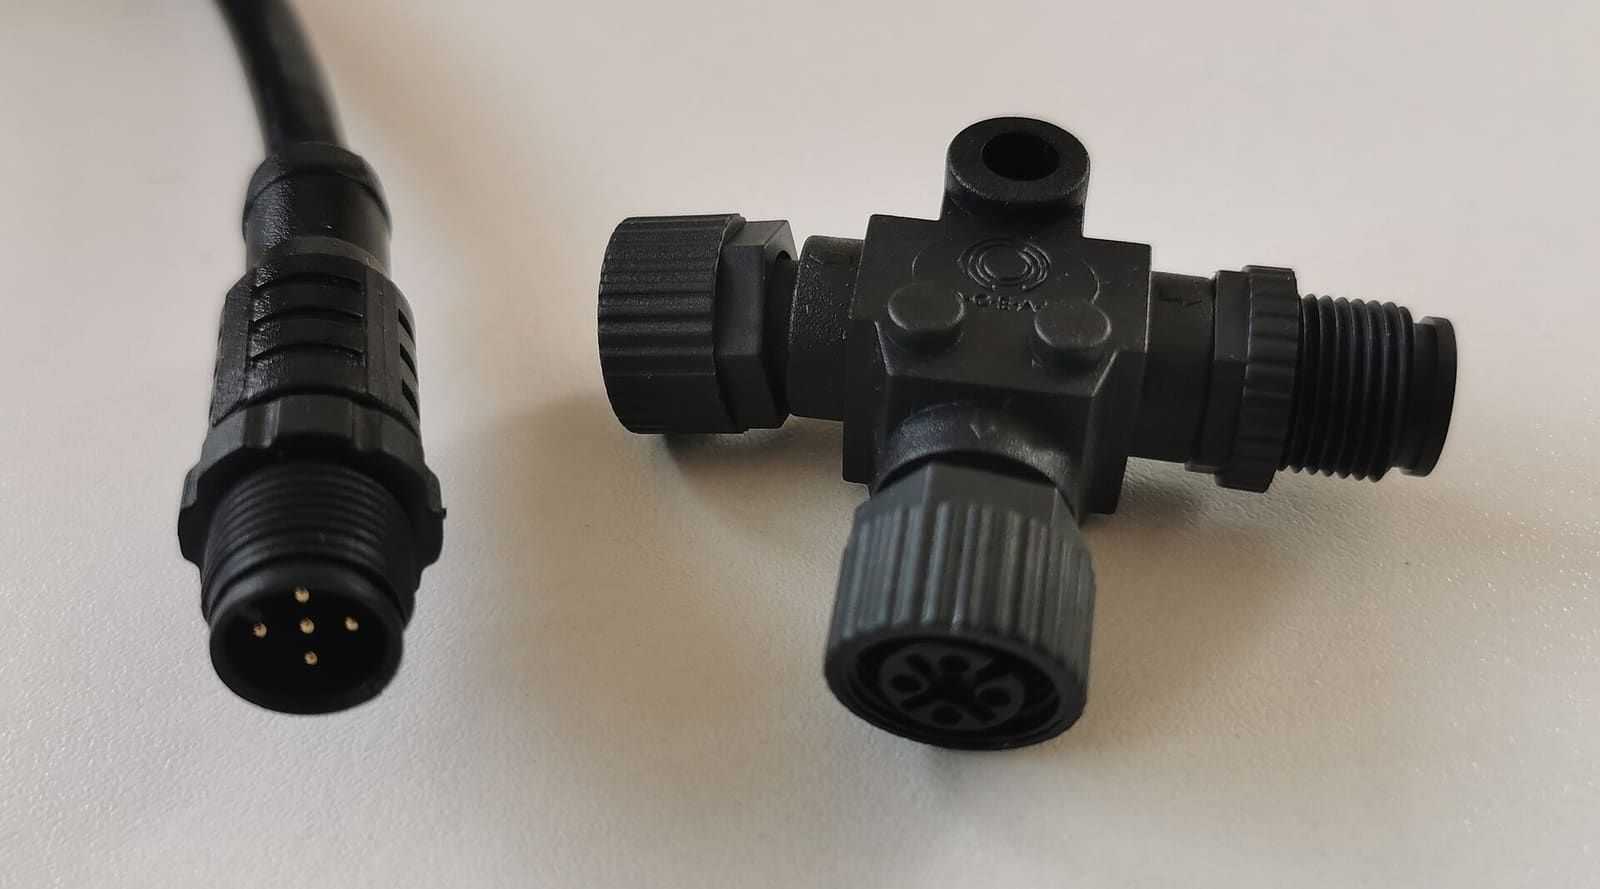
- T-connectors: each T has two backbone sides and one top port where a device plugs in.
- Drop cables: short cables from the top of a T to each device. Each drop can be up to 20 feet (6 m) long.
- Terminators: a 120-ohm resistor plug at each end of the backbone. Exactly two, one at each end.
- Power tap: the one place where 12-volt power feeds the network, usually through a fused cable to a T in the backbone.
What it is not. Older NMEA 0183 gear uses bare wires, not round screw-on plugs. Brand cables such as Raymarine SeaTalkng, Simrad SimNet or some engine-maker harnesses are NMEA 2000 underneath but may need adapter cables. Larger boats may use bigger "mini" connectors in the backbone, which need adapters to connect to the common "micro" size.
Steps
Before you touch anything, trace the backbone from one end to the other with a flashlight and take photos. Note where each T is, which device plugs into it, where the power cable joins, and where the two terminators are. Common hiding spots are behind the helm panel, under the console, and in the engine compartment near the engine gateway. Draw a simple line diagram. This map is the most useful troubleshooting tool you will ever have.
Most "everything disappeared" problems are power. Check that the electronics or NMEA 2000 breaker is on and the inline fuse in the power cable is good. Then open your chartplotter's network or device list (often under settings, communications or diagnostics) and write down which devices show up and which are missing.
- Nothing shows up: usually no network power or a bad backbone connection near the power tap.
- One device missing: usually that device's drop cable, connector, or the device's own power.
- Devices come and go: usually loose connections, termination problems, low voltage, or one faulty device disrupting the rest.
Unplug and replug each connector with the network powered off. Look for green or white corrosion, bent or pushed-in pins, cracked collars, and water in the socket. The collars should be hand tight, never tightened with pliers. Cap any unused T ports so water cannot get in. Clean light corrosion with electrical contact cleaner and let it dry; replace anything with damaged pins.
An NMEA 2000 network needs exactly two terminators, one at each end of the backbone. Garmin warns never to add terminators to a network that is already properly terminated. Some devices and some backbone pieces have a terminator built in, so read labels carefully. Problems you might find:
- Only one terminator, for example after someone extended the backbone and lost the end plug
- Three or more, often because a new kit came with its own terminators and the installer plugged them in
- A terminator in the middle of the backbone instead of at an end
For a device far from the rest, such as a wind sensor at the masthead, Garmin allows an in-line terminator in place of the last T, with the device plugged into it. It still counts as one of the two terminators.
Terminators with a built-in LED (such as some Actisense models) show green when network voltage and polarity are correct, which makes this check quick.
Turn the network breaker off. Using a breakout cable plugged into a free T port, set your meter to ohms and measure between the white (NET-H) and blue (NET-L) wires. A healthy network reads about 60 ohms, which is two 120-ohm terminators in parallel.
- About 120 ohms: only one terminator is working
- About 40 ohms or lower: three or more terminators
- Near 0 ohms: a short in a cable or connector
- Very high or open: no terminators, or a broken backbone between you and them
Do not probe the pins inside connectors with meter tips; it is easy to short or bend them.
Turn the breaker on. Measure between the red (NET-S, positive) and black (NET-C, negative) wires at the power tap, then at each end of the backbone. NMEA 2000 devices are designed to run from 9 to 16 volts. Look for at least 9 volts at the far ends with all devices on. Garmin's NMEA 2000 technical reference sets the design limit at no more than a 1.67-volt drop between the T where power joins and the farthest device; if your reading is close to that or worse, the network needs work. If the far end is low, the power tap may be at one end of a long backbone, the supply wire may be too thin, or a connection may be corroded. Moving the power tap to the middle of the backbone helps on long runs.
Also watch the voltage when you crank the engine. If devices reboot or vanish while starting, the network is likely powered from the starting battery or a circuit that sags during cranking. The same goes for a stand-alone fish finder that shuts off every time you start the motor, a very common owner question: measure the voltage at the unit's plug while someone cranks. A big dip points to a tired battery (have it load tested) or a corroded connection or thin wire between the battery and the unit; a separate house battery for electronics stops the problem for good.
- There should be one power tap feeding the network. If power is connected at more than one place, Garmin says a power isolator must sit in the backbone between them.
- Power should come through a switch or breaker, not straight from the battery. Some devices stay on whenever the network has power and can drain your battery. Garmin's install manuals say to wire a new power cable to the ignition switch or another in-line switch, and to use a power isolator when you join a network whose maker you do not know.
- Each device has a LEN (Load Equivalency Number) on its label or in its manual; one LEN equals 50 milliamps. On big networks, add up the LENs to make sure one power tap can supply them all. A marine electronics installer can do this math for you.
Look for drops longer than 20 feet, drops plugged into drops, Ts hanging off the end of a drop, or a backbone that branches into two directions from the middle. All of these break the "one straight line" rule. A long run to the far end of the boat must be backbone cable, not a drop. Mixing very different cable brands and thicknesses on long runs can also cause errors.
If one device knocks others offline, power down and unplug devices one at a time (or split the backbone in half by moving a terminator), then power up and see if the network is stable. When the problem disappears, the last thing you unplugged is the suspect. Look for a damaged drop cable, water in that device's plug, or a device that needs a software update or repair. Professional tools such as network analyzers can show error counts and "bus load" for each device.
If you have two GPS antennas, two heading sensors or two depth sounders, the chartplotter may switch between them and show jumpy or wrong data. Most chartplotters have a "data sources" or "preferred source" menu where you choose which device to trust for each kind of data. Pick the best one and save it, then do the same on every display.
Manufacturers fix bugs and improve NMEA 2000 compatibility with updates, so many "dropouts" disappear after updating. The usual steps:
- Check the current software version on each chartplotter and device, then compare with the latest version on the maker's website or app.
- Update by memory card or over Wi-Fi as the maker describes. Raymarine chartplotters, for example, detect update files on a card and can update connected Raymarine devices; Garmin uses its ActiveCaptain app or Garmin Express.
- Unzip downloaded files if instructed, and use a blank card, not your chart card.
- Keep shore power or a charger on, and do not switch off anything until the update says it is complete.
Chart updates are separate from software updates. They usually come through your chart subscription (for example Navionics or Garmin charts) and the maker's app or desktop software.
Label each drop cable at both ends with what it connects to, and keep your network map with the boat papers. Note the date of each software update in BoatMend. The next person to work on the network, including you, will thank you.
Common mistakes
- Adding the extra terminators that came in a new device's box. You already have two; leave the extras in the bag.
- Using a long drop instead of extending the backbone to reach the far end of the boat.
- Powering the network from two places without an isolator, or straight from a battery with no switch.
- Overtightening connector collars with pliers, which cracks them and lets water in.
- Leaving T ports uncapped in the engine compartment or under the console.
- Putting update files on the chart card, or turning off power mid-update.
- Connecting a 24-volt supply directly to the network.
When to call a pro
- Fuses blow, connectors are melted or hot, or you smell burning plastic
- Your meter readings are fine but devices still drop out, or the network has many devices and you need a power (LEN) and layout check
- An engine gateway or engine data has gone missing, especially on newer engines with digital controls
- You are adding an autopilot, steer-by-wire or digital switching to the network
- A chartplotter will not finish a software update or will not boot afterward
Tips
- Keep a spare male and female terminator, two Ts and a short drop cable in a zip bag aboard.
- A breakout cable (a short NMEA 2000 cable with one end stripped) makes meter checks safe and quick.
- When you add a new device, plug it into a spare T in the backbone, not into a drop, and confirm it appears in the device list before closing up the panel.
- Photograph the device list screen when everything works. It is your "known good" reference.
Official references
We read these to write this guide. Your engine's own manual always wins.
- Garmin – Technical Reference for NMEA 2000 Products, NMEA 2000 Glossary
- Garmin – Considerations for Existing NMEA 2000 Networks
- Garmin – NMEA 2000 Components
- Panbo – NMEA 2000 network troubleshooting with Digital Yacht, Actisense, and DIY tools
- Actisense – Advanced diagnostics
- Raymarine – Updating software from a memory card (Axiom LightHouse 4)
- NMEA – NMEA 2000 Standard
- Garmin – Technical Reference for NMEA 2000 Products, Power Distribution and Balance
- Garmin – Technical Reference for NMEA 2000 Products, Network Termination
- Garmin – ECHOMAP UHD, NMEA 2000 Considerations
Safety: BoatMend is for information only and does not replace a certified marine technician. You are responsible for your safety and your boat. Read the full disclaimer.
Last updated 2026-10-24
Related guides
How to Troubleshoot Dash Gauges, a Dead Tachometer or a Wrong Fuel Gauge
Work through dead or wrong dash gauges from the cheapest check to the most involved: fuses and breakers, power and ground, the gauge-versus-sender test, the tachometer's pulse setting and the extra checks for digital network gauges. Most gauge problems turn out to be a bad connection, not a bad gauge.
Fish Finder and Depth Sounder Transducers: Mounting, Fixing Bad Readings and Cleaning
Where and how to mount a transom-mount transducer so it reads cleanly at speed, how to track down lost bottom readings and noisy screens, how to clean and paint a transducer without ruining it, and why thru-hull transducers are a haul-out job for a pro.
Set Up Your VHF Radio: MMSI, DSC, GPS Hookup and Radio Checks
Get a free or low-cost MMSI number, program it into your DSC radio, connect your GPS so a distress alert sends your exact position, check the antenna, and learn the Channel 16 rules and the right way to do a radio check.

How to Find and Fix Corroded Electrical Connections on a Boat
Track down the green crust and loose terminals behind flickering lights, dead gauges and slow cranking with a simple voltage-drop test, then remake the connection the marine way: tinned wire, a proper crimp, adhesive-lined heat shrink and a protective coating.
Autopilot Care: Calibration, Drive Maintenance and Common Faults
Keep your autopilot steering straight and safe, whether it is a tiller pilot, a below-deck linear drive or a hydraulic pump on a center console. Check the drive and rudder feedback, fix voltage drop, calibrate the compass, run a proper sea trial, and work out what common alarms and wandering courses really mean.