Jet Boat Care - Flushing, Clearing the Pump, Oil, Steering Nozzle and Storage
A practical care routine for twin-engine sport jet boats like Yamaha models: pre-ride and post-ride checks, flushing both engines the safe way, clearing debris from the pumps, spotting a worn wear ring, keeping the nozzle and reverse bucket working, and getting the boat ready for storage.
Time
2 h
Shop would charge
$200-600
Applies to
Jet boat · Jet boat
Safety first: Jet pump impellers are sharp and start turning the instant an engine cranks. Before you reach into a cleanout port, the intake or the nozzle, shut off both engines, pull the lanyard and keep the key or fob in your pocket. Never turn on flushing water with the engine off (it can flood the engine through the exhaust). If you smell fuel, see water rising in the hull, or an engine overheats, stop and get help: TowBoatUS or Sea Tow, or VHF channel 16 / 911 in an emergency.
Owners often ask
- How do I flush both engines on my twin-engine jet boat?
- One engine on my jet boat revs higher than the other but pushes less. Why?
This guide walks you through it. Still stuck? Ask the AI Mechanic about your engine.
Tools
- Garden hose and the flush adapter that fits your boat (a hose shut-off valve helps)
- Flashlight
- Marine grease and a grease gun if your boat has grease fittings
- Silicone or corrosion-protectant spray made for marine engines
- Soft brush and boat soap
- Battery charger or maintainer
- Phone camera (to photograph the impeller through the cleanout port)
Parts & supplies
- Engine oil and filters specified in your owner's manual (kits are sold per model)
- Replacement anodes for the jet pumps if they are about half gone
- Fuel stabilizer and fogging oil for storage
- Spark plugs only if inspection shows wear (exact type from your manual)
Before you start
A sport jet boat is basically two personal watercraft drivetrains in a boat hull. Each engine drives its own jet pump: water comes in through an intake grate on the bottom, a spinning impeller inside a close-fitting wear ring pushes it out, and a steering nozzle at the back aims the jet. A reverse bucket drops over the nozzle to push water forward for reverse and neutral. The engines are raw-water cooled: they use the water you're boating in.
That means a jet boat lives or dies by three habits: keeping the pumps free of debris, flushing after every trip, and fighting corrosion. Everything is doubled on a twin, so check both sides every time.
Yamaha's own short list for jet boat basics is changing engine oil every 50 hours, flushing regularly and preventing corrosion. Your owner's manual has the full schedule for your model and year; download it from Yamaha's boating resources page if you don't have it. Scarab and other brands with jet drives follow the same ideas, but use their manual's procedures.
Steps
Yamaha's pre-ride routine, in short:
- Open the engine compartment to air out fuel vapor and run the blower before starting.
- Look for fuel or oil leaks, loose cooling hoses and loose wiring. Make sure battery terminals are clean and tight and the battery is strapped down.
- Check the oil level on both engines. The method depends on the model: Yamaha says screw-in dipsticks are checked with the engine warm, while newer pull-out dipsticks are checked cold. Never fill over the full mark.
- Work the throttle, steering and reverse to be sure they move smoothly without binding.
- Confirm the cleanout plugs are seated and locked, and look at the intake grates and hull.
- Test the stop switch and lanyard on each engine.
- Check the fuel system for leaks by looking and sniffing, and plan your fuel the way Yamaha's checklist does: a third to go out, a third to come back and a third in reserve.
Once you're running, look for a steady stream from each engine's cooling water pilot outlet. A weak or missing stream on one side means that engine's cooling water is restricted, often by debris in the pump or a clogged passage. Shut that engine down and find out why before it overheats.
Weeds, rope, plastic bags and sticks get sucked into jet intakes. Signs: one engine revs higher than the other but pushes less, vibration, or the boat won't plane.
- Shut off both engines and pull the lanyard.
- On the trailer or in calm, shallow water, open the cleanout ports (usually under a hatch in the swim platform).
- Look in with a flashlight and pull out what you can reach. Feel only with the engines off and the lanyard out.
- Check the intake grate from below and the nozzle from behind.
- Reinstall and lock the cleanout plugs before you start again. A loose plug lets water into the hull.
If something is jammed between the impeller and the wear ring, or rope is wound tightly on the shaft, the pump may need to come off. That's dealer work on most models. For more detail on inspecting the impeller, wear ring and grate, see our jet pump guide.
Yamaha says to flush the engines with fresh water after every use, in fresh or salt water, because deposits build up in the cooling passages over time and salt left inside keeps corroding. The order matters:
- With the boat out of the water and level, connect the garden hose adapter to the engine's flush connector.
- Start the engine first, then turn on the water right away.
- Run it at a fast idle for about 3 to 5 minutes.
- Turn the water off first, then blip the throttle a few times to clear water from the exhaust, and stop the engine. Yamaha says not to run more than about 15 seconds after the water is off.
- Remove the adapter and refit the cap. Repeat on the other engine.
Yamaha warns never to turn the water on before starting or leave it on with the engine stopped: water can flow back through the muffler into the engine. If the engine dies while flushing, shut the water off immediately. If your hose pressure is low, flush one engine at a time rather than splitting the water between both.
Why bother in fresh water? Yamaha explains "dry corrosion": burning ethanol-blended fuel leaves corrosive sulfate salts in the hot exhaust parts. If the water jackets around the exhaust clog with deposits, hot spots form and those salts eat the exhaust from the inside out. Regular flushing keeps the jackets clear. If salt has crusted on the engine itself, Yamaha says a gentle, low-pressure rinse with a plain hose (no spray nozzle) is fine, as long as you keep water away from the air intake and let the engine dry completely before you spray on protectant.
After flushing, Yamaha's post-ride steps are:
- Open the stern drain valves and rinse the bilge, engines and jet units with fresh water, looking for damage as you go.
- Raise the bow on the trailer so the water drains out and the boat can dry.
- Spray the engines with a marine silicone or corrosion-protectant spray to protect rubber parts and fight salt corrosion. Yamaha says this matters even in fresh water.
- Wash the hull with marine boat soap, not dish soap, which strips wax.
On Yamaha boats the sacrificial anodes are usually on or near the jet pump body. Replace them when they're about half gone, use the factory-recommended type, and never paint them. Yamaha also notes that in fresh water anodes can get a thin film of growth that stops them working, so scrub them with a brush and soap when you wash the boat.
With both engines off and the lanyard out, have a helper turn the wheel lock to lock and work the shifter while you watch from behind:
- Both nozzles should move together, smoothly and fully, with no binding or clicking.
- Each reverse bucket should drop fully for reverse and lift fully for forward. A bucket that hangs partway causes drag, poor top speed or weak reverse on that side.
- Look for loose or cracked linkages, frayed cables and worn bushings.
Lubricate grease fittings and pivot points with marine grease if your manual calls for it. If a nozzle or bucket is out of sync with the other side, the cables need adjusting; that's usually a dealer job.
Sand and gravel wear the impeller edges and the wear ring over time. The classic sign is an engine that revs high but the boat feels slow, takes longer to plane or "cavitates." On a twin, compare the engines: if one side always reaches higher rpm with less push, that pump is the suspect. Photograph the impeller edges through the cleanout port: nicks, rolled edges or pitting mean it's time for a dealer inspection. Measuring the wear ring gap and replacing it needs the pump removed and the clearance spec from the service manual.
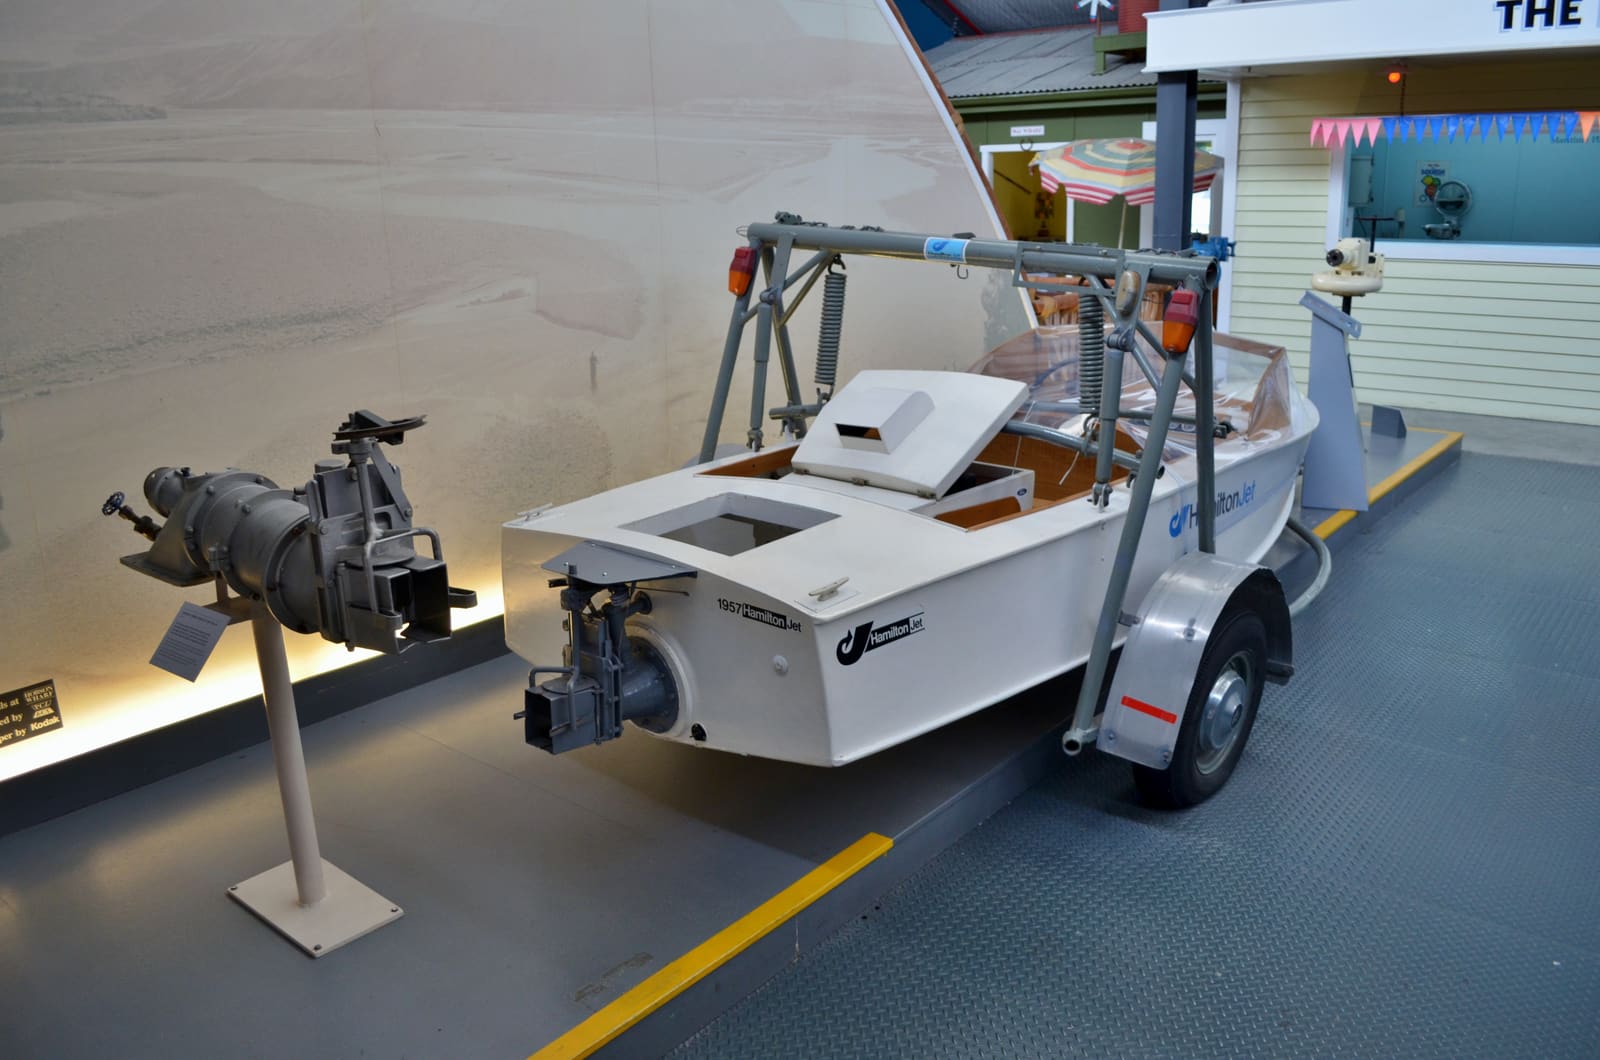
The jet unit at the stern of a small jet boat, with a second unit on a stand. The round nozzle steers the boat and the hinged reverse bucket drops over it for reverse. Modern sport boats use the same idea. Photo: Bahnfrend / Wikimedia Commons · CC BY-SA 4.0 Yamaha's basics list oil changes every 50 hours, and it says to change the oil and filter before storage rather than waiting for spring, because used oil holds acids and moisture (typical; confirm the interval and oil type for your model in the manual). Yamaha sells oil change kits for its boats. Change both engines at the same time and record the hours in your log. On these engines, use the oil grade your manual specifies; marine four-stroke oils have additives for the corrosion and constant high loads boats see.
- Spark plugs: Yamaha's rule of thumb is to inspect them every 100 hours or every other season. They should be light brown with fairly sharp edges. Replace with the exact type your manual lists.
- Thermostats and pop-off valves: these control engine temperature. Yamaha notes salt deposits or small debris can hold them open, so the engine runs cool and never reaches normal temperature. If one engine runs cooler than the other on the gauge, that's a clue.
Yamaha suggests removing the cleanout access port caps after use to drain water that pools on them, and leaving them out while the boat sits on the trailer at home (it keeps them from sticking in the ports). Reinstall them before you tow any distance, then remove them again when you get home. Always reinstall and lock the cleanout plugs themselves before launching.
For a long layup or winter, Yamaha's list includes:
- Change the oil and filters on both engines.
- Add fuel stabilizer at the storage dose and run it through the system. Yamaha suggests storing with the tank about 7/8 full and never plugging the tank vent.
- Fog the engines with the fogging product your manual recommends.
- Grease all fittings to push out water.
- Charge the batteries fully, check them monthly, and bring them indoors if the boat sits outside in freezing weather.
- On boats with a shower tank, drain it below half; on boats with ballast tanks, loosen the ballast pump caps to drain the pump bodies.
- Clean and dry the boat completely before covering it.
In freezing climates, cooling passages and the exhaust can hold water. Follow your manual's winterizing steps or have your dealer do it, and book early: Yamaha points out that waiting for the first freeze is too late.
Common mistakes
- Turning the flushing water on before starting the engine, or leaving it running after the engine stops. This can put water in the engine.
- Flushing only one engine, or splitting weak hose pressure between both so neither gets enough.
- Reaching into a cleanout port with the lanyard still attached.
- Forgetting to reinstall and lock a cleanout plug, which lets water into the hull at speed.
- Skipping the flush because the boat is used in fresh water. Yamaha says flushing matters in fresh water too.
- Ignoring one engine that revs a bit higher than the other. It's often a worn wear ring, debris or a damaged impeller on that side.
- Running in very shallow water and sucking up sand and gravel, which wears impellers and wear rings quickly.
- Painting over or ignoring anodes until they're gone.
When to call a pro
- An impeller with chips, cracks or rolled edges, or a wear ring that needs measuring or replacing
- Rope or debris wound tightly on the driveshaft, or anything you can't remove through the cleanout port
- Overheat alarms, a missing pilot stream you can't clear, or a big temperature difference between the engines
- A nozzle or reverse bucket that binds, won't move fully, or is out of sync with the other side
- Water in the hull that keeps coming back, or any fuel leak
- On the water and can't get home safely: call TowBoatUS or Sea Tow, and in an emergency use VHF 16 or 911
Tips
- Put a quarter-turn shut-off valve on the end of your flush hose. It makes the start-then-water, water-off-then-stop order much easier.
- Keep a log for each engine (port and starboard): hours, oil changes, anodes and any odd behavior.
- Carry a flashlight and a pair of gloves aboard for quick cleanout port checks.
- After running in weedy or muddy water, check the pumps before the next trip, not at the ramp.
- Compare the two engines' rpm at the same throttle position now and then. A difference that grows over time is an early warning.
Official references
We read these to write this guide. Your engine's own manual always wins.
Safety: BoatMend is for information only and does not replace a certified marine technician. You are responsible for your safety and your boat. Read the full disclaimer.
Last updated 2026-10-23
Related guides
Jet Ski and Jet Boat Pump Care: Clearing the Intake Grate and Checking the Impeller and Wear Ring
Clear weeds, rope and rocks from the intake grate of a Sea-Doo, Yamaha WaveRunner, Kawasaki Jet Ski or jet boat, and learn to spot a damaged impeller or worn wear ring. A clogged or worn pump is the usual reason a jet craft revs high but goes slow.
How to Winterize a Jet Ski or PWC (Sea-Doo, Yamaha WaveRunner, Kawasaki)
Get your personal watercraft ready for the off-season by flushing and draining the cooling and exhaust system, stabilizing fuel, changing oil, fogging, and storing the battery. Doing it yourself takes an afternoon and helps avoid freeze damage, corrosion and spring no-starts.
How to Flush Your Engine With Fresh Water
Rinse salt, silt and sand out of your outboard or sterndrive cooling system using the built-in flush port, flush muffs or a flush bag. Flushing after every saltwater trip is one of the easiest ways to prevent corrosion and overheating.
How to Inspect and Replace Sacrificial Anodes (Zincs)
Check the anodes on your outboard, sterndrive or inboard running gear, replace them when they are half gone, and choose the right metal for the water you boat in. Fresh anodes are cheap insurance against expensive corrosion damage to your lower unit, drive and prop.
How to Fog an Engine for Storage
Coat the inside of your engine's cylinders with fogging oil before a long layup so rust does not form over the winter. Learn when fogging applies, how it differs for carbureted, fuel-injected and direct-injection engines, and why your maker's instructions come first.

Marine Battery Care: Test, Charge and Store for Winter
Check your boat battery's health, charge it the right way for its type (flooded, AGM or lithium), and store it so it is ready in spring. Most "boat won't start" calls start with a neglected battery.

Launch Day and Haul-Out Checklist for Trailer Boats
A step-by-step checklist for getting your boat off the trailer and back on again safely and quickly, from the drain plug and tie-downs to the blower and ramp etiquette. Following it in order prevents the classic mistakes that sink boats and back up the ramp.