Prop Ventilation vs. Cavitation - Why Your Engine Revs Up and the Boat Loses Grip
Sudden RPM spikes, blowouts in turns, or a prop that slips when you accelerate are usually ventilation, not cavitation. Learn to tell them apart, then work through the fixes in order: trim, load, prop damage, the hull ahead of the prop, engine height, and finally a different prop.
Time
1 h
Applies to
Outboard, Sterndrive (I/O)
Safety first: A prop that suddenly lets go in a hard turn can make the boat lurch and throw people off balance or overboard. Keep passengers seated while you test, slow down before turning, and test in calm, open water away from other boats. Do all prop inspection with the engine off, the key out and the lanyard removed. If you lose propulsion and can't get home, call TowBoatUS or Sea Tow; in an emergency use VHF channel 16 or dial 911.
Owners often ask
- My prop blows out and the engine revs up in sharp turns. Is that cavitation?
- How high should my outboard be mounted on the transom?
This guide walks you through it. Still stuck? Ask the AI Mechanic about your engine.
Tools
- Flashlight
- Prop wrench or socket and a block of wood
- Straightedge (a long level or a straight board)
- Tape measure
- Phone with a GPS speed app, or your chartplotter
- Notebook or the BoatMend maintenance log (rpm, speed, trim, load)
Parts & supplies
- None to start; a prop repair, hub kit or different prop depends on what you find
Before you start
Boaters often call any prop slip "cavitation," but there are two different problems:
- Ventilation: air from the surface or exhaust gas gets sucked down into the prop. Air is much thinner than water, so the prop suddenly spins faster and pushes less. The engine revs up fast, the boat slows or slides, and it usually happens in turns, when trimmed high, or when accelerating. Boating Magazine explains that this is why outboards and sterndrives have an anti-ventilation plate just above the prop (on inboards, the hull bottom does that job).
- Cavitation: water pressure on the back of the blades drops so low that the water boils into vapor bubbles, which collapse against the metal. West Marine links it to damaged blades, the wrong pitch, or running a prop beyond what it was designed for. It shows up as vibration, a rattling or grinding sound, gradual loss of speed, and pitted, rough "cavitation burn" on the blades.
Quick way to tell: if it comes and goes with trim, turns or rough water, and the prop looks fine, it's ventilation. If the blades are pitted or damaged and the problem is there all the time, think cavitation. West Marine notes a boat can have both at once.
Have your owner's manual handy: you'll need the full-throttle rpm range for your engine. Record your normal top rpm and speed as a baseline.
Steps
Note what the boat is doing when the engine revs up:
- Only in sharp turns: classic ventilation. Common on boats with high-mounted engines or props without much cup.
- When accelerating from a stop (hole shot): often trim too high, too much pitch, or a slipping hub.
- At steady cruise in calm water: engine too high, damage to the prop or hull, or a slipping hub.
- In rough water or chop: the prop may be breaking the surface as the boat pitches.
- All the time, with vibration: look for prop damage first.
Mercury explains that trimming down points the prop thrust slightly upward and pushes the bow down, while trimming up raises the bow. Trimmed too far up, the prop runs close to the surface and grabs air. Try this:
- Trim fully down before accelerating, then trim up gradually once on plane.
- Before a turn, trim down a bit and slow down.
- If the blowouts stop when you trim lower, your prop and engine are probably fine; adjust how you drive or look at a prop with more grip (step 10).
A boat that is stern-heavy or bow-light rides with the transom low and the bow high, which changes how water flows to the prop. So does an overloaded boat. Move people and heavy gear forward, empty the livewell and bilge, and test again. Also make sure the boat is within its capacity plate limits.
With the engine off, key out and lanyard removed, tilt the engine up and look closely, as Mercury recommends:
- Nicks, chips or bent blades. Spin the prop and watch the blade tips; a bent blade looks out of line with the others. Mercury notes that hitting soft sand or mud can bend blades slightly with no obvious damage.
- Fishing line or weeds around the hub or behind the prop. Mercury says line can work into the gap and wrap the prop shaft, damaging the seal.
- Cavitation burn: a rough, pitted, sandpaper-like patch on the blades, usually near the edges or tips.
- Worn-down edges. Yamaha points out that sand, silt and grit in the water slowly wear away a prop's edges. The prop can look fine at a glance and still lose grip and performance, so compare the blade edges with a new prop if the engine checks out but the boat has slowly lost its bite. MasterCraft adds a clue for inboards: damage on only one blade usually means the prop was hit while stopped, damage on all blades means it was turning.
Damaged blades can cause both cavitation and poor grip. A prop shop can often repair them.
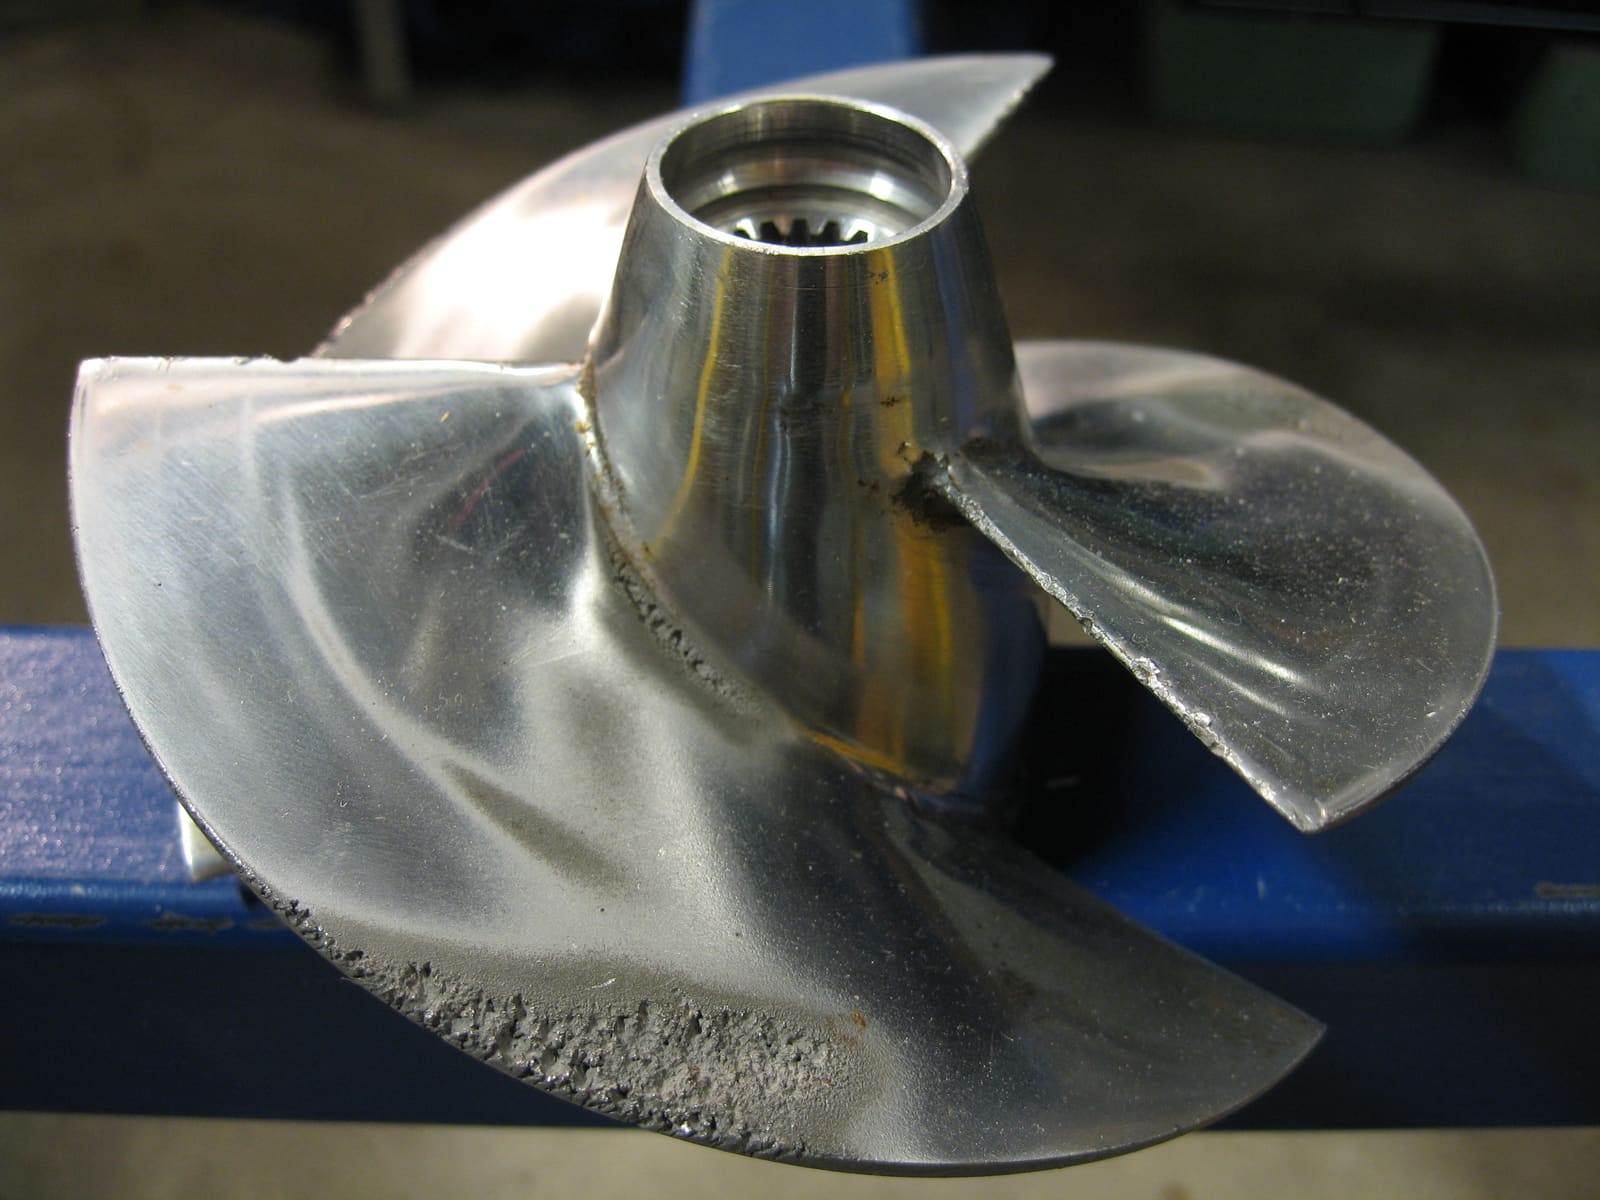
Cavitation erosion: the rough, pitted band along the blade edges of a personal watercraft impeller. Cavitation burn on a boat propeller looks much the same. Photo: Erik Axdahl / Wikimedia Commons · CC BY-SA 2.5 Inside most props is a rubber or plastic hub that cushions the gears and is designed to give way in a hard strike. Mercury describes its Flo-Torq hub as sacrificial for exactly this reason. A hub that has started to slip feels just like ventilation: the engine revs up and the boat doesn't push, often worst under heavy load or at the hole shot, and it doesn't change with trim. A prop shop can test it. Carrying a spare hub kit (or a spare prop) can get you home.
The water reaching the prop has to flow smoothly along the bottom of the hull. Anything that disturbs it can feed air or turbulence into the prop:
- A transducer mounted in line with the prop or sticking down too far below the hull bottom
- Damage, gouges or repairs near the transom, or a bottom that isn't flat and straight there (a "hook" or "rocker"); check with a straightedge laid along the bottom toward the transom
- Through-hull fittings, ladders, or trim tab hardware right in front of the prop
- Heavy growth or barnacles on the bottom
Look at the flat plate above the prop. A bent or broken plate, or damage to the gearcase in front of the prop, can let air get down to the blades. Make sure any trim tab or anode fin under the plate is intact and aligned. BoatTEST also points to nicks and scratches on the lower unit itself, especially on its leading edge, which disturb the water flowing back to the prop. Damage to the gearcase or a bent prop shaft needs a dealer; see the gearcase guide.
Engine height is one of the biggest causes of ventilation on outboards. Boating Magazine's repower article gives the common starting point: with the engine vertical, the anti-ventilation plate should be about even with the hull bottom. Too high, and the prop can ventilate and the water pickups can struggle to get enough cooling water; too low, and you get extra drag and spray. To check:
- With the boat level on the trailer and the engine trimmed vertical, lay a straightedge along the hull bottom (the keel area near the transom) so it sticks out past the transom.
- Compare the straightedge to the anti-ventilation plate.
Many performance setups run the engine higher than this on purpose, with props built for it. If your engine is mounted well above the hull bottom and ventilates in normal use, raising or lowering it is a job for a dealer or rigger: it changes the mounting bolts and must follow the engine maker's installation instructions. See the outboard mounting guide.
With a normal load in calm water, run at full throttle (safely, with trim set for best speed) and note the rpm. Compare it to the range in your owner's manual:
- Above the range with a lot of slip: the prop may have too little pitch, a slipping hub or ventilation.
- Below the range: too much pitch, extra weight, or a fouled hull. West Marine notes too much pitch for the engine and load is a common hidden cause of cavitation.
If the hull and engine height are fine and the boat still ventilates in turns or at the hole shot, talk to a prop shop or dealer about:
- More cup: a curled lip on the trailing edge of the blades. Boating Magazine says cup helps the prop hold water, reduces ventilation, and lets props run at higher engine heights and trim angles. It also usually drops full-throttle rpm a little.
- More blades: many boaters find a four-blade prop holds better in turns and rough water.
- A different design made for your engine height and hull. Bring your rpm and speed notes.
A prop shop can often add or reduce cup on your existing prop.
Props with vent holes (some Mercury props): Mercury's Performance Vent System (PVS) uses holes in the prop hub behind each blade, closed partly or fully with plugs. BoatTEST explains that the holes let a little exhaust between the blades only while accelerating, so the engine revs up faster and the boat planes sooner; at cruise, water pressure blocks them and they make no difference. That means a short burst of high rpm at the hole shot can be normal on a vented prop. If the engine over-revs and the prop won't "hook up" when you accelerate, smaller plugs (less venting) usually help; if the hole shot feels sluggish, larger openings may help. Check that all plugs are present and the same size, and get the plugs for your exact prop from a Mercury dealer.
If you found cavitation burn or damaged blades:
- Have the prop repaired and properly finished, or replaced if the damage is severe.
- Confirm the pitch and design suit your boat's weight and horsepower.
- Clean any growth or debris off the prop and hub.
West Marine points out that cavitation mainly attacks the prop itself, but the extra vibration also stresses the gearcase and shaft, so don't put it off.
After each change, retest in the same conditions (same load, calm water) and write down rpm, speed and trim. Change one thing at a time so you know what actually helped.
Common mistakes
- Calling every RPM spike "cavitation" and replacing the prop, when the real fix was lower trim or slower turns.
- Ignoring a slipping hub because the prop blades look perfect.
- Raising the engine (or adding a jack plate) for speed without a prop designed for it, then fighting blowouts in every turn.
- Mounting a transducer directly in front of the prop.
- Running a prop with nicks and bends "because it still works," which can cause cavitation burn and vibration.
- Changing prop pitch without checking that full-throttle rpm stays within the range in the manual.
- Testing with a different load each time, so results can't be compared.
When to call a pro
- A spun hub, a bent prop shaft, or damage to the gearcase or anti-ventilation plate
- Raising or lowering the engine, adding a jack plate, or changing mounting holes
- Choosing a new prop or having cup, pitch or blades reworked at a prop shop
- Vibration that continues after the prop is repaired or replaced
- Cooling alarms or a weak telltale after changing engine height
- If you lose propulsion on the water: call TowBoatUS or Sea Tow, and in an emergency use VHF 16 or 911
Tips
- Keep a simple log: full-throttle rpm and speed with your usual load. It's the baseline for every prop and height decision.
- A little ventilation in a very hard turn is normal on many boats. Frequent blowouts at cruise are not.
- Carry a spare prop and hub kit, plus the wrench, if you boat in shallow water.
- On sterndrives, check that the drive trims down fully. A trim system that won't go all the way down can cause hole-shot blowouts.
- Bring photos of your transom, the engine height and the prop to the prop shop; it speeds up the advice.
Official references
We read these to write this guide. Your engine's own manual always wins.
- West Marine – Propeller Cavitation vs. Ventilation, Causes, Symptoms and Fixes
- Boating Magazine – The Parts of a Boat Propeller
- Boating Magazine – Engine Repower 2020, Part 5 (engine mounting height)
- Mercury Marine – 5 Ways to Use Power Trim
- Mercury Marine – Maintenance Made Easy, Propeller Maintenance
- BoatTEST – Mercury Prop Performance Vent System (PVS)
- BoatTEST – Propeller Ventilation and Cavitation, Know the Difference
- Yamaha Outboards – Maintenance Matters, Propeller Solutions
- MasterCraft – Knowledge Center, Propeller Maintenance
Safety: BoatMend is for information only and does not replace a certified marine technician. You are responsible for your safety and your boat. Read the full disclaimer.
Last updated 2026-10-24
Related guides
Propeller Care: Inspect, Remove, Replace and Choose the Right Pitch
Check your prop for damage, pull it to clear fishing line and grease the shaft, reinstall it correctly, and learn how pitch affects your engine's wide-open-throttle RPM. The right prop in good shape protects your engine and often makes the boat run better and use less fuel.

Loss of Power, Hesitation or Misfire - Troubleshooting Guide
Figure out why your engine bogs down, stumbles, will not reach full rpm or runs rough. Work from simple checks like trim, prop and fuel filter to ignition and engine protection modes before paying for diagnostics.
How to Check and Top Up Power Trim and Tilt Fluid
Check and top up the hydraulic fluid in your power trim and tilt unit, then work through the simple checks when the motor won't go up, won't go down or slowly sinks. Most trim problems are a dead battery, a bad relay, low fluid or a release valve left open, and you can find those yourself.
How to Mount or Re-Tighten an Outboard on the Transom
A loose outboard can steer badly, crack the transom or fall off the boat. Learn how to center the motor, check engine height, tighten clamp screws, seal and bolt through the transom with backing plates, add a safety cable on small motors and spot transom flex before it becomes a costly repair.
How to Inspect and Troubleshoot Hydraulic and Electric Trim Tabs
Keep your trim tabs working with a simple seasonal check of the blades, anodes, fluid, lines and wiring, and track down the usual faults when a tab won't move, only one side works, or the tabs stay stuck down.
How to Clean, Remove Oxidation and Wax Your Boat's Gelcoat (Plus Pontoon Tubes)
Wash your hull the right way, bring back chalky, faded gelcoat with compound, and seal it with wax so it stays glossy and protected from the sun. Includes how to clean and protect the aluminum tubes on a pontoon boat.
How to Remove and Reinstall an Outboard Gearcase (Lower Unit) Without Losing Shift
Dropping the lower unit is the first step of every outboard water pump job, and the reinstall is where most DIY trouble starts: no forward gear, no cooling water or a driveshaft that will not seat. Learn how to set the shift position, protect the water tube, line up the splines and test everything before the boat goes back in the water.