How to Inspect and Replace Spark Plugs
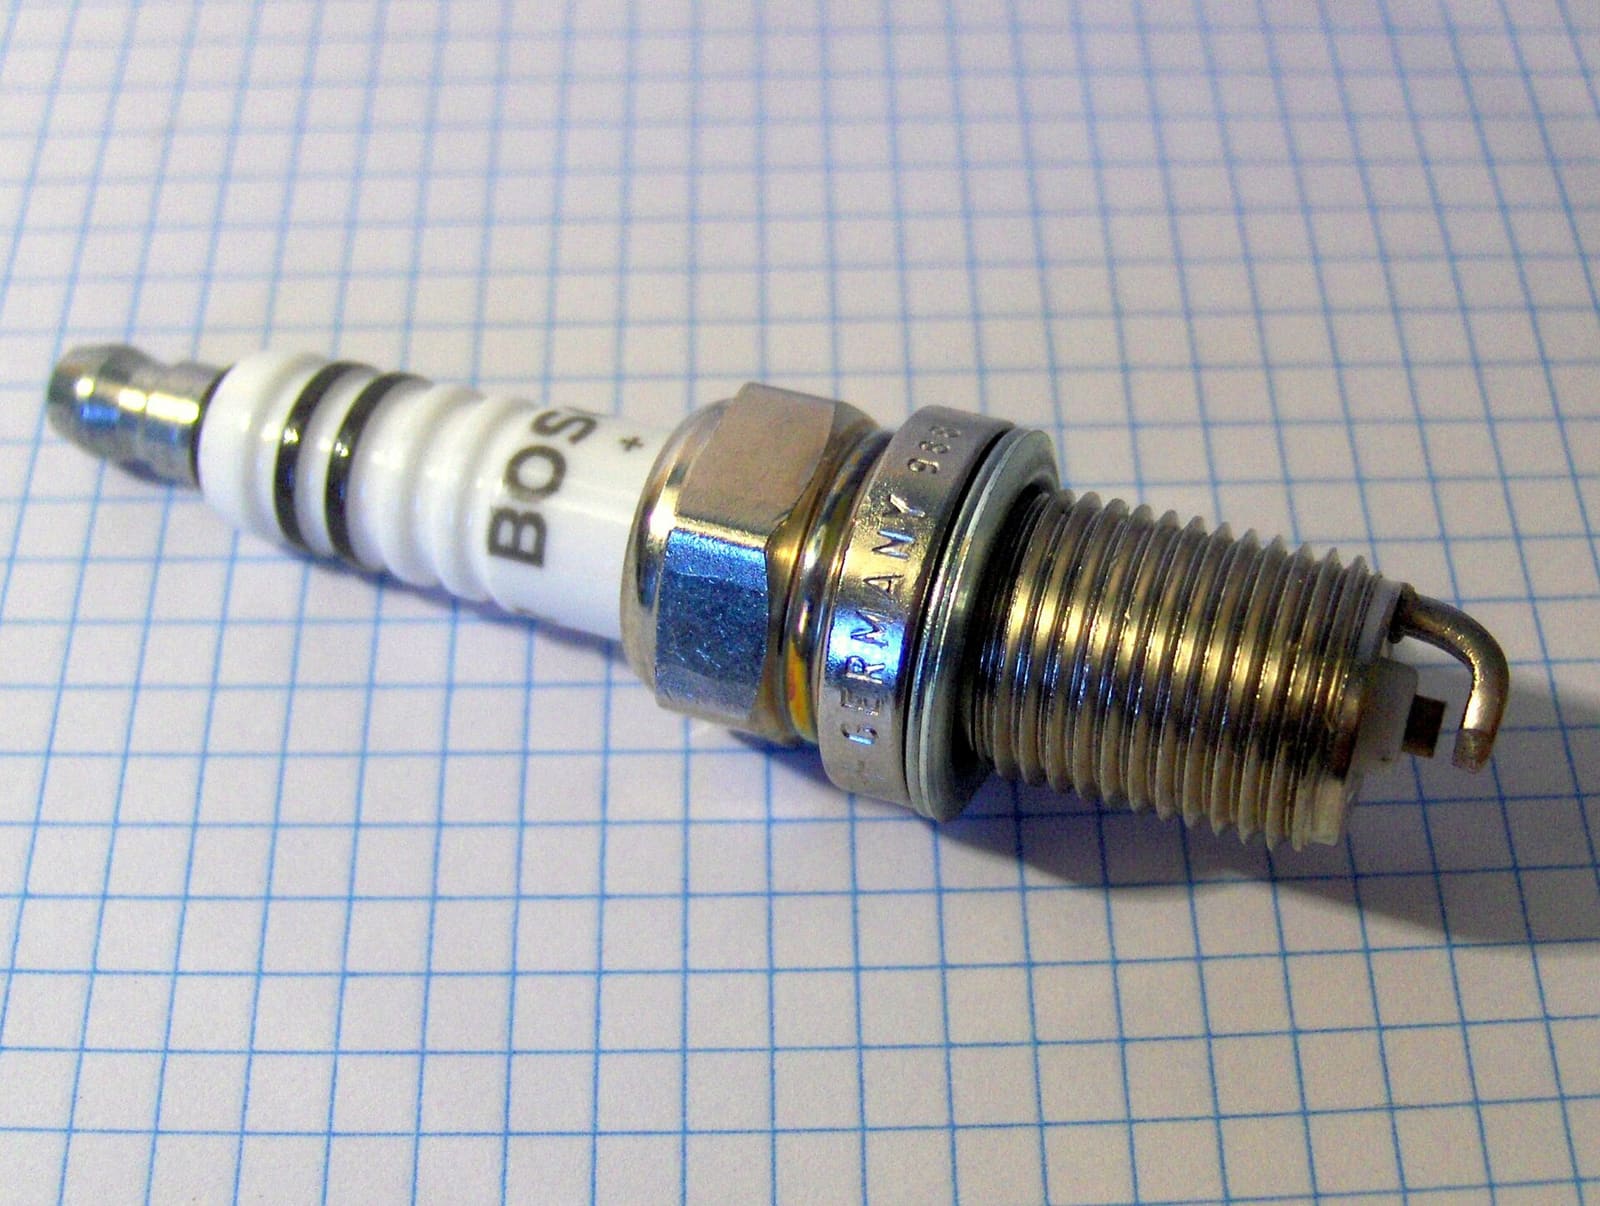
Pull, read and replace the spark plugs on a gas outboard, sterndrive, inboard or PWC. Fresh, correctly gapped plugs help the engine start easily and run smoothly, and the old plugs tell you a lot about the engine's health.
Time
45 min
Shop would charge
$100-300
Applies to
Outboard, Sterndrive (I/O), Gas inboard, Jet ski / PWC
Safety first: Work on a cool engine; plugs and cylinder heads stay hot long after shutdown and aluminum threads strip easily when hot. Remove the key and the kill-switch lanyard so the engine cannot crank while plugs are out. On inboards and sterndrives, run the blower and check for fuel smell first. If you smell gasoline in the engine compartment, stop and find the leak (or call a pro) before doing anything that could make a spark.
Tools
- Spark plug socket (correct size, with rubber insert) and extension
- Ratchet
- Torque wrench (inch-pound or low-range foot-pound)
- Spark plug gap tool (wire-type gauge is best)
- Compressed air or a small brush
- Dielectric grease
- Anti-seize compound (only if your manual allows it)
- Masking tape and a marker
Parts & supplies
- Spark plugs (exact brand and number listed in your owner's manual)
Before you start
How often: many engines call for an inspection every year or 100 hours and replacement on a set schedule. Some modern 4-strokes use long-life iridium or platinum plugs with longer intervals. Your owner's manual has the schedule, the exact plug number, the gap and the tightening spec. Do not guess these: the wrong heat range or gap can cause misfires or engine damage. Yamaha, for example, says to pull 4-stroke plugs for a look every 100 hours or every other season, and to replace them only with the exact plug it lists rather than a cross-reference. Mercury's owner FAQ gives every 300 hours or 3 years, whichever comes first, as its general replacement interval (typical; confirm for your engine, since 2-strokes and some models differ).
Plug types: some plugs come pre-gapped and the maker says not to adjust them (many iridium plugs). Others need gapping. Check the box and your manual.
Access:
- Outboards: remove the cowl. Some V6 and V8 engines need covers or the flywheel cover removed.
- Sterndrives and inboards: plugs are on both sides of V engines; the side near the hull can be tight. Plan for some contortion.
- PWCs: remove the seat and sometimes a cover. Some models have ignition coils sitting directly on top of each plug ("coil-on-plug").
Do one cylinder at a time so plug wires never get swapped.
Steps
Engine off and cool, key out, lanyard off. Blow or brush debris away from the plug wells before you pull anything. Dirt that falls into an open cylinder can score it.
Put a piece of tape with the cylinder number on each plug wire or coil connector. Your manual shows the cylinder numbering.
Pull plug wires by the rubber boot with a slight twist, never by the wire itself. For coil-on-plug engines, unplug the electrical connector, remove the hold-down bolt if there is one, and lift the coil straight out.
Fit the spark plug socket straight onto the plug and turn counterclockwise. It should break loose with steady pressure. If it feels very tight or gritty after the first turn, stop: a little penetrating oil and patience is far cheaper than repairing stripped threads in an aluminum head.
Line plugs up in cylinder order and compare them (based on NGK guidance):
- Light tan or gray tip, little deposit: normal, healthy cylinder.
- Dry, black, sooty: running rich, too much idling or trolling, a plug that is too "cold" for the use, or a weak spark.
- Wet with fuel: the cylinder is not firing (bad plug, coil or wire), or flooding.
- Wet, oily, black: oil getting into the cylinder (worn rings or valve seals). Normal on some 2-strokes right after fogging.
- White, blistered or glazed tip, or melted electrodes: running too hot or lean. This can quickly damage pistons.
- Worn, rounded center electrode or wide gap: simply worn out; replace.
- One plug looks very different from the rest: that cylinder has a problem worth tracking down.
Take a photo of the lineup. Save it in your BoatMend log.
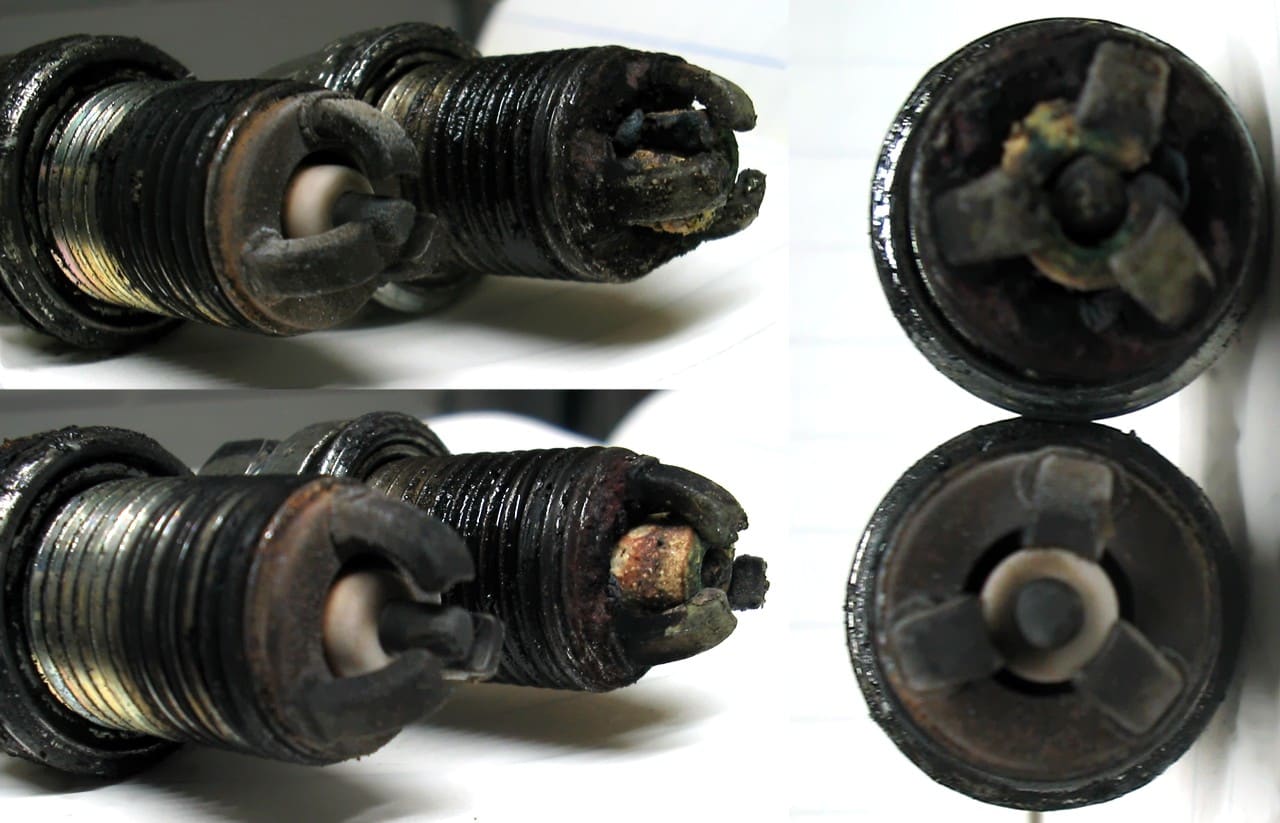
Two worn-out plugs with heavy deposits and eroded electrodes. Plugs like these get replaced, not cleaned. Photo: A7N8X / Wikimedia Commons · CC BY-SA 3.0 Unless the plug is marked "do not adjust," slide a wire gauge of the gap size from your manual between the electrodes. It should drag slightly. Adjust by gently bending the side (ground) electrode only, never the center one, and never by tapping the tip on something hard.
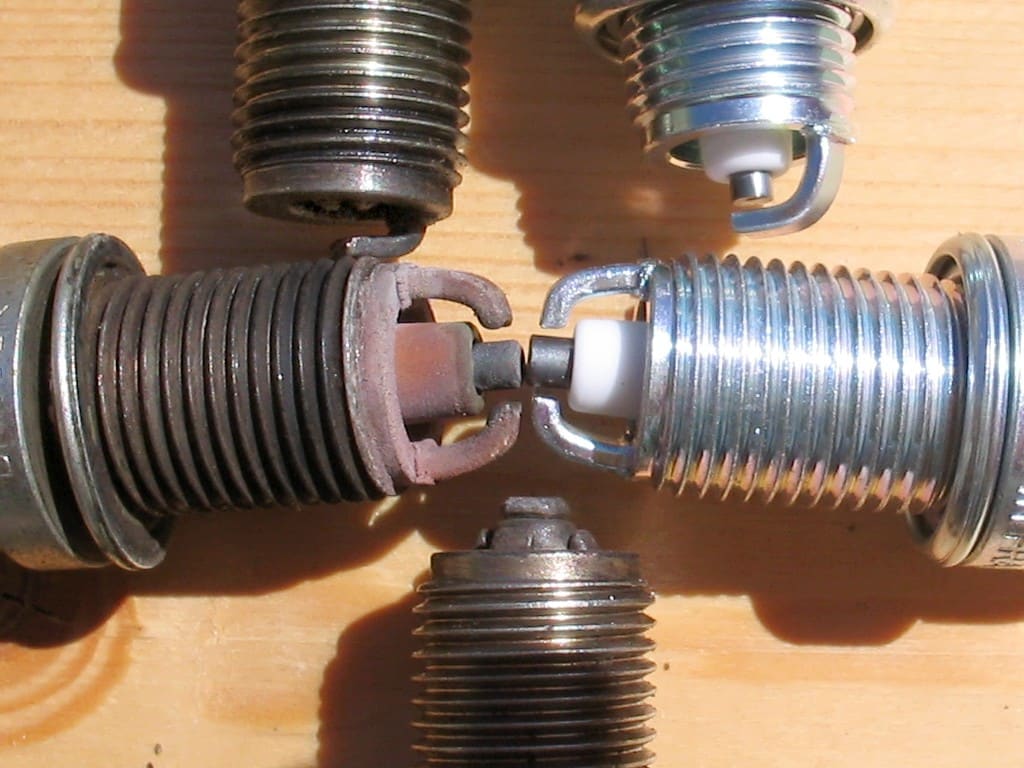
Worn plug (left) next to a new one (right). Note the sharp edges on the new electrodes; set the gap on the new plug before installing it. Photo: A7N8X / Wikimedia Commons · CC BY-SA 4.0 Make sure the threads are clean. Some engine makers recommend a light coat of anti-seize on the threads (Mercury suggests this for outboards); others, and many plug makers, say not to because plated plugs do not need it and it changes the torque. Follow your manual. Never get anti-seize on the electrode.
Thread it in by hand, or with a short piece of rubber hose pushed onto the plug top, until it is finger-tight. If it does not spin in easily, back it out and try again. A cross-threaded plug in an aluminum head is an expensive mistake.
Use a torque wrench and the value in your manual. If no torque wrench is available, the plug box usually shows a turn-based method for new plugs (a fraction of a turn past finger-tight, depending on gasket type). Do not over-tighten.
Put a small dab of dielectric grease inside the boot. Push the boot or coil down until it clicks or seats fully. Reinstall any coil bolts and connectors. Repeat Steps 3 to 10 for each cylinder.
With cooling water supplied (in the water, in a test tank or on flush muffs; the built-in flush port on most outboards is for engine-off flushing only, unless your manual allows running on it), start the engine. It should idle smoothly. A rough idle usually means a boot is not fully seated or two wires were swapped.
Record the date, engine hours, plug type and what the old plugs looked like.
Common mistakes
- Buying a "cross-reference" plug at the auto parts store instead of the exact plug in your manual.
- Re-gapping a plug marked "do not adjust", or bending the center electrode while setting the gap.
- Starting the plug with a ratchet instead of by hand, and cross-threading it in an aluminum head.
- Pulling plugs from a hot engine, when the threads in the head are most likely to strip.
- Leaving dirt around the plug wells, which drops into the cylinder as soon as the plug is out.
- Removing all the wires at once and putting them back on the wrong cylinders.
- Yanking the plug wire by the cable instead of the boot.
When to call a pro
- A plug is seized, the threads feel gritty, or a plug or thread strips
- Old plugs show white, blistered tips or melted electrodes (lean condition can destroy a piston)
- Plugs are wet with oil or one cylinder is clearly not firing and new plugs do not fix it
- The engine is under warranty and requires dealer service
- You smell fuel near the plugs or coils
Tips
- Keep a spare set of plugs and the socket on board. A fouled plug is a common cause of a rough-running outboard on the water.
- Buy the exact plug in your manual; a "close" heat range can still cause trouble.
- If you troll for hours, ask your dealer whether a different plug or more frequent checks make sense for your engine.
- Plugs are often replaced during winterization; see the fogging and winterizing guides.
Official references
We read these to write this guide. Your engine's own manual always wins.
- Mercury Marine – FourStroke Maintenance
- Mercury Marine – How to Winterize Your Outboard
- NGK Spark Plugs – How do I read a spark plug?
- Yamaha Outboards – Maintenance Matters, Additional Tasks (spark plugs)
- Suzuki Marine – DIY Maintenance videos (spark plugs)
- Mercury Marine – Owner FAQs (spark plug interval)
Safety: BoatMend is for information only and does not replace a certified marine technician. You are responsible for your safety and your boat. Read the full disclaimer.
Last updated 2026-10-23
Related guides

Loss of Power, Hesitation or Misfire - Troubleshooting Guide
Figure out why your engine bogs down, stumbles, will not reach full rpm or runs rough. Work from simple checks like trim, prop and fuel filter to ignition and engine protection modes before paying for diagnostics.
Engine Won't Start or Won't Crank - Troubleshooting Guide
Find out why your boat engine will not turn over or will not fire, starting with the simple things owners miss most, like the kill switch lanyard and battery switch. Many no-starts are fixed at the ramp in minutes without a tow.
Engine Starts Then Dies - Troubleshooting Guide
Track down why your boat engine fires up and then stalls, whether at idle, when you shift into gear, or after a few minutes of running. Most causes are in the fuel supply and can be checked with no special tools.
How to Winterize an Outboard Engine
Protect your outboard from freeze damage, stale fuel and internal corrosion over the off-season. Most owners can do it in an afternoon with basic tools, compared with a shop bill that often runs several hundred dollars.
How to Fog an Engine for Storage
Coat the inside of your engine's cylinders with fogging oil before a long layup so rust does not form over the winter. Learn when fogging applies, how it differs for carbureted, fuel-injected and direct-injection engines, and why your maker's instructions come first.