Ethanol (E10) Fuel Care: Stabilizer, Phase Separation, Fuel Lines and Tank Vents
Keep E10 gasoline from damaging your boat engine. Learn how to use stabilizer, test for water and phase separation, and inspect the fuel lines, primer bulb, anti-siphon valve and tank vent. Most fuel-related breakdowns start with one of these.
Time
1 h
Shop would charge
$100-300
Applies to
Outboard, Sterndrive (I/O), Gas inboard, Jet boat, Jet ski / PWC
Safety first: Gasoline vapor is explosive. Work outdoors or in a well-ventilated space, with no smoking, sparks or running power tools nearby, and keep a fire extinguisher handy. If you smell gas in the bilge or see fuel leaking inside the boat, do not start the engine or flip any switches: get everyone off the boat and call a marine mechanic, or 911 if the leak is large. On inboards and sterndrives, always run the blower for at least four minutes and sniff the engine compartment before starting.
Owners often ask
- How do I know if I have water in my gas or phase-separated ethanol fuel?
- Do I really need fuel stabilizer if I use the boat every few weeks?
This guide walks you through it. Still stuck? Ask the AI Mechanic about your engine.
Tools
- Clear glass jar with a lid (for a fuel sample)
- Water-finding paste and a wooden dowel (optional)
- Flashlight
- Screwdriver or nut driver for hose clamps
- Small wire brush or toothbrush (for the vent screen)
- Approved gasoline container, rags and a fire extinguisher within reach
Parts & supplies
- Marine fuel stabilizer
- Ethanol-resistant marine fuel hose (if replacing)
- Primer bulb or complete fuel line kit for your engine (if replacing)
- Marine stainless hose clamps
- 10-micron water-separating fuel filter for your engine
Before you start
Why ethanol is a problem in boats: most US gasoline is E10 (up to 10% ethanol). Ethanol attracts water. Boats sit for weeks, and their tanks breathe damp air through the vent. Over time the fuel absorbs water. Yamaha notes that once the water reaches only about half of one percent, the water and ethanol separate from the gasoline and sink to the bottom of the tank, right where the fuel pickup is. This is called phase separation. The engine can then suck in water, and the gas left on top has lower octane. Both can cause poor running or engine damage.
Key facts from the engine makers:
- E10 maximum. Mercury says its current gasoline engines are designed for fuel with no more than 10% ethanol. Suzuki says E15 is not approved for its outboards. Avoid E15 and E85 at the pump. Check your own engine's manual.
- Ethanol-free is best when you can get it (Mercury).
- Stabilizer prevents breakdown, but it can't fix bad fuel. Yamaha notes that no additive will restore stale fuel, remove water or cure ethanol-related problems. Once fuel has phase separated, it has to be removed.
- Fuel ages fast. Mercury says fuel can start to oxidize and form gum in as little as two weeks. Honda adds that, depending on your region's fuel blend, it can deteriorate in as little as 15 days, and faster in heat, humidity and a half-empty tank.
- Never E85. Honda says E85 must not be used in its outboards, and that fuels with more than 10% ethanol can cause starting and running problems and damage metal, rubber and plastic fuel parts. Fuel blends and labels change by state, so read the pump label every time.
- Old fiberglass tanks. Mercury warns that fiberglass tanks made before 1991 may not be compatible with ethanol. If you have one, ask the boat builder.
Vented or not? Older boats have tanks that vent freely to the outside. Newer boats (and all new portable tanks) have low-emission systems that don't freely vent. This changes how you store the boat (see step 3).
Steps
Buy from busy stations or fuel docks that sell a lot of gas. Add marine fuel stabilizer at the rate on the bottle when you fill up, not weeks later. Yamaha recommends treating every tank, not just before storage. For portable gas cans, add stabilizer before you fill them so it mixes, and store them out of the sun.
Read the pump label before you squeeze the handle. Many stations now sell E15 from the same pump as E10, often as a cheaper "88" or "Unleaded 88" grade.
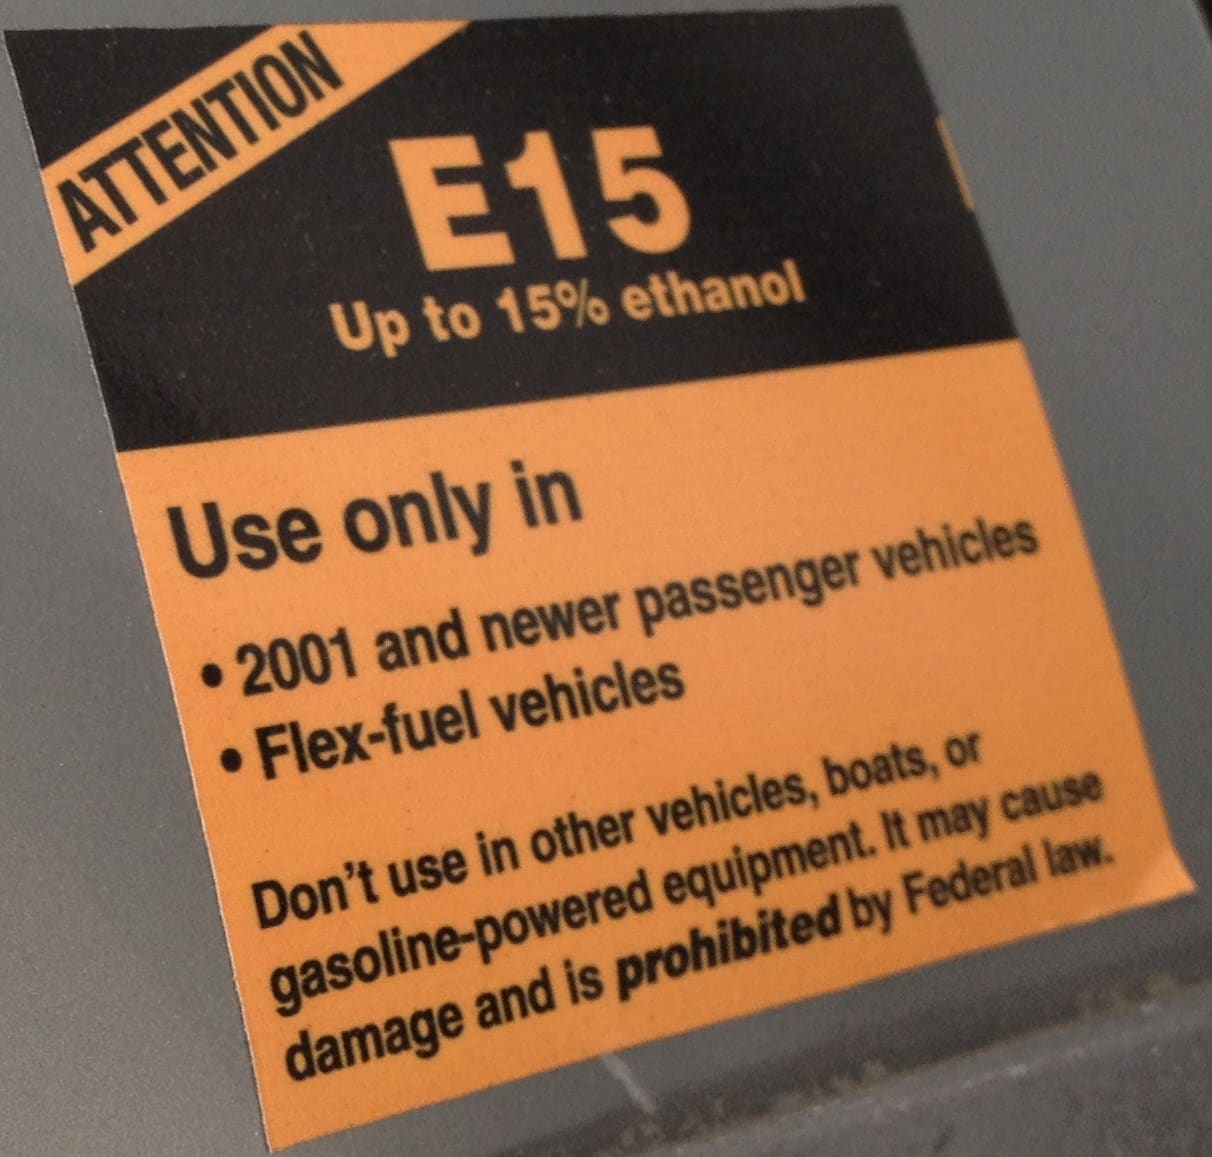
The federal E15 pump label says it in plain words: don't use it in boats. Photo: 127driver / Wikimedia Commons · CC0 Drain or siphon a few ounces of fuel from the tank (or the bottom of the fuel filter) into a clear glass jar. Let it sit for about 30 minutes. Mercury describes what to look for:
- Clear bubble or layer at the bottom: water.
- Cloudy, jelly-like layer below the gas: phase separation.
Another option is to coat a dowel with water-finding paste and lower it to the bottom of the tank. The paste changes color where it touches water. If you find water or separated fuel, see step 12.
- Older boats with vented tanks: fill with fresh, stabilized fuel before storage to leave less room for damp air. Mercury suggests stopping at about 95% full so the fuel has room to expand and doesn't push out the vent.
- Newer boats with low-emission, non-vented tanks: Mercury says these can usually be stored with a low fuel level, but any fuel left in the tank should be treated with stabilizer. Ask your dealer if you're unsure which you have.
- Portable tanks: run the engine on fresh, stabilized fuel, then use any leftover gas in your car or lawn equipment.
After adding stabilizer, run the engine about 10 minutes so treated fuel reaches the whole fuel system. Run it in the water, in a test tank, or (outboards and sterndrives) on external flush muffs with the water on first; inboards and PWCs use only the flush method in their manual. Never run an outboard on its built-in flush port; that port is only for flushing with the engine off.
Ethanol is a strong solvent and can break down older hoses from the inside. Mercury notes that a line can look fine outside but delaminate inside, shedding bits that clog the engine. Check every fuel hose you can reach:
- Hard, cracked or swollen hose
- Soft, spongy or sticky spots
- Fuel weeping or a gas smell at fittings (run a finger under each joint and look for stains below it)
- Rusty or loose hose clamps
- On built-in tanks, the fill and vent hoses too: BoatUS insurance claims show they can leak fuel and fumes just like the supply line. Hoses should be supported by clips or straps without sharp edges.
Replace damaged hose only with Coast Guard-rated marine fuel hose that is also rated for ethanol, never automotive or garden hose, and use stainless marine clamps. If you don't know how old your fuel lines are, replacing them is cheap insurance.
On outboards with a primer bulb, squeeze it before starting. It should become firm. Yamaha says that if it doesn't firm up, check for a leak, and if there is none, replace the bulb.
Also replace the bulb if it's hard and stiff, sticky, cracked or swollen. BoatUS explains that a stiff bulb usually means the small one-way valves inside are failing, and old rubber can shed bits into the fuel. Don't try to soften an old bulb.
Check the arrow on the bulb: it must point toward the engine. A bulb installed backward stops fuel flow.
A primer bulb that collapses (goes flat) while the engine is running means the engine is pulling against a restriction between the tank and the engine. Common causes, cheapest first:
- Tank vent closed or blocked (step 8)
- Kinked or pinched fuel hose
- Clogged fuel filter
- Blocked or sticking anti-siphon valve (step 7)
- Clogged pickup screen inside the tank
BoatUS uses a similar rule: too much pressure points to a fuel-line connection problem, a vacuum points to a venting problem, and no pressure at all usually means an air leak in the line.
On many boats with built-in tanks, a small valve sits where the fuel line leaves the tank. It stops fuel from siphoning out of the tank and into the bilge if a fuel line breaks, so it's an important safety part. Over time it can stick or partly clog, which starves the engine at higher RPM. Symptoms are a collapsing primer bulb and an engine that loses power or dies at speed but idles fine.
Never remove the anti-siphon valve or drill it out to "fix" fuel flow. If you suspect it, have a mechanic test it and install the correct replacement for your fuel system.
Find the fuel vent fitting on the side of the hull (it usually has a small screen). Boating Magazine notes that salt, corrosion, insects and spiders often clog the screen. Clean it gently with a small brush, or replace the vent if the screen is eaten away.
Signs of a blocked vent: the engine dies after running for a while, you hear a "whoosh" of air when you open the fuel cap, or the tank is hard to fill and fuel spits back. If you can see the vent hose, make sure it has no sag or low loop where fuel can collect and block it.
The vent can also let in water. When washing the boat, point the hose spray aft along the hull so you don't shoot water into the vent.
Modern EPA-compliant portable tanks don't vent freely, so they build pressure in the sun. BoatUS explains that this pressure can push fuel through the outboard and out into the water. Open the cap slowly, away from the engine, to release pressure before connecting the line. A fuel-demand valve installed between the tank and the primer bulb holds that pressure back and only lets fuel through when the engine is running. Older tanks with a manual vent screw must have the vent opened before you run the engine and closed for transport.
A 10-micron water-separating filter between the tank and the engine is your last line of defense. Yamaha recommends changing its external 10-micron filter every 50 hours and Mercury says many filters are changed every 100 hours or yearly. Change it sooner after a bad tank of fuel. Typical; confirm in your manual. Carry a spare. See the fuel-water separator guide.
Use a marine stabilizer for every fill and for storage. Some makers also sell fuel-system cleaners for periodic use during the season. Don't pour in "water remover" additives expecting them to fix a tank of separated fuel; they can't. Use the dose on the bottle: Westerbeke reminds owners that a bigger dose doesn't mean better protection, which is a good rule for every engine. Don't stack several different additives in one tank.
Don't try to burn it off or dilute it with fresh gas; adding fresh fuel to a half-tank does not reverse phase separation. The contaminated fuel needs to be pumped out and disposed of properly, the filters replaced, and the system checked. On built-in tanks this is a job for a dealer or mobile fuel service. For a portable tank, empty it into an approved container, take it to a hazardous waste collection site, rinse the tank with a little fresh gas, and refill.
Mercury also advises discarding gas more than a year old, even if it was stabilized.
Common mistakes
- Adding stabilizer at the end of the season to old fuel that has already broken down.
- Leaving a vented tank half full all winter, which invites condensation.
- Filling a vented tank to the very top in cold weather, so fuel expands and spills out the vent.
- Putting E15 in a boat because it is cheaper at the pump.
- Installing the primer bulb backward, or pumping a stiff old bulb instead of replacing it.
- Removing the anti-siphon valve because the engine starves for fuel.
- Using auto parts store fuel hose that isn't rated for marine use.
- Dumping a jar of water and fuel back into the tank after testing it.
When to call a pro
- Any gasoline smell or leak inside the boat (stop and call; don't start the engine)
- Water or phase-separated fuel in a built-in tank
- You suspect the anti-siphon valve or the fuel pickup in the tank
- Fuel hoses inside the boat need replacing and you can't reach them safely
- An older carbureted engine has sat with old fuel; Mercury recommends professional carburetor cleaning
- The engine keeps losing power after you've cleared the vent, replaced the filter and checked the lines
Tips
- Keep a clear jar and a spare filter on board. A quick sample tells you a lot when an engine starts acting up.
- Log every fill-up's stabilizer and every filter change in your BoatMend log.
- If you only use the boat a few times a year, buy smaller amounts of fuel more often so it never gets old.
- Ethanol-free gasoline is sold at many marinas and some stations; it's worth the extra cost for boats that sit.
Official references
We read these to write this guide. Your engine's own manual always wins.
- Mercury Marine – Fuel Basics (Maintenance Made Easy)
- Mercury Marine – Service and Support FAQs (ethanol and storage)
- Yamaha Outboards – Maintenance Matters, Fuel and Fuel System
- BoatUS – Outboard Primer Bulbs
- BoatUS – How To Install A Fuel-Demand Valve
- Boating Magazine – Five Boat Fuel Vent Tips
- Suzuki Marine – FAQs (E15 not approved)
- Honda Marine – Fuel Recommendations
- Westerbeke – Maintenance and Use FAQs (fuel additives)
- BoatUS – 5 Spring Claims to Avoid (fuel lines, fill and vent hoses)
Safety: BoatMend is for information only and does not replace a certified marine technician. You are responsible for your safety and your boat. Read the full disclaimer.
Last updated 2026-10-24
Related guides
How to Replace a Fuel/Water Separating Filter (and Check for Water in Your Fuel)
Swap the spin-on fuel/water separator on your gas boat and learn to spot water and ethanol phase separation before it stalls the engine. It is one of the cheapest jobs on the boat and one of the best protections for a fuel-injected engine.
Engine Starts Then Dies - Troubleshooting Guide
Track down why your boat engine fires up and then stalls, whether at idle, when you shift into gear, or after a few minutes of running. Most causes are in the fuel supply and can be checked with no special tools.
Loss of Power, Hesitation or Misfire - Troubleshooting Guide
Figure out why your engine bogs down, stumbles, will not reach full rpm or runs rough. Work from simple checks like trim, prop and fuel filter to ignition and engine protection modes before paying for diagnostics.
Engine Won't Start or Won't Crank - Troubleshooting Guide
Find out why your boat engine will not turn over or will not fire, starting with the simple things owners miss most, like the kill switch lanyard and battery switch. Many no-starts are fixed at the ramp in minutes without a tow.
How to Winterize an Outboard Engine
Protect your outboard from freeze damage, stale fuel and internal corrosion over the off-season. Most owners can do it in an afternoon with basic tools, compared with a shop bill that often runs several hundred dollars.
Spring Commissioning - Getting Your Boat Ready for the Season
Wake your boat up after storage with a step-by-step check of the battery, fuel system, engine, drive and safety gear. Catching a cracked hose or dead battery in the driveway beats a tow on opening weekend, and saves a typical shop commissioning fee.